Have you ever felt the frustration of leaving the front or patio door open for a cool breeze, only to find your home invaded by mosquitos and flies? Then I’m going to tell you how to install a screen door and prevent that from ever happening.
Stick around to learn more about screen door installation and what types of screen doors are available.
Key Takeaways
- Measure the door opening and door to ensure a proper fit.
- Determine swing direction and install hinges on the opposite side of the handle.
- Use shims to level the door in the frame and secure it with mounting screws.
- Install the door handle and make any necessary adjustments for smooth operation.
How Hard is it to Install a Screen Door?
With or without a frame, installing a screen door can be tricky, but it’s not impossible. Anyone can do it, especially with these easy tips!
Cost of Installation
The DIY cost of installation will vary significantly based on the type of door you choose. A classic screen door constructed of untreated timber costs roughly $30.
While entry-level vinyl and aluminum ones cost around $50, if you choose stainable hardwood or an intricate design, the price might reach $200.
Add the price of the hardware needed (unless included with the door), and you should have an idea of how much money you need to spend to install the screen door.
Time Needed
Installing a screen door doesn’t take very long. It’s mostly a matter of measuring, drilling, and making adjustments, if necessary. You can allocate a day for this, but it shouldn’t take you more than a few hours.
Types of Screen Doors
Before learning about screen door installation, let’s take a look at the existing types of screen doors.
Traditional Screen Doors
If your home is decorated in a traditional style or you like an antique-looking screen door, a traditional screen door is an ideal alternative.
Pivoting Screen Doors
A pivoting screen door is a relatively new type of screen door on the market. This highly unusual screen door rotates on a pivot box, which creates a different opening style.
Retractable Screen Doors
Another form of screen door appropriate for contemporary or modern décor is the retractable screen door. These screen doors conserve space because they effectively ‘roll up’ into housing located within the frame.
Barn Screen Doors
This screen door style is ideally suited for extremely broad door openings, but you may easily customize it to any size. One significant benefit of barn screen doors is that they allow adequate wind and natural light to enter your property.
Sliding Screen Doors
This screen door style is best suited for homes with a modern or contemporary aesthetic. They are really attractive and work well with sliding doors. Compared to standard screen doors, sliding screen doors offer less security because most of them are not lockable.
Decorative Screen Doors
Ornamental screen doors incorporate a variety of motifs or embellishments that are quite appealing and eye-catching. Decorative screen doors provide you the option of customizing your door to fit your style and preferences.
Screen Doors vs. Storm Doors
Screen doors have a screen that guards against bugs and critters while allowing air to circulate continually. While the frame can be constructed from a variety of materials, the most popular configurations use wooden frames and a minimal number of components.
Storm doors are primarily installed to protect your front door and home against the elements. They have a few different components, the most noticeable of which is a glass panel instead of a screen. The glass blocks out elements like rain and wind.
Some storm doors have an interchangeable screen and glass panel, a design that allows homeowners on-demand fresh air.
How to Install a Screen Door
These steps will have you enjoying the summer breeze while keeping the bugs at bay in no time.
Measuring for the Door
Before you learn how to install a screen door, you need to measure for one accurately.
What You’ll Need
- Tape measure.
- Tall stool/step ladder.
- Pencil.
- Paper.
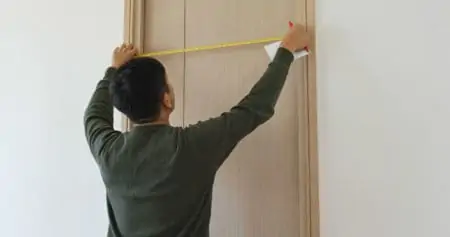
1. Measure the Door Frame
Grab your tape measure and determine the length and width of the exterior part of the door frame. Measure the top, center, and bottom portions of the frame.
2. Calculate the Size
Subtract a ¼ inch from the shortest results of your width and length measurements. You require a minimum of an ⅛ of an inch gap around the door for a good fit.
Installing the Door
The next part is tricky, but follow these steps, and you’ll do it like a pro.
What You’ll Need
- Shims.
- Drill.
- Three spring-loaded hinges like these Amazon Basics Spring Loaded Hinges.
- Door handle.
- Screen door.
- Tape measure.
- Pencil.
1. Determine Swing Direction
It’s best if the positioning for your screen door handles matches that of your entry door. If these two interfere with one another, you can position the handle for the screen door in the opposite direction.
2. Recruit a Helper
Ask someone to help you place the screen door in the door frame. This way, you can have both your hands free to secure it. If there is no one to help you, it’s best if you take down the door so you can easily attach the hinges.
3. Placing the Shims
Take the shims and wedge them between the frame and the door to make sure you have a proper fit. Use at least one shim at the top and bottom side of the door, and two more on the left and right side.
4. Measure for the Hinges
You have to install the three hinges on the side opposite the handle. Measure five inches from the top and the bottom of the door and make a mark. For the middle one, measure the distance between the top and bottom hinges and mark the middle of this distance.
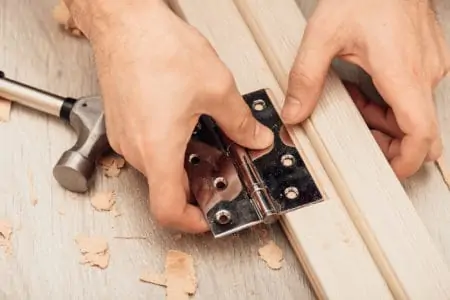
5. Install the Hinges
Take one of the hinges and use it as a template for making drill holes. Align the hinges with the marks you’ve previously made. Drill all the pilot holes needed for each of the three hinges.
Grab the drill and fix the mounting screws into the pilot holes. Screw them deep so that the hinges are fixed in place at the end.
Utilize your drill to attach the hinges to the adjoining door frame while the door is still in position. Begin by drilling starter holes, referencing the attached hinges, and then installing the mounting screws.
6. Inspect the Door
Open and close the door to ensure that the hinges are not sagging and are supporting the door properly. Close the door completely to ensure that it fits snugly into the door frame. If it appears to be rubbing, adjust the mounting screws for a better fit.
7. Install the Handle
Follow the manufacturer’s directions for properly installing the handle components that were included, or install a more stylish doorknob.
What To Do if Your Screen Door Sticks
Having a screen door that sticks is annoying, especially if you have to use it several times during the day. Thankfully, this can be fixed through several methods.
Tighten the Hinges
To manipulate these small hinge screws, you can use a ratchet or a hand screwdriver. If you’re using a cordless drill or driver, make sure the clutch is set very low to avoid screws breaking.
Adjust the Door Stop
Occasionally, the issue is that the door is bent and does not close securely. If the door is an antique of significant worth, a skilled craftsman may be able to bend it back into shape gradually. This is a time-consuming and costly fix.
A simpler solution is to adapt the doorstop to conform to the curve of the door. Using a thin pry bar, pry up the doorstop and reattach the nail to match the warped door.
Sand the Door
For this, you can use sandpaper, a belt or palm sander, or even a rotary tool. If required, remove the door (particularly if it is stuck at the bottom). Sand the area carefully, extending the sanded area well beyond the binding area. Clean the door of any debris.
FAQs
Get more answers before diving into your project. Here are some common questions I get asked all the time.

Are Retractable Screen Doors Worth It?
It depends on what you need them for. They can add value to your home and keep all sorts of pests outside, but they don’t prevent your pets or children from bolting outside.

Are Screen Doors on the Inside or Outside?
The primary purpose of screen doors is to allow you to keep your front door open. They let fresh air and natural light in while keeping bugs, birds, and debris out. If your front door opens inwards, it makes sense to have the screen door on the outside.

Can You Have Both a Storm Door and a Screen Door?
Screen doors are storm doors that use screens instead of glass. Combination storm doors can be purchased with screens or with built-in screen panels.

Can You Paint a Screen Door?
It’s very easy to paint a screen door, whether it’s made from metal or wood. You need basic tools and products, like a brush, paint, and primer.

Why is My Screen Door Warped?
When a screen door warps, it is usually as a result of excessive force being applied to it. This happens when you’re slamming the door or failing to prop it open properly.
Bottom Line
I hope this tutorial sheds some light on how to install a screen door. Installing a screen door isn’t complicated, and probably the most difficult thing is making the correct measurements and final adjustments.