Door hinges are more important than they first seem. They are your first line of defense against intruders, keeping your family safe. They also enable you to seal off spaces inside your home. All hail the mighty door hinge!
In this article, we will show you how to install a door hinge and share tips to help you get the best results.
Key Takeaways
- Know the different hinge types: Ball-bearing for security, pin for interior doors, spring for automatic closing, and left/right-hand side hinges.
- Prepare before installation: Gather tools such as a drill, hammer, tape measure, sandpaper, new hinges, screws, wooden blocks, wood stain, and paintbrush.
- Remove old hinges: Support the door, check if new hinges match, remove old hinges, and prepare the door jamb and door.
- Replace hinges: Fit the new hinge, secure it with screws, and repeat the process for the second hinge. Test if the door swings freely and closes properly.
Types of Door Hinges
Understanding which type of door hinge is best for your project helps you get the best results. You will need to know the difference between a door hinge for security and a door hinge meant for interior doors.
Ball-Bearing Door Hinge
Ball-bearing hinges are one of the best for security because they have sealed pins. These pins are non-removable, so they will deter any would-be intruders from trying to force entry. Understandably, ball-bearing hinges are a good option on door slabs or heavy exterior doors.
Pin Door Hinges
These hinges have removable pins, so they are unsuitable for exterior doors. However, they are the standard hinge for internal doors. The pins can be tapped out from the bottom of the hinge so that you can remove the door.
Spring Door Hinges
Spring door hinges are excellent for garage and back doors. They work by automatically shutting the door once opened. If you have a screen or storm door, you will be familiar with the concept of the door shutting automatically.
Left/Right-Hand Side Hinges
These are standard hinges that either mount on the (can you guess what I’m about to say next?) left or right-hand side of your door. They come as sprung, ball-bearing, or pin hinges.
Before You Buy
Check the building codes with your local building department to determine door swing directions. The side your door opens matters and may be subject to restrictions due to ease of access, disability access, and fire regulations.
How to Install a Door Hinge Yourself
Before you immerse yourself in the task, think about the tools and supplies you will need. Planning is the best way to achieve the perfect results and avoid mistakes.
What You’ll Need
- Drill.
- Hammer.
- Tape measure.
- Sandpaper (180-grit).
- New hinges.
- Screws.
- Wooden blocks.
- Wood stain.
- Paintbrush.
Removing the Hinge
Before you can fit the new hinge, you will need to remove the old one. It should be a simple job, but one technique makes it easier.
1. Support the Door
Open the door fully and slide the blocks underneath to stabilize it. It also holds the door open so you can see the entire hinge.
2. Check the New Hinges Match
Compare the new hinges to the old ones to ensure they are like-for-like. Grab the measuring tape to confirm that the existing door hinges are placed correctly.
The top hinge is seven inches from the top of the door frame and 11 inches from the base of the door jamb. Assuming the positioning is correct, we can move to the next phase.
3. Remove the Old Hinge
Grab the drill and remove the old door hinges. Always start on the top one, and remove the screws that hold the hinge leaf in position.
Place the hinge and screws in a safe place. Inspect the wood beneath for damage and stripped-out screw holes. If that’s the case, you may need to plug some of the old spots with small wooden wedges to help the new screws grip.
4. Prepare the Jamb and Door
You might need to perform some minor repair work if the old hinge had been attached for some time. The door may also need some remedial work to suit the new hinge.
Grab the sandpaper, remove any rough bits of wood, and lay down a coat of stain to match the door’s color. Wait for the stain to dry.
If the hinges don’t match the old ones, you will need to use wood putty to reduce the size of the mortise (the recess where the hinge sits). Wait while the putty dries, and then use the sandpaper to smooth it, so it blends in. Then apply the stain to match the color with the door.
Replacing the Hinge
Once you have prepared the mortise and smoothed it with sandpaper, it’s time to fit the new hinge.
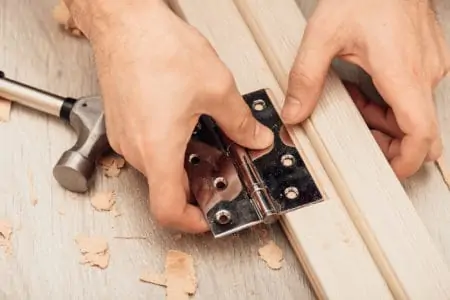
1. Fit the New Hinge
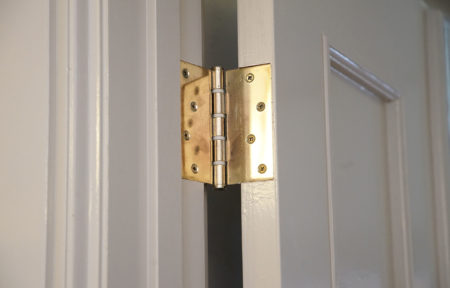
Lift the new hinge into place, so it matches the position of the old one. Using the drill, drive the screws into the side of the door and on the jamb. Then tap the hinge pin in place to connect the two plates of the hinge.
2. Replace the Second Hinge
The procedure for replacing the second hinge is the same as the first one. Use the drill to remove the screws from the old hinge on the frame and side of the door.
Follow the sanding and staining steps to neaten the wooden surface beneath the hinge. Then secure the new hinge in the same spot as the old one. Insert the hinge pin and test the door to ensure it swings freely and closes properly.
Tips for Easy Door Hinge Installation
The pros make hanging doors look easy because they understand the techniques. There is no reason we shouldn’t take a leaf out of their book and use the same hints and tips for an easier life.
Want to know how to install a hinge easily? Here are some valuable pointers to get you started.
Consider Three Hinges for External Doors
Most internal doors are hollow, consisting of a honeycomb center with two sheets of plywood. You would only ever need two hinges on a plywood door, but on an exterior door, consider installing three hinges.
This is for two reasons: the first is to distribute the weight of a heavy door evenly, and the second is for security. Someone trying to kick in a door with three hinges will likely fail unless they are Bruce Lee.
Try Spring Hinges
Spring hinges work best when installed on cabinet doors. They are spring-loaded, so spring back in place when you close the door. You can also install a spring hinge on external doors, especially if you are security-conscious.
With the door firmly shut, it is less likely to attract the opportunist intruder lured by the promise of easy access.
Think Security
Security is paramount when installing hinges on external doors. Instead of fitting hinges with removable hinge pins, use ball-bearing hinges. They don’t have removable pins, making it almost impossible to remove them.
You can also use these hinges internally if you want to lock away any personal items inside your home.
Use the New Hinge as a Template
If you are cutting a new mortise on a frame and door, use the actual hinge to draw around with a pencil to give you the guiding line where to cut the mortise. When the mortise has been cut, use the hinge as a template again to mark the screw holes.
Always Drill Pilot Holes
Before screwing directly into the wood of the door jamb and door, use the drill and make four pilot holes. The drill bit needs to be smaller than the screws because it has to bite into the wood. The pilot holes help the screws grip and reduce instances of wood splitting.
FAQs

Is It Easy to Change Door Hinges?
It is easy to replace door hinges, especially if you swap like-for-like. The entire process should only take you between 10 and 20 minutes from start to finish.

How Do You Change a Door Hinge Without Removing a Door?
Remove the screws from the top hinge while the door is resting on blocks to keep it stable. Replace the top hinge, and repeat the process for the bottom hinge. Now remove the blocks, and the door will swing freely.

Why is My Door Not Shutting After Installing Door Hinges?
The most likely cause is that the mortise is too shallow. This makes the hinge sit above the level of the wood on the door and door frame so that when it closes, it creates resistance. The fix is easy: remove the hinge and use a wood chisel to make the mortise deeper.

Where Should I Place the Hinges?
The upper hinge should be a minimum of six to seven inches from the top of the door. The base should be no lower than nine to 11 inches from the bottom of the door.

Can You Paint Door Hinges?
You can paint door hinges, but you need to take care because dry paint can clog the hinge mechanism and stop the door from swinging freely. Also, using the same paint for the hinge and door won’t work because wood absorbs paint, but it sits on the metal surface of the hinge.
The Last Word on Hinges
Installing a hinge is not a complicated process. It costs between $10 and $20 and only takes 10 or 20 minutes. All you need to do is ensure that your new hinges match the old ones.
If you fit a hinge on a new door or frame, you will need to cut the mortise, making it more challenging. However, swapping a door hinge should be a task that even those with the most basic DIY skills can manage.
So what are you waiting for? Roll up your sleeves and get started.