Scroll saws are the ultimate tools for cutting fine detail, making them essential for woodworkers, craftspeople, and many other artisans. The thin blade makes it possible to create intricate designs in wood and other materials.
With the right saw and correct cutting techniques, you will be able to make precise cuts and achieve a smooth finish. However, using one can be challenging if you have never done it before, so you might need some advice.
In this article, we will explain how to use a scroll saw to get the best results possible. This includes learning the various parts of the saw, the different cuts you can make, and some general advice about how to use one properly.
Key Takeaways
- Scroll saws are great for intricate cuts and detail work in wood, plastic, and other materials.
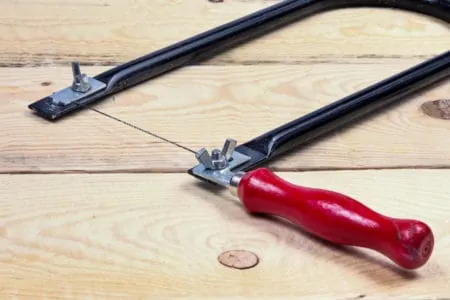
- There are two types of scroll saw blades: plain-end and pin-end, with pin-end blades providing smoother cuts for intricate patterns.
- Always use the right blade for the material and thickness, and ensure proper blade tension for cutting up to 2 inches thick wood.
- For safety, keep hands away from the blade, wear an N95 mask and protective goggles, and practice cutting on scrap material before working on your project.
What You Can Make with a Scroll Saw
As scroll saws have thin blades, they are best suited to detail work. Their blades are flexible, which enables you to turn at tight angles and cut curves. They are the ideal tool for cutting dovetail joints and inlaying (including intarsia), as well as making components for musical instruments.
With enough expertise, you will even be able to make decorations, children’s toys, and jigsaw puzzles. Before you can do this, you will need to learn the various cuts and designs you can make with a scroll saw.
Scroll Cutting
Scroll cuts are general-purpose cuts that follow a pattern or template as you maneuver the workpiece around the blade. As scroll saws have thin, flexible blades, it is possible to cut with far greater precision than if you used a different type of saw.
Top Tip
Interior Scroll Cutting
Interior scroll cutting is used to remove pieces of material away from the edge, without breaking through to its perimeter. This is usually done by removing one or both ends of the blade, sliding it through a hole in the material, then reattaching it to the saw to make the cut.
Stack Cutting
Stack cutting is used to cut multiple pieces at the same time for identical results. It is challenging and generally only done well by experienced scroll saw users. However, if you can master it, it will speed up your work significantly and improve your overall efficiency.
Parts of a Scroll Saw
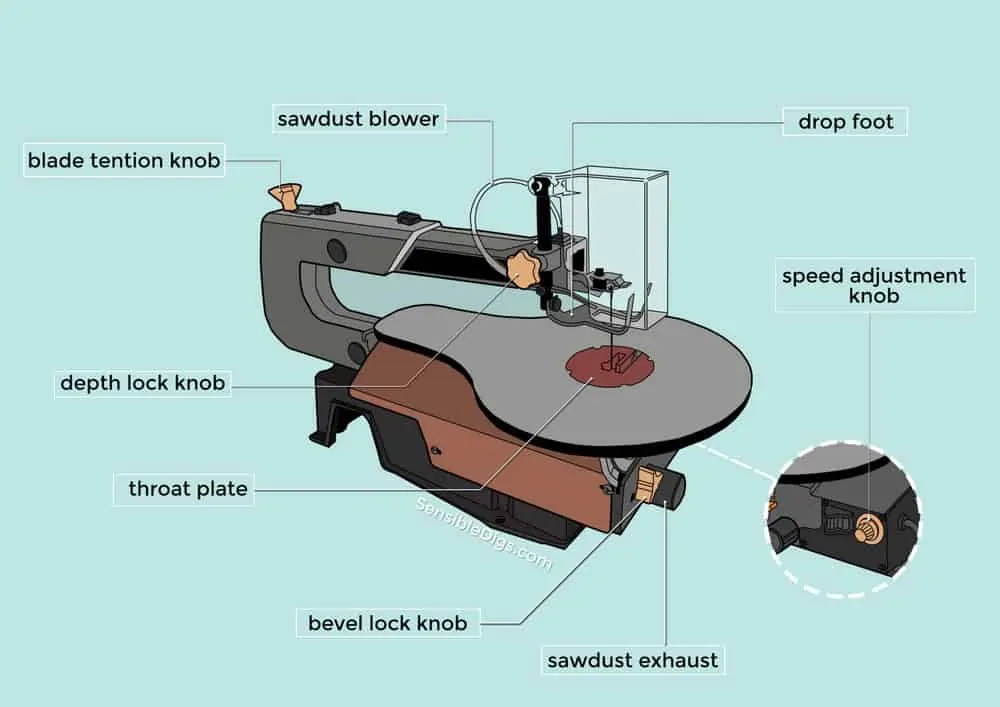
Scroll saws are among the more complicated types of power saws but they are easy to use when you know how. Before you start cutting, take the time to familiarize yourself with the different parts and you should find it easier to use your saw.
How to Use a Scroll Saw Safely
Before you start any sawing project, it is essential to have the correct safety equipment. To use a scroll saw safely, we recommend always wearing an N95 face mask and eye goggles to protect your lungs and eyes respectively.
1. Prepare the Design
First, you will need to mark the cuts you want to make onto the material you are cutting. An alternate way to do this is by printing the design and sticking it to the material.
Make sure your design has bridges with patterns to signify the positive and negative spaces. Positive space is where the material stays intact, and negative areas are where it will be removed.
If you are inexperienced, it is best to stick to simple designs. Once you have marked your design, you will need to set up your saw.
2. Safety Gear
Any power saw will release sawdust and other debris, so it is important to protect your lungs and eyes. Put on your N95 face mask and protective goggles. Leave them on throughout your work and you will be able to complete it safely.
3. Check the Saw
Make sure the saw’s table is flat and it is secure on a stable surface. If possible, attach it to whatever it is mounted on.
4. Choose the Right Blade
You will need to choose a suitable blade for the type of material you are cutting and how thick it is. If you are cutting thin wood, your detail will benefit from the flexibility and precision of a smaller blade. On the other hand, thicker stock requires a larger, tougher blade. Larger blades are also better for stack cuts.
5. Set the Blade Tension
Once you have chosen the right blade for the task, make sure it is tensioned correctly. There is no gauge that will show you exactly how to do this. It will come with experience and trial and error when getting to know your scroll saw.
Once the blade is installed, try plucking it like a guitar string. It should make a pinging sound. If you over-tension the blade it will be prone to snapping, whereas under-tensioned blades will be too flexible to cut effectively.
Take Note
6. Power Up
Plug the saw into an electrical outlet or insert its battery if it is cordless. Then, turn on the saw and its light. If your saw doesn’t have a built-in light, position a lamp so you can see your work clearly and there are no shadows on the saw’s table. If your saw has a sawdust blower or extractor, you should also switch it on now.
7. Test Your Saw
Take a scrap piece of wood that is the same thickness as your workpiece and test the saw. This should give you a good sense of whether or not the blade is tensioned correctly and let you see whether you need to adjust your lighting.
8. Set the Speed
It is better to start the saw at a low speed as you can always adjust it if you think it can cut more quickly. This is especially true if you are a beginner as you might be surprised by how fast a scroll saw’s blade can move.
Denser pieces should always be cut at slower speeds, as this will allow the blade to work its way through the material without placing too much stress on it. If you are cutting softwood, you will be able to do it more quickly.
Top Tip
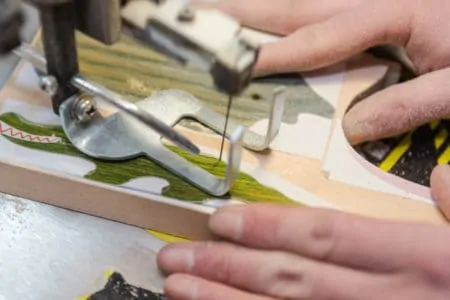
9. Guide the Workpiece
Guide the material toward the blade to cut your design, controlling it with your thumb and forefinger. Hold the wood flat and apply gentle pressure. Don’t try to force it or you could damage your workpiece or the blade. Keep both hands on the material at all times but make sure your fingers are away from the blade. Always maintain your focus to prevent any accidents.
10. Making Turns
When making 90-degree turns, remove the workpiece from the saw. Then, draw the material toward you and slide the blade along the line you have already cut. Turn the wood so it faces the new line and then proceed with the cut.
Quick Note
11. Power Off
When you have finished cutting your design, remove your workpiece from the saw and switch off the machine. Unplug the power cord or disconnect the saw’s battery if it is cordless. You can now remove your personal protective equipment and take a closer look at your work. If you are happy with it and don’t need to use your scroll saw again, remove its blade and store it somewhere safe and dry.
Scroll Saw Top Tips
When it comes to using a scroll saw, there is no substitute for experience but there are some tips and tricks that will help you stay safe and achieve the best results possible:
- If you have long hair, tie it back to prevent it from becoming tangled in the blade.
- Remove any jewelry and wear short sleeves. This will prevent them from getting caught on the blade and causing injury.
- Don’t saw wood when it is wet as it is more prone to binding. If the wood is dry, your blade will be able to cut through it with less tension.
- If you making an interior cut, drill a pilot hole and thread the blade through it before attaching the blade to the scroll saw.
- You can apply some clear packing tape to the surface of the material before you cut it. This will prevent it from burning. It also helps to lubricate the wood as the blade spins through it.
- You should always stand when operating a scroll saw. This will make it easier to maintain your balance and you will be less likely to fall forward while using the saw.
- Try to distribute your weight evenly for greater stability.
- Always cut with a sharp blade. Dull blades can bind with the material and cause it to jump. This could be the difference between a rough edge and a smooth finish.
- Print out the design you want to cut and glue it to the surface of the material. This will save time and help you make accurate cuts.
- Use the drop foot to prevent the material from jumping while sawing it. Alternatively, you can hold it down by hand while maneuvering it around the blade.
- Choose wood that is suitable for the job. Baltic birch plywood is an excellent material for cutting with a scroll saw.
- Using a magnifier light will illuminate the area where you are working and make intricate cuts much easier.
FAQs

Why Should You Use a Scroll Saw?
Scroll saws excel at cutting intricate shapes, curves, and designs into wood, plastic, and other materials.
They provide much more control than jigsaws, giving you the precision required for fine detail work. This includes making patterns for marquetry inlays or cutting out intricate fretwork pieces.
Scroll saws are also ideal for small-scale crafting projects such as jewelry boxes or thin decorative elements that need to be cut precisely. In the hands of a skilled user, a scroll saw will enable you to make neat, intricate cuts consistently.

What Are the Two Types of Scroll Saw Blades?
Scroll saws use two types of blades: plain-end and pin-end. Plain-end blades have an open loop at one end and are used for basic cutting. Pin-end blades have a pin or rivet set into the blade near the open loop, which holds the blade in place more securely when cutting.
Pin-end blades usually provide smoother cuts and will help you cut more intricate patterns than plain-end blades. Whether you are working with wood, metal, plastic, or other materials, a pin-end blade will help you achieve better results.

What Is the Thickest Wood That a Scroll Saw Can Cut?
If your scroll saw blade is tensioned correctly, you should be able to cut a maximum thickness of 2 inches. Proper blade tension will prevent it from bending or breaking while cutting.
You should also ensure that the material you are cutting is held down securely, so it won’t shift unexpectedly. The thicker the piece of wood, the slower your blade should move as you cut it to prevent your saw from wearing out or suffering damage.

How Do You Keep Your Hands Safe When Using a Scroll Saw?
When using a scroll saw, never place your hands in line with the blade. A scroll saw’s blade moves at high speeds and can cause serious harm if your hands come into contact with it.
To prevent any injuries, position your hands in such a way that they won’t touch the blade if they slip unexpectedly. If necessary, you might need to use a push stick to keep them at a safe distance. Ideally, you will never need them, but protective gloves could make a difference if any accidents occur.

Is a Scroll Saw Better Than a Jigsaw?
Which type of saw is better will depend on the specific project you are working on. Scroll saws are ideal for intricate detail work, such as cutting tight curves and making intricate shapes in wood, plastic, and other materials.
They also offer greater control than jigsaws, so they are generally better for precision cuts. However, jigsaws are usually better suited for larger projects that require rougher, less intricate cuts.
As a general rule, if you are looking to make finer cuts in smaller pieces of material, a scroll saw is better. A jigsaw is better for larger, heavier-duty work.