When you flush the toilet and the water still runs, you know you have a problem. But, what is causing it? Hoping the problem will go away is not an option, and with your limited plumbing skills, you can see your bank balance dwindling at the thought of employing a plumber.
We explain the causes of a running toilet and how to stop it, so you don’t have to shell out a small fortune to get it fixed.
Key Takeaways
- Adjust the float: Check water levels and adjust the float inside the toilet tank to stop continuous running.
- Replace the flapper: If the flapper is malfunctioning, water may continue to flow even after flushing. Replace the flapper to fix the issue.
- Fix the refill tube: If the refill tube is broken or misaligned, it could cause a leak. Replace or adjust the tube to stop the toilet from running.
- Adjust the flapper chain: Ensure the flapper chain is the correct length, not too short or long, for the flushing mechanism to work properly.
Why Won’t My Toilet Stop Running?
There are several reasons why the toilet still runs after you’ve flushed. Luckily, there are a few simple steps you can take to remedy the situation. But first, let’s look at the causes.
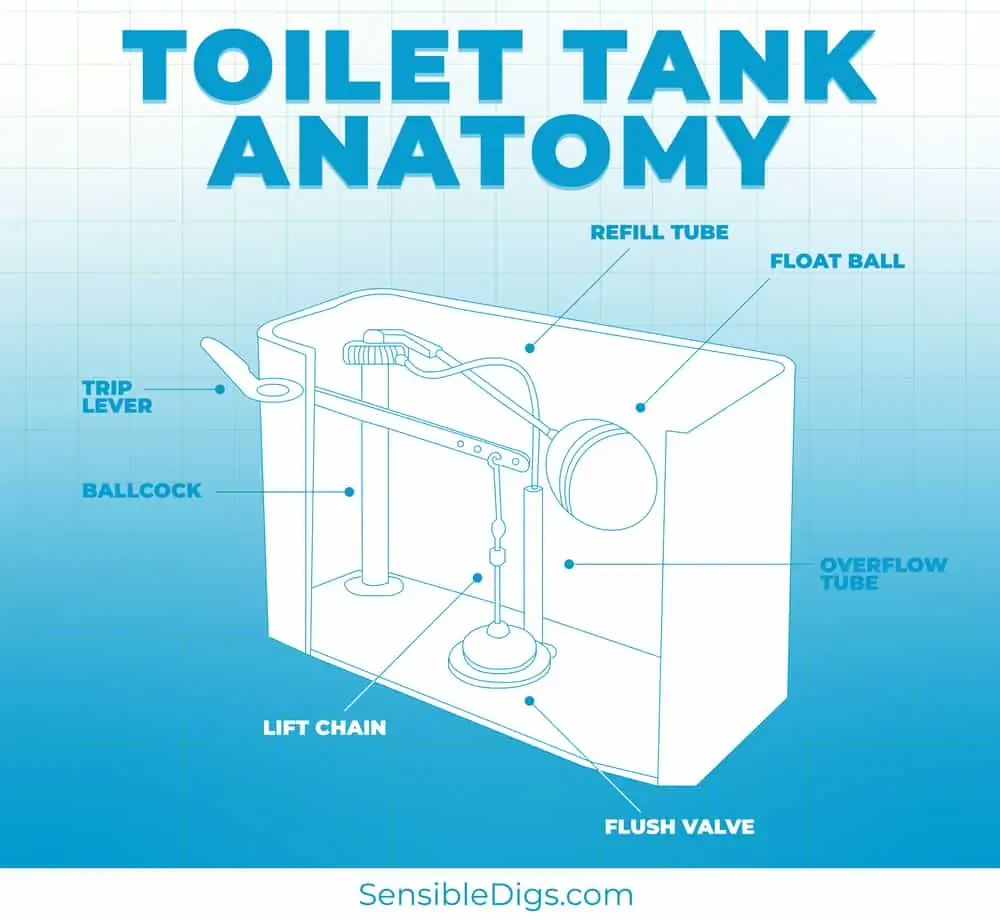
The Float Needs Adjusting
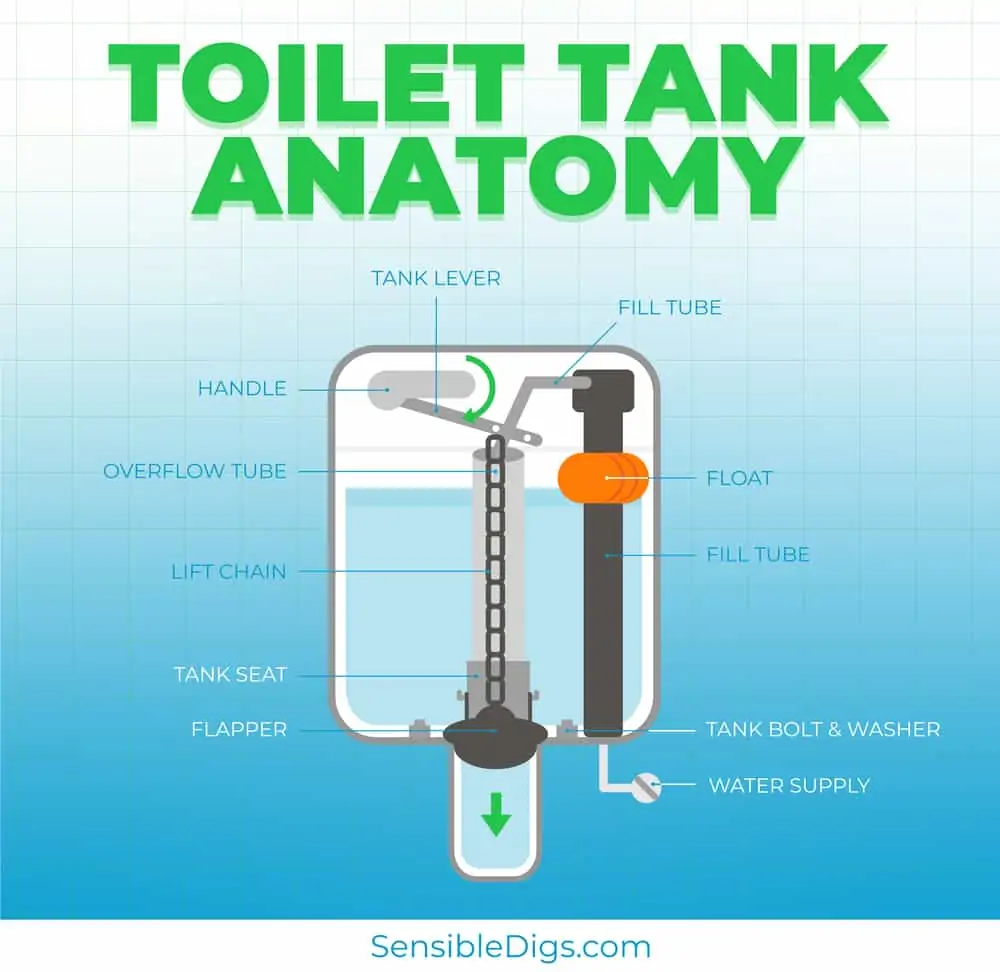
Inside the toilet water tank is a float that, when it fills, rises to the top to trigger the flush mechanism to stop. Often, the arm that the float is attached to needs adjustment to raise or lower the height of the float.
You can adjust the float by simply unscrewing it, so the flush valve raises or lowers.
The Flapper Needs Replacing
The toilet flapper sits on a chain and raises when the toilet flushes and lowers when the water tank fills back up. A tell-tale sign that the flapper is malfunctioning is when the water still flows even though the toilet flush cycle is completed, or you hear the toilet flush on its own.
It could be a complete replacement, or the seals need renewing. Either way, there is a strong chance that the toilet flapper is your culprit.
The Refill Tube Is Broken
The refill tube is the part of the toilet responsible for refilling the water tank. Over time, the pressures of daily use increase the wear and tear on the valve. They become misaligned, which causes a leak or a break in the components.
The filler valve screws into the base of the toilet and connects directly to your water supply. They are easy enough to replace and can be bought as a stand-alone replacement or as part of the water tank replacement kit.
Adjust the Flapper Chain
The flapper chain length is crucial if you want a smooth-running toilet. Too short or twisted, and the flapper stays up, allowing the toilet to continuously flush, or too long, and the flush mechanism fails to operate at all.
Adjusting the chain is easy. Remove enough linkage to allow the chain to attach to the bar with enough slack to avoid any future knots.
Bent Ball Float Arm
Over prolonged periods, the ball float arm becomes bent, which could be why the toilet continuously flushes. This repair is the easiest of the bunch, requiring zero technical skills.
How Do You Fix a Toilet That Keeps Running?
So, we know what the common problems are, but what are the solutions. We take a look in detail, using easy-to-follow step-by-step guides.
Here is a list of the tools you will need:
- Rubber gloves.
- Replacement fill valves.
- Toilet replacement parts.
- Multi-bit screwdriver.
- Cutting pliers.
Adjusting the Float
1. Check the Water Levels
The best water level is 1 to 2 inches below the overflow tube and the fill valve. If the water is above, it creates an imbalance in the water levels. Look at the inside of the tank to check for imprinted markers to indicate the correct setting.
2. Cut Off the Water Supply
Twist the isolation tap clockwise to shut off the water supply, Empty the tank before you attempt any repair. Some models require you to press the flush button, while others need a twist clockwise.
Now flush to get rid of the water in the tank.
3. Inspect the Float Valve
The height of the ball float determines the amount of water the tank retains. The float should be level with the water.
It’s also a great idea to check that the float is free of water. This could change the weight of the float, causing an imbalance. If there is water inside, the ball float is cracked and needs replacing.
4. Make Adjustments
Use a screwdriver to make minor adjustments to the height of the ball valve. You can turn the screw clockwise or counterclockwise to adjust the level up or down. Try and turn the screw a full rotation to keep the flush consistent.
5. Turn the Water Back On
Once you are satisfied the adjustments are effective, turn the water back on and test the flush. Keep an eye on the water level as it refills because if the valve is too high or low, you need to make further adjustments.
Replace the Flapper
1. Turn Off the Water
Locate the shut-off valve behind your toilet. Turn it clockwise until it stops moving. You may still hear running water, but don’t worry because this is the excess water draining away rather than freshly pumped water still flowing through the system.
2. Empty the Tank
Lift the toilet tank lid and set it aside. Flush the toilet and allow the water to drain from the tank. Because you’ve isolated the water supply, the tank will not refill.
As the water drains, make a note of the flapper’s position as this might reveal what the problem is. It could be a broken seal or an incorrectly sized chain. A fully working flapper valve raises and lowers smoothly, sealing the hole without any gaps.
3. Disconnect the Flapper
The flapper is a semi-circular piece of rubber that sits over the hole where the water empties into the toilet bowl. It is connected in 2 places: the overflow valve via small pegs and the chain that attaches to the flush lever.
Unclip the chain first, then slide the edges free from the pegs. Treat the flapper with kid gloves because exposure to hard water can cause the rubber to become brittle and snap. Most new flappers come with a chain attached, so disconnect the existing one and replace it with the new chain.
4. Install the New Flapper
Make sure the new flapper is correctly sized. It’s a great idea to take the old one with you to the hardware store. It should cover the drain hole and have the same connection points as the old one.
If you can get the same model, even better.
5. Connect the Flapper
Slide the holes on each side of the flapper onto the pegs on the valve. Attach the chain to the lever handle and clip it onto the top of the flapper. Double-check that the flapper is secure and doesn’t work loose after a couple of flushes.
If there is grime on the seal, use fine-grit sandpaper to remove anything that might restrict the flapper from making a seal.
Replacing the Toilet Refill Tube
1. Isolate the Water
Using the isolation valve located behind the toilet, turn it fully clockwise until it doesn’t turn anymore. This ensures that the tank stays empty when you flush. Flush the tank and watch as the water level drops, revealing the working components of the water tank.
2. Remove the Refill Tube
Disconnect the refill valve from the inlet water pipe using an adjustable wrench. Loosen and remove the mounting nut that holds the bottom flange on the fill valve at the base of the tank. Grip the refill tube with a pair of pliers to stop it from rotating as you loosen the nut.
3. Prepare the New Filler Valve
Insert the supplied rubber washer over the end of the water inlet pipe to create a watertight seal when you tighten the nut back up. Now it’s time to adjust the height of the valve.
It’s a simple case of screwing the pipe, so it increases or decreases in length. Ideally, it should mirror the size of the old one where it fits under the lid of the toilet tank. The top of the valve should be slightly taller than the overflow tube.
4. Install the Refill Tube
Slide the refill tube into the hole at the base of the toilet tank so that it can easily connect with the water pipe. Thread the mounting nut by hand and then grab the pliers to ensure the seal is secured.
Be careful not to twist the refill tube inside the tank. Now, reconnect the water supply pipe to the base of the refill valve and tighten it by hand. Then use a wrench to create a tight seal.
5. Turn On the Water
After you’ve made your adjustments and attached the rubber fill tube to the nipple on top of the refill valve, you are ready to connect the water.
Open the isolation valve and allow the water to fill the toilet tank. When this is done, flush the toilet, and hopefully, you will get a successful outcome. If the tank drains and refills without any leaking water, you can pat yourself on the back.
Adjust the Flapper Chain
1. Remove the Tank Lid
Lift the tank lid and place it aside. The flushing handle should be connected to the flushing lever. At the other end, the chain connects to the top of your flapper. You don’t need to empty the water tank to perform this repair.
2. Remove the Chain
Unclip the chain from the lever arm and find the small openings in the links of the chain. This allows you to remove them to the required length. It might be a good idea to don rubber gloves for added grip.
3. Grab a Paperclip
Hook a paperclip into the hole in the lever arm and bend it, so it creates a circle. Keep an opening in the loop so you can slide it through the lever arm opening. A plastic-coated paperclip might be better for this task as it won’t rust as easily.
4. Connect the Chain
Slide the end link onto the circular paperclip and then squeeze the paperclip tightly shut. Allow the chain to sag slightly to cater to twists and snags.
5. Flush and Check
Now flush the toilet and check the chain for tightness by pressing down the lever handle. It should lift the flapper enough to allow water to flow freely. If it doesn’t, continue to adjust the chain and the paperclip until you get it right.
You might need to attach the paperclip to the following link down from the top.
Straighten the Ball Valve Arm
1. Lift the Tank Lid
As before, grab the lid with both hands and lift it, carefully placing it aside. The good news is you don’t need to drain the tank to accomplish this.
2. Use Your Hands
Put on your rubber gloves and grab the ball valve arm with both hands. Apply gentle but firm pressure and twist the arm straight. If you can’t do this by hand, you may need to empty the tank and remove the ball valve, but most should bend under manual pressure.
3. Flush the Toilet
Because bending the ball valve arm back into shape is not an exact science, you may have to make minor adjustments and flush to check you have sorted the problem. When you are satisfied, replace the tank lid.
Give It a Go
When your toilet starts to run even though you have completed the flush cycle, don’t panic. Lift the lid of the toilet tank, and you will see that the internal mechanisms of a toilet are pretty simple.
It means that you can achieve most repairs and adjustments easily without the need for expensive plumbers. And think about all that money you will save, not to mention the immense feeling of satisfaction when you succeed.