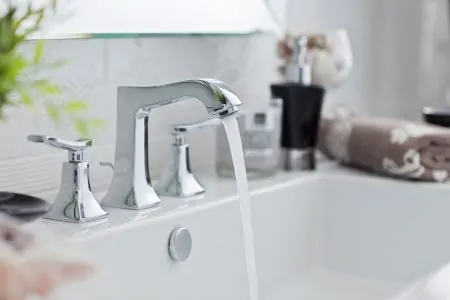
Kitchen faucets work loose over time and, if left unchecked, can damage your pipes. If that happens, a small job becomes an expensive repair. The good news is a loose kitchen faucet is easy to fix.
We show you how to tighten a kitchen faucet in easy steps so that you can perform the task yourself and save on plumber costs.
Key Takeaways
- Clear out under the sink for better access and isolate the water supply as a precaution against leaks.
- Use a flashlight and an adjustable wrench, basin wrench, or vice grips to locate and tighten the hex nut at the base of the faucet.
- If the handle is loose, use a screwdriver or Allen key to tighten the screw under the decorative cap or at the base of the handle.
- If you don’t have a basin wrench, you can use duct tape, two coins, or a zip-tie to tighten the nut at the base of the faucet.
How To Tighten a Kitchen Faucet Base
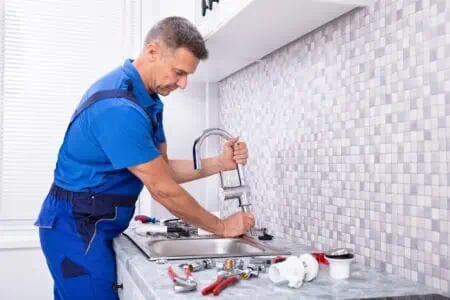
A kitchen faucet base is simple enough to fix, thanks to the single nut that needs tightening. The difficulty comes because you have to get access to the nut, which is located under the sink, recessed below the countertop.
What You Need
You will need the following tools:
- A flashlight.
- A basin wrench, adjustable wrench, or vice grips.
Now let’s get into the details of how to tighten a kitchen faucet base.
1. Clear Out Under the Sink
Most under-sink cupboards are crammed full of cleaning products and other useful items. You will have to clear it out so you can get your head and arms inside.
2. Isolate the Water Supply
Locate the water supply and turn off the small hot and cold taps before attempting to tighten the nut that holds the faucet. While this is not completely necessary, it is good to take precautions in case you loosen a water pipe and spring a leak.
3. Get Into the Cupboard
Slide into the cupboard, so you are facing the bottom of the faucet under the countertop. Don’t forget to use your flashlight to locate the nut at the base of the faucet.
4. Tighten the Nut
Depending on the tool you have chosen, secure it to the nut. If you are using an adjustable wrench, find the correct setting by holding it up to the nut. When it starts to grip, it’s time to twist clockwise to tighten it. It may involve a little bit of wriggling to find a comfortable position.
The easiest tool to use is a basin wrench. It has a long shaft and is ideal for working in tight spots.
5. Check the Faucet Is Secure
Before replacing everything back under the sink, check that the faucet is secure and there is no more movement. If you are happy, turn the water on and replace all your things.
How To Tighten a Faucet Handle
If the nut at the base of the faucet is not the problem, it might be time to tighten the handle. There are many styles of faucet handles, including pull-out taps, commercial versions, and touchless models.
Tightening the faucet handle is simple enough, but the challenge is establishing what type you have.
What You Need
To complete this task, here’s what you will need:
- A Phillips head screwdriver.
- A flat-head screwdriver.
- A knife.
- An Allen key (hex head wrench).
1. Turn Off the Water Supply
Reach under the sink to locate the two small water taps. Twist them counterclockwise and shut off the water supply. As we said before, you don’t need to do this, but it is a precautionary measure in case you loosen a pipe and spring a leak.
It also means that you are free to open the faucet and continue working without water coming through.
2. What Type of Faucet
The way the faucet attaches to the countertop differs between models. Some have a hex nut that tightens at the base of the handle. If it’s not obvious where the hex nut is located, pop off the decorative cap on the handle using the knife or flat head screwdriver.
Once off, it should reveal a hex head set screw or a Phillips head screw.
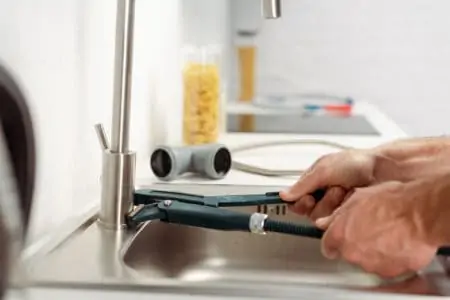
3. Tighten the Screw
Depending on the type of faucet, the way you tighten it differs. If you have a hex head screw at the base of the handle, take the Allen key and insert it into the top and turn it clockwise until it doesn’t tighten anymore.
This might mean you have to open the faucet, which justifies isolating the water earlier.
If you have a faucet with a Phillips key located under the decorative cap, insert the Phillips head screwdriver and turn clockwise until it doesn’t tighten anymore.
4. Check the Handle Is Secure
Before going any further, double-check that the handle is secure by giving a good twist. If it doesn’t move, you can start replacing everything.
5. Turn On the Water
Replace the decorative cap and reach into the cupboard and turn the water back on.
How To Tighten a Kitchen Faucet Without a Basin Wrench
The perfect tool to use when tightening the base nut on a kitchen faucet is a basin wrench. It is especially useful because it has a long shaft that enables you to grip and tighten the nut in the most confined spaces.
We would all have the tools we need for each DIY or repair task in an ideal world, but what do you do if you have to improvise? There are other ways to tighten the nut.
Duct Tape
Duct tape is surprisingly effective at tightening the nut at the base of the faucet. You have to clear out the items under the sink to be able to reach the nut.
Tear a strip of duct tape about 12 inches long. Then cut it down the center along the length, so you have two separate 12-inch strips. Stick one strip to the other, making a double-thick piece of duct tape that is extra-sturdy.
Reach in and wrap one end of the tape around the nut, leaving a 6-inch tail. Make sure the tape adheres to the nut, or this technique won’t work.
Now pull the loose-hanging duct tape clockwise, and the nut should begin turning. Keep twisting until the nut doesn’t turn anymore. Check the faucet is secure, and if it is, remove the tape from the nut and put everything back in the cupboard.
Two Coins
Grab two large coins and position them on either side of the nut, with your knuckle in between the coins for extra grip. Now begin turning the nut in the direction it tightens using your middle and index finger.
Keep rotating until the nut will move no more. Check the faucet to see if it has tightened.
Zip-Tie
Zip ties are not just for securing electrical cables; they can also tighten kitchen faucet nuts. Wrap the zip-tie tightly around the body of the nut. Now grab the tail of the zip-tie and pull it in the direction that the nut tightens.
When the nut doesn’t move anymore, check that the faucet is secure.