Sanding wood is the process of making a rough surface smooth. The idea is to eradicate mill marks left by industrial cutting machines and other flaws or dents that exist.
There are several ways you can sand wood, from manual to powered sanders, so we decided to show you how to sand wood for the best outcomes.
Key Takeaways
- Two ways to sand wood: manual and power tools.
- Choose the right sandpaper grit for specific tasks.
- Work with the grain to reduce surface scratching.
- Proper sanding technique is crucial for smooth results.
How To Sand Wood by Hand
The first method we are going to look at is manual sanding. This is how your grandfather and his before him would have worked to achieve smooth results. There are two main ways to sand manually, so let’s get started.
Types of Sandpaper
Before we get onto the step-by-step guide of how to sand with sandpaper, we must first discuss the types of sandpaper available and what their grit means.
There are two types of grit within this category, namely, macro and micro. Here’s a handy chart.
Macro Sandpaper
| Type | Grit | Used For |
|---|---|---|
| Very fine | 220-150 | Sanding bare wood |
| Fine | 120-100 | Prepare wood for finishing, plaster; remove water stains |
| Medium | 80 | Sanding bare wood and removing varnish and paint |
| Coarse | 60-40 | Removing blemishes and stains, plus mill marks |
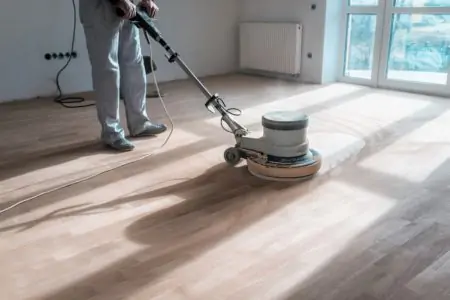
| Extra-coarse | 36-24 | Ideal for hardwood floor and deck sanding |
Micro Sandpaper
| Type | Grit | Used For |
|---|---|---|
| Ultra-fine | 1,000-800 | Finish sanding and polishing |
| Super-fine | 600-400 | Final wood finish |
| Extra-fine | 360-320 | Wood finishing and polishing |
| Very fine | 240 | Drywall sanding, finishing between coats |
Using Sandpaper
For convenience, using sandpaper is the best method. It’s also the cheapest as it requires no additional tools. Using your hand as a backing for sandpaper is not ideal if you are working on flat surfaces or softwoods.
It can lead to hollowing out, which causes the surface to feel uneven. Before starting, always put on a facemask and goggles to protect against airborne pollutants in the dust.
1. Tear the Sandpaper
The best sanding technique using just sandpaper is to tear a sheet of 9-inch by 11-inch paper into 3 sections crossways.
2. Fold
Now you have 3 strips of sandpaper, fold each section into thirds lengthways. This gives you two rigid surfaces, plus a third when you need it.
3. Flip the Paper
Work the paper until one side dulls, then flip it over and use the other surface. When this one dulls, refold the paper to use the third section.
It gets the most out of the sandpaper and reduces waste. Plus, it decreases the chance of the folds slipping while you work.
4. Work With the Grain
Use sweeping straight motions that run the length of the grain, especially if you are looking to get the finest detail from the wood. Working against the grain highlights scratches on the surface when you use a transparent stain.
If you are painting the wood, going with the grain is less important.
Using a Sanding Block
Unlike the previous method, a flat-backed sanding block is the ideal manual tool for smoothing flat surfaces. It gives an even finish without the risk of creating hollowed-out sections.
If the block is hardwood, a softer layer between the paper and the block helps improve the performance. Cork is an ideal material.
1. Fold the Paper
Using the same strip of sandpaper, fold it in half. It gives you extra grip on the block and 2 surfaces to use when the first one dulls.
2. Attach the Paper
Place the paper on the block facing one side down, with the other gripped between your finger and thumb on the top of the block. Some sanding blocks have slots at either end to grip the paper.
If you have this type, you will need to adjust the paper’s length to accommodate.
3. Flip the Paper
As you work the sandpaper, it dulls. Just as you would when using your hand as a backing, flip the worn side and replace it with the fresh side you used to grip it in place.
4. Work With the Grain
Work with the grain to reduce surface scratching. Clear varnish and stains are unforgiving if you work across the grain, highlighting every mark. And the worst part is those cross-grain scratches are largely invisible until stained.
Use steady, sweeping motions in straight lines to get the best results.
How To Sand Wood With a Power Tool
Power tools speed up the sanding process and place less strain on your arms and wrists. They are better suited to larger-scale tasks, whereas hand sanding is for detailed work.
Before getting into the nitty-gritty about the best techniques, let’s examine the types of sanders suitable for wood.
| Type | Description | Used For |
|---|---|---|
| Belt sander | Drives an abrasive belt to remove material | Ideal for large-scale projects and rough surfaces |
| Random orbital sander | Disc spins on an off-center axis for efficient sanding | Larger tasks plus metal |
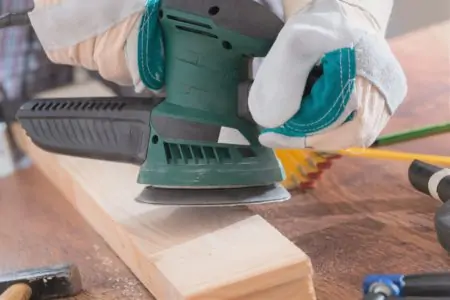
| Detail sander | Has a triangular sanding pad for better detail | Used as a finishing tool to get detail |
| Orbital sander | Operates a spinning abrasive disc | Larger tasks, as well as metal |
| Electric planer | Smooths by removing thin layers of surface wood | Used on windows, doors, and other detailed carpentry |
For the purposes of this article, we are using a belt sander. You will also need the same PPE to protect you from dust.
Using a Belt Sander
1. Load the Sandpaper
Unlike the sanding block, the belt sander uses a specific abrasive belt to remove material. The sanding strip stays in place thanks to a tension lever. To insert the new strip, release the tension lever and slide it over both ends, making sure it is lined up and straight.
Now apply the tension lever to lock it in place.
2. Power Up
Plugin the sander and attach the dust collection bag. Put on your PPE and switch it on. Wait for the sander to reach capacity speed before applying it to your wooden surface.
3. Apply the Sander
Using steady but firm force, place the base of the sander onto the wood. It will kick at first as the sanding belt grips the wood, so make sure you use both hands to hold it steady.
3. Work With the Grain
Move the sander in straight lines along the length of the grain. Working slowly and methodically ensures you maintain a level of pressure on the sander, and you reduce the chances of marking the wooden surface.
4. Power Off
When you have finished, turn the sander off and unplug it from the wall. Make sure you dispose of the sawdust first before removing your goggles and facemask.
How To Remove Sanding Dust
As you advance with the project, make sure you remove the dust between grit sandpaper changes. If you don’t, you risk impeding the sandpaper’s performance and damaging the surface of the wood.
You could try a dustpan and brush, but this kicks the dust into the air. Tack rags are better suited to small areas of debris and would quickly load with large amounts of dust.
The best way is to use a vacuum system that attaches to your power tool, sucking the dust to a central canister, or a standard vacuum cleaner nozzle to suck the debris away.
The other option is a dust collection bag attached to the exhaust of the power tool. It collects the pollutants inside the bag, ready for disposal when it is full.
If you prefer an air sander, compressed air is an effective way to remove hazardous waste material.
How To Know When To Stop Sanding
Knowing when to stop sanding is a challenge. A lot of it comes from experience. Getting a feel for when you have removed enough material and surface scratches as you move through the different sandpaper grades is something you will develop over time.
However, there are two methods you can use as a guideline.
Adjust Your Viewing Angle
Take the wood and bring your eye level in line with the surface of the material. Use the natural light from a window or bright lamp to help you examine for scratches and blemishes. By doing this, you will quickly see mistakes.
Wet the Wood
Wetting the wood immediately lifts any scratches and blemishes to the surface, making them easy to spot. It’s a bit like using a transparent stain that highlights cross-grain scratches.
Use mineral spirits like paint thinner or denatured alcohol. Avoid paint thinner if you use a water-based coating on the wood as the oily residue interferes with how it adheres and penetrates the wood.
Also, alcohol can slightly raise the grain of the wood, so you may need to remove a little bit more of the surface using micro sandpaper.
FAQs

Can Sanding Ruin Wood?
Sanding can ruin wood if you over-sand. This usually occurs if you apply too much pressure when sanding, use sandpaper with the wrong grit, or excessively sand a surface.

How Much Should I Sand Before Staining?
The best way to determine this is to know for how long to use each grit. As you may know, sandpaper comes in different levels of coarseness, and you have to use more than one when sanding wood.
It’s best to start with 80-grit sandpaper and always avoid fine-grit until later. This grit will help eliminate a lot of material from the wood’s rough surface at the cost of visible scratches.
That’s when fine-grit sandpaper kicks in. If you can’t go 80-100-120-150-180 grit (because few of us have that much sandpaper around the house), you can also go 80-120-180 grit.
Grab a pencil and draw a curved line across the wooden surface. Don’t apply pressure because the pencil line can cause a dent in the wood. Begin sanding until the line has disappeared. As you move into the next grit, draw another line and repeat the process.

Should I Sand the Wood After Primer?
There are certain situations when you must sand the wood before and after applying primer. Primer can cause the wood grain to rise, thus impeding the smooth finish you crave.
When you want to sand the wood with a primer, you must use fine-grit sandpaper (220-grit should suffice in most cases).
Consider using an orbital sander because it helps maintain the wood’s natural aesthetic. Keep in mind the main goal: evening out the potentially-risen wood grain.

Is It Better to Sand Wood Wet or Dry?
The opinions on this topic are divided, but most experts will tell you it’s fine to wet sand wood as long as you remember a few things.
Wet sanding combines water and sandpaper, but you can’t use any type of sandpaper. Look for sandpaper that’s labeled as being suitable for wet sanding.
When you wet sand wood, you remove less material than dry sanding. That’s why many woodworkers advise dry sanding first and wet sanding after.
Dry sanding uses coarser sandpaper and can be achieved by hand or using a power sander. It gives your project a smoother finish and is great for removing carving imperfections.
Since both these sanding methods have advantages and drawbacks, consider the following:
- Use wet sanding to remove scratches, deal with less dust, and help details stand out in your woodworking project.
- Employ dry sanding when you want to complete the finish faster and eliminate imperfections caused by woodworking tools.

How Do You Prevent Sanding Swirl Marks?
To prevent sanding swirl marks, you have to understand what’s causing them. Swirl marks are often a result of improperly using a random orbital sander.
And maybe you’re using the wrong technique, or your sander isn’t working correctly. Swirls marks are also caused by poor-quality sandpaper and dust/debris clogging your sander.
If you want to prevent sanding swirl marks, learning the correct sanding technique is the first step.
People put a lot of pressure on their tools when sanding when they should keep a steady hand. Experiment with steady pressure on some wood pieces before you start working on the real deal.
Operating the sander too fast is another problem. You can’t rush the ending process; you’ll just end up doing more harm than good. Move your sander one inch per second and avoid constantly turning it off and on again. This’ll lead to swirl marks and an uneven surface.
Another common mistake that leads to swirl marks is not putting down the sander before they turn it on. If you just place the sander on top of the surface and turn it on after, you can prevent a lot of surface gouges.
Lastly, avoid using incorrect or poor-quality sanding discs. When you invest in quality sandpaper, it has the right abrasiveness level and is less likely to leave marks. Industrial-grade sanding discs are optimal if you want to prevent swirl marks.

Should I Oil the Wood After Sanding?
Oil should always be applied on wood after sanding and not before. This is done to close open wood pores and provide a smooth surface.
By proper sanding and using the right type of oil, your wooden surfaces can have a nice sheen and protect the surface. As the oil penetrates the wooden surface, it can revive the wood’s natural colors when applied periodically.
Understanding Sanding
There are few tasks more satisfying than sanding wood. You get to see the results as they happen. Making your project tactile and smooth to the touch is a real pleasure. Maybe it has something to do with taming a raw material and turning it into something beautiful?
Whichever method you choose, have fun.