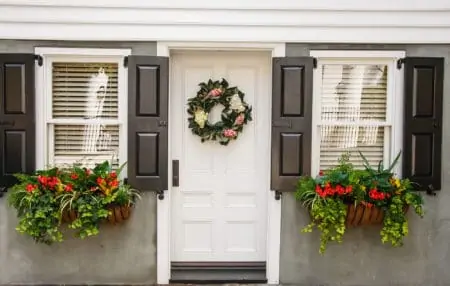
Whether you live in an apartment or a house, window boxes can spruce up the exterior design of your home.
However, some people might be intimidated by the idea of drilling holes under the windows. We’re going to show you two methods on how to hang a window box: with and without drilling.
Key Takeaways
- Choose the right location for your window box, usually 1 inch below the sill for sash windows or 6-8 inches below for awning or casement windows.
- Hang window boxes with mounting brackets by measuring, marking, and drilling holes for the brackets, then installing the box on the brackets.
- Hang window boxes on vinyl siding without drilling by using vinyl siding hooks and D-rings to mount the box securely.
- Select plants that thrive in your environment and provide proper care, including drainage, potting mix, and regular watering and fertilizing.
Where Should a Window Box be Placed?
Knowing how to hang a window box means determining its exact location to install the brackets. And this depends on the type of windows your home has.
You want the top bracket to be located about one inch below the sill for sash windows. While for awning or casement windows, the mounting brackets should be located about six to eight inches below the window. This is so you can still open it without being obstructed by growing plants.
To maximize the aesthetic effect, determine the size of your windows. Select a window box that fills the width of your window entirely. You want to ensure that the window box fits snugly against your window.
How to Hang Window Boxes with Mounting Brackets
Before you can begin attaching the window boxes on brick or vinyl, you’ll need to ensure you have the right tools at hand.
What You’ll Need
- Pencil.
- Measuring tape.
- Drill.
- Screws.
- Mounting brackets like these brackets from Achla Designs.
- Level.
1. Measuring for the Brackets
Take a measuring tape and a pencil to mark the location for your mounting brackets. Measure one inch from the bottom of the window frame and make a marking. Then hold the bracket so that the upper-most part of the bracket is in line with the marking.
Next, while holding the mounting bracket in place, mark the location of the screw holes. Use a spirit level to ensure that your markings are level; you don’t want your window box to be hanging at an angle!
2. Fastening the Brackets
Install the mounting bracket on the side of the house. To do this, you are going to need a drill. Using the level, mark a straight horizontal line with a pencil roughly to where you want the brackets to be.
Take the bracket and place it right under your level pencil mark. With a pencil, mark where the holes are in the bracket. Set the bracket down.
Pre-drill the holes you marked. Then insert just one screw so you can adjust the bracket afterward if need be.
Use a level to make sure the bracket is mounted straight. This should be done before inserting the second screw. When leveled, you can install the second screw and repeat for the other bracket.
3. Installing the Window Box
Place the box on top of the brackets, making sure it has a central position. Secure the box to the brackets using 2.5-inch screws and a drill. This is basically installing the last remaining screw in the bracket. Only this one goes through the box.
How to Hang Window Boxes on Vinyl Siding
Some people don’t want to drill holes into their vinyl siding. Thankfully, they can still install window boxes with hangers designed for such a task. The following method will show you how to install window boxes on vinyl siding without drilling any holes.
What You’ll Need
- Vinyl siding hooks.
- D-rings.
- Screwdriver.
1. Inserting the Hooks
Locate the seam of the siding where you wish to hang the window box. Insert the top ends of the hooks into the seam.
2. Mounting the D-Rings
Mount the D-rings, such as these Vinyl Siding Hooks, on the back of the window box and screw them with a screwdriver. When choosing where to mount them, make sure that the hooks will be concealed once you hang the window box.
3. Hanging the Window Box
Hang the window box to the vinyl siding. Thread the ends of the hooks in the D-rings located on the back of the box.
What to Put in the Window Box
The hardiness zone in which you reside helps determine which plants will survive in your environment. Consider the climate you live in and choose plants that thrive in your area. Also, consider the quantity of sunlight that your boxes will receive.
If your window boxes are shaded by roofing or trees, shade-tolerant plants are perfect. But, if your planter receives direct sunlight, flowers that thrive in bright light are a smart bet.
Some flowers that look exceptionally well in a window box include zinnias, geraniums, and petunias. For fillers, you can choose vinca, heather, or ivy, as they will cascade beautifully over the edges of the box.
Flowering Bulbs
Flowering bulbs can add a ton of impact to your window boxes. You can opt for bulbs that are planted in the fall, such as snowdrops or daffodils. Or you can go with those planted in late spring, like alliums and lilies.
Herbs & Vegetables
Plant herbs if you have a convenient spot. You could have fresh access to herbs like mint, thyme, and sage by simply opening the window.
For Experienced Gardeners
People with gardening experience can train climbing vines to wrap around the window frame for an ensemble effect. Connoisseurs may opt for a focal point of topiary forms. Topiaries made of ivy, creeping figs, or other recognizable shapes can catch the mind.
How to Care for Window Box Plants
Here are a few tips on how to care for flowers and other plants that go in a window box:
- Drainage is critical. Select window boxes with pre-drilled drainage holes or drill your own. The soil mustn’t become too moist, as this can result in root rot.
- Use a commercial potting mix or create your own. Compost the area if you are growing edible plants.
- Fill the box with a potting mix almost to the brim. It is critical to add enough good potting soil around the plants to ensure their stability.
- Ensure that you water and fertilize frequently. Window boxes exposed to direct sunlight will quickly dry out.
- When it comes to watering, it’s prudent to install self-watering planters or create a timetable. Your window box might be out of the reach of sprinklers.
FAQs

Are Window Boxes Bad for Your House?
Window boxes can significantly improve the aesthetics of your home. However, they should be properly installed and cared for. If not, they could lead to a series of problems, like wall damage or even planters falling right off the hooks.

Do Window Boxes Attract Bugs?
Any outdoor plant will eventually attract some bugs because it’s just how nature works. Planting specific plants in your window boxes might attract bees and a variety of other useful insects.

Do Window Boxes Need Drainage Holes?
A window box must have drainage holes to prevent plants from sitting in damp soil. If you purchased a window box without drainage holes, drill holes in the bottom before mounting it on the wall.

How Much Weight Can Vinyl Siding Hooks Hold?
The majority of vinyl siding hooks can support up to five pounds. Use heavy-duty metal siding hooks, which typically support 10 to 12 pounds, for hanging heavier goods like huge metal ornamentation.
Final Words
Knowing how to hang a window box is far less complicated than settling on what plants to put in it. But once you’ve hung up your gardening gloves, your home’s curb appeal is sure to impress.