Knowing how to build a shed door is not only satisfying, but is also more straightforward than you might think. Shed door DIY is the best approach to protect your shed against the elements and secure the contents.
This article focuses on shed door ideas and ultimately shows you how to make a shed door using the braced, ledged, and framed methods.
Key Takeaways
- Choose the right materials: Use 1×4 timber boards, exterior plywood beadboards, or siding that mimics the grooved effect of beadboard, at least one to one and a half inches thick.
- Measure accurately: Allow a 0.25 to 0.5-inch gap between the door and frame for smooth opening and closing and to accommodate for winter swelling.
- Build a strong door: Opt for a ledged, braced, and framed door for the most robust and secure option.
- Seal the door: Use weatherstripping, door sweeps, or brushes to protect against drafts, debris, and rainwater, and to keep your shed contents safe from the elements.
Shed Door Plans
Essentially, there are three types of shed door design, and this article will show you how to build each one. We talk you through the various stages of building a shed door, starting with the most simple.
After that, you can move on to more complicated projects. But, before we get started, first, you will need to know how to measure accurately for your custom shed door.
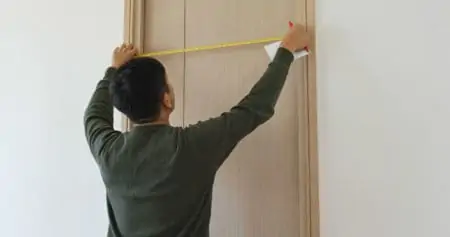
Sizing a Shed Door
Measuring for a single or double shed door takes accuracy. Get the dimensions wrong, and the door will not fit properly. This is a problem if you value security and want your garden storage to protect against the elements.
Start by measuring the width of the opening from the inside of the frame to the opposite side. Do this for the top, middle, and base of the jamb, and use the smallest measurement as your guide.
Subtract about 0.5 inches from each side of your smallest measurement to allow for the door to open and close without restrictions.
Now, measure from the top of the threshold to the underside of the header jamb. Do this for the left and the right and use the smallest measurement as your guide. Again, allow for 0.5 inches of clearance on both sides.
Most shed doors measure between 25 and 45 inches wide and 66 to 84 inches in height.
Word Of Advice
Always double-check your measurements to eradicate errors when you cut the wooden planks to size.
How to Build a Simple Shed Door
Deciding on the door design may depend on your confidence levels and skill set. While none are particularly challenging, some door plans are more complicated than others. Regardless of the door type you choose, you will need the correct tools and supplies.
What You’ll Need
- Measuring tape.
- Spirit level.
- Pencil.
- Circular saw, or hand saw.
- T1-11 siding or plywood beadboard.
- Two 1×8-inch boards, wider than the width of the door.
- Nine 1×4-inch timber boards, longer than the length of the door.
- 220-grit Sandpaper.
- Wood glue.
- 1.25-inch screws.
- 1.5-inch lag screws.
- Hinges.
- Countersink drill bit.
- Hasp latch.
- Two sawhorses.
- Clamps.
- Face mask.
- Safety gloves.
- Goggles.
Single Door
Constructing a replacement single door is the easiest and cheapest of all the designs. However, while it may be the fastest way to secure your outdoor shed, it isn’t the most heavy-duty door you can build.
We’ll start with this one because it is simple and then move on to the next phase, where the designs get more interesting.
1. Choose the Right Materials
You have several options when choosing the materials to construct your door. You could work with plywood sheathing, which resembles wood paneling, or you could use beadboards. Beadboards slot into each other for a secure grip.
We chose T1-11 siding for the simplest door design. The crucial thing is to use materials that blend in with the aesthetics of the wooden shed. It also means that you speed up the process because you don’t have to cut individual boards to size.
Top Tip
Get siding at least 1.5-inches thick to ensure it is sturdy enough to withstand the elements and provide the security you need.
2. Cut the Siding to Size
Using the measurements for your door opening, mark the length and width of the door using a tape measure. Mark the dimensions with a pencil and make the straight lines using a spirit level for accuracy. Use the clamps to hold the paneling securely to the sawhorses.
3. Make the Cut
Before Starting
Don your face mask, goggles, and protective gloves. Sawdust contains carcinogens that can irritate your lungs, throat, and eyes.
You can use the handsaw to cut along the marked lines, but it will take longer with a greater margin for error. Plugin the circular saw and let it power up to full speed before cutting for faster results.
Now cut along the line, staying on the outer edge rather than the inside of the pencil marks. Do this for the length and the width. Smooth the edges with sandpaper to remove splinters.
4. Flip the Siding
While the siding comes as a complete sheet, it still needs additional support to prevent warping in extreme weather conditions. Turn the siding over so that the smooth side faces you. This is the side we will attach the ledges to.
5. Mark the Lines for the Ledges
Use the tape measure and mark the three evenly-spaced sections where the battens will go. The top and bottom ledges should be around six to 10 inches from the edge of the door. The third batten should run through the middle of the door to provide balance.
Cut the 1×8-inch boards so they leave a gap on either side of the door for it to close flush. Flip the door over, so the outside faces up and screw them into position using the 1.25-inch screws.
6. Mount the Hinges
Fitting the hinges is simple enough because you have the three cross-section battens to direct you. Each hinge should line up with the center of each ledge. Attach the hinges to the door using the 1.5-inch lag screws.
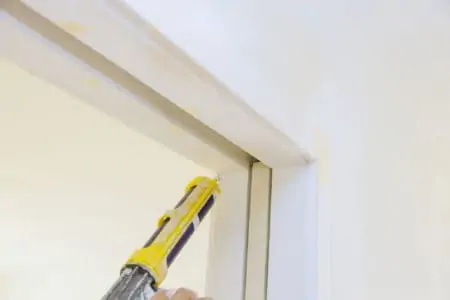
Hold the door up to the opening and center it with a 0.5-inch gap around the frame. Mark where the hinge leaf meets the jamb with a pencil.
Remove the door and grab a power drill and relevant-size drill bit. Countersink the required number of holes and screw the hinge to the frame. Creating a countersink enables the screws to sit flush with the hinge leaf.
7. Test the Door

Ensure the door opens and closes and it is well balanced. Make adjustments if necessary. Now you can mount the hasp latch by screwing the concealed plate into the shed frame and the staple end to the door.
A hasp latch is the most common shed lock, consisting of a long hinged bar that fits onto a catch called a staple clasp. All you need now is a sturdy padlock to secure your shed.
Ledged and Braced Door
Ledged and braced doors are more secure and robust compared to ledged doors. Also, we will construct the door from individual timber boards rather than using siding that emulates beadboard.
1. Cut the Boards to Length
Cut the 1×4-inch grooved timber boards to the required length using the circular saw. Lay them on a flat surface and run a line of wood glue along each adjoining edge. Now clamp each board together and let the wood glue set.
2. Measure and Cut the Cross Battens
With the glue set, flip the boards so the inside faces upward. The cross battens (ledges) are cut from the 1×8-inch timber boards. Allow two inches clearance from the edges of the door.
Cut two cross-sections and place them three to five inches from the top and bottom of the door. The final ledge runs through the middle of the door. Once you are happy with the location of the battens, screw them in place with the 1.25-inch screws.
The cross-sections add structural integrity to the door and lock the individual boards in place.
3. Measure and Cut the Braces
The braces are constructed from the remaining three 1×4-inch boards set diagonally between each ledge. Lay the 1×4-inch board diagonally from the top ledge to the middle ledge from right to left in a Z shape.
Grab the pencil and mark the angle where the brace meets the ledge. Do the same for the brace between the middle and lower ledge.
Switch on the circular saw and let it reach full speed, and make the cuts along the pencil line. Dry fit the brace between the cross-section battens to ensure a snug fit.
4. Secure the Braces
If you are happy, screw them in place using the 1.25-inch screws. Four per brace should do, with two located at each end.
Top Tip
Always screw from the door’s exterior to make the finish neater. You can also countersink the holes to avoid the wood splitting.
5. Fit the Hinges
Follow the same steps as before to fit the hinges, remembering to drill pilot holes to prevent the frame from splitting.
6. Fit the Hasp Latch
Line the hasp latch with the center cross-section of the door. The easiest way is to attach the concealed screw plate to the door first and then shut the door to line up the staple end of the latch.
Mark the location of the screw holes with the pencil and countersink with the drill and drill bit. Now use the 1.5-inch lag screws to secure it to the door frame.
Ledged, Braced, and Framed Door
This is the most robust door design because the frame ties the ledges and bracing together to make the door incredibly rigid. If you have something valuable inside your shed, this door will keep it secure against intruders.
1. Cut the Boards to Length
The easiest way to do this is to glue the grooved 1×4-inch boards together using wood adhesive and clamp them while they set. Wait while the adhesive cures.
Measure the length of the door and mark the dimensions onto the wooden boards using a spirit level. Fire up the circular saw and make the desired cuts.
Top Tip
By gluing the boards together instead of measuring them individually, you can cut them in one go. It ensures that each length is the same.
2. Measure and Fit the Cross Sections
Follow the same steps as before, ensuring that there are three-cross sections at the top, middle, and bottom. However, instead of a two to three-inch gap from the end of the ledge to the edge of the door, we need to make the cross-sections shorter.
Measure four and a half inches in from the edge of the door. This allows for the four-inch wooden frame on either side of the door. Also, thanks to the additional half an inch, it enables the door to shut flush.
Screw the cross-sections with the 1.25-inch screws, placing two at each end and two in the middle of each plank.
3. Measure and Fit the Frame
The frame runs down either side of the door, about half an inch from the edge. It should also run the length of the door, with the ends lining up with the outer edges of the cross-sections. Lay the 1×4-inch timber planks onto the door and make pencil marks at either end.
Now use the circular saw to cut them to size. Secure them with the 1.25-inch screws.
4. Attach the Hinges
Grab the drill and drill bit and make as many pilot holes as there are screw holes in the concealed hinge plate. Secure the hinge using the 1.5-inch lag screws. Do this for the top, middle, and bottom, ensuring that each hinge lines up with the center of the cross-sections.
Lift the door into the opening and line up the hinge with the door frame. Mark the location with a pencil and drill the relevant number of pilot holes. Now secure the hinge to the jamb and try the door to see if it swings freely.
Take Note
You may need someone’s help lining up the door to attach the hinges.
5. Attach the Latch
Line up the hasp latch, ensuring enough overhang over the door’s edge, and screw it in with the 1.5-inch lag screws. Now mark the position of the staple end that attaches to the door frame. Drill pilot holes and secure them with the lag screws.
How to Seal a Shed Door
Once your shed door is in situ, you will need to seal it against the wind and rain. You might also want to consider small rodents attracted to a dry and warm environment.
From weatherstripping kits to door sweeps, keeping the elements at bay is crucial.
Weatherstripping
Most weatherstripping is either foam or vinyl and comes with adhesive to stick onto your doors. Because wood is porous, you might want to secure your weatherstripping with carpenters staples.
Work along the frame, ensuring the door still closes without too much resistance and still seals the door.
Door Sweeps
Door sweeps attach to the base of your shed door and stop debris and rainwater from blowing under the gap. Rubber door sweeps are effective but are less robust than vinyl models. Simply screw the door sweep to the base of the door, ensuring it covers the entire gap.
Brushes
Door brushes keep heavy debris at bay and protect your replacement door, but they are less effective at keeping rainwater out. Brushes can be installed on any part of the door, although they are primarily intended for the door base.
FAQs

Which Wood Should I Use For My Shed Door?
You can use 1×4 timber boards, exterior plywood beadboards, or siding that mimics the grooved effect of beadboard. Try to use material at least one to one and a half inches thick.

Do I Need a Header for a Shed Door?
You should fit a header because it helps to support the roof’s weight and reduces drafts and leaks.

Should Shed Doors Swing In or Out?
Most shed doors swing out because you want to maximize the usable space inside. A door that swings inward will reduce the floor space.

How Much Gap Should Be Around a Shed Door?
There should be between 0.25 inches and 0.5 inches between the frame and the door. This allows for the door to open and close and winter swelling.

How Do I Square a Shed Door?
The easiest way is to use a spirit level to determine whether the door or frame is out of square. If the door is the culprit, hold the spirit level against the door and line the bubble to the center. Draw a line along the door’s width to mark how much material to remove.
You can then plane the door so it sits level.

How Do I Prevent the Shed Door From Warping?
Exterior polyurethane will protect the wood against the elements. Another way is to build a ledged, braced, and framed door.
This is the strongest because it has added reinforced cross beams and a frame to hold the door in position.
The Last Word On Shed Doors
Without a shed door, your shed is open to security breaches and the extremes of the weather. It becomes a glorified storage recess, leaving you unable to store anything valuable. A well-fitted shed door solves all these problems.