Updating your kitchen with a new faucet can help transform the overall appearance of the room, as well as provide added functionality. A kitchen faucet can be expensive, so you might want to save money by installing it yourself.
Installing a faucet is a relatively minor DIY plumbing project, and you should be able to do it without much experience. Still, it is important to be careful and there are some things you should know before getting started.
To help you, we have written a step-by-step guide on how to replace a kitchen faucet. If you follow it, you should be able to replace your kitchen faucet in a couple of hours.
Key Takeaways
- Turn off supply valves: Close hot and cold supply valves before starting to avoid flooding.
- Gather necessary tools: Have a basin wrench, flashlight, new supply lines, and other essential items ready.
- Remove the old faucet: Use a basin wrench to unscrew nuts securing the retaining bracket, then lift the old faucet out.
- Install the new faucet: Follow the manufacturer’s instructions to properly install your new kitchen faucet.
Before You Start
Although replacing your kitchen faucet is a relatively straightforward process, it is important to plan ahead. Before you start, ensure you have all the tools needed to install a kitchen faucet and a compatible replacement.
Plan Ahead
Step 1: What You Need
Ensure that you have the following items before starting:
- Replacement faucet
- Basin wrench
- Flashlight
- New supply lines (unless they are included with the faucet)
- Camping lantern or head torch
- Rags
- Putty knife (not necessary, but useful to keep handy)
- Bowls
Step 2: Read the Manufacturer’s Instructions
Before you turn the water off, we strongly recommend reading the instructions thoroughly.
Our guide will help you through the process, but every faucet type and brand is different, so you should defer to the manufacturer’s instructions for your specific model.
Step 3: Clear the Cabinet Underneath the Sink
Replacing a kitchen faucet requires getting under your sink. To make this easier, take the time to remove any obstructions so you can move around more easily.
This also provides an excellent opportunity to declutter your cabinet — just watch out for any bugs!
How to Replace a Kitchen Faucet
Now that you have gathered your tools and cleared your workspace, it’s time to get started.
Every faucet type is different, but replacing one will usually follow these steps:
Step 1: Turn off Supply Valves
To avoid flooding your property, it is vital that you close the hot and cold supply valves. Turn them clockwise to tighten. Once they are closed, open the taps and make sure no water comes out.
If the valves are shut but water still flows out, the valves might also need replacing. To do this, we recommend contacting a professional plumber.
On the other hand, if no water comes out, you can disconnect the supply lines. Place a bowl under the hoses to catch any trapped water. Then, use your basin wrench to unscrew the nuts — turn them counter-clockwise until they are loose.
Step 2: Light the Area
The space beneath a sink is always dark. To make life easier for yourself, place a camping lantern or worker light under the faucet. If you don’t have one, a head torch can also work well. A well-lit area will make the project far easier.
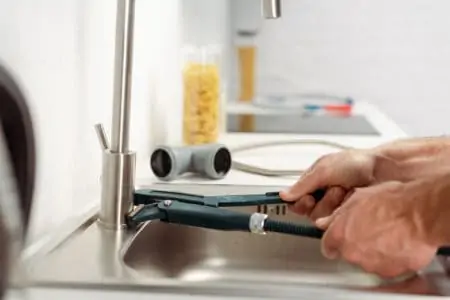
Step 3: Disconnect the Old Faucet
Use the basin wrench to unscrew the nuts securing the retaining bracket to the faucet. If there are any plastic nuts, it’s best to use your fingers to protect them. If the plastic nuts are too tight, use pliers instead of a wrench.
This is also where you can use the putty knife. If the faucet is difficult to loosen, gently insert the putty knife between the fixture and sink and lift it slowly. Be careful not to scratch or damage the sink.
Once the old faucet is loose, lift it from the hole. You can now prepare to install the new one.
Step 4: Clean the Area
This isn’t always essential, but it is often necessary. If your old faucet has been in place for years, it will probably leave behind some unsightly residue. Grab a rag or a sponge and clean the area.
This ensures everything will look and feel as new as possible. You don’t need to do a deep clean, but removing residue from the old fixture will help you achieve a cleaner finish when your new faucet is installed.
Step 5: Install Your New Faucet
Install your new faucet according to the manufacturer’s instructions.
If it has a single handle, place all the supply lines through the same hole. However, if is a double-handle faucet, make sure you align the hot and cold hoses correctly.
Once everything is in the correct position, use the basin wrench to tighten the nuts for the new faucet. Avoid tightening them too much as this could cause trouble over time, including damaging the washers.
Deck Plate
Step 6: For Pull-Downs and Pull-Outs Only: Install the Weight
Most faucets with extendable sprayer heads use a weighted system. Refer to the manufacturer’s instructions for specific directions.
Place the weight onto the part of the sprayer hose located under the sink. Many manufacturers mark the area where you should attach it, usually with a colored line. If you place the weight incorrectly, it could impact your use of the pull-out/pull-down feature. Thankfully, this is easy to fix.
Step 7: Wipe Down the Lines and Hose
Once the faucet is positioned and connected, grab a dry rag and wipe down the supply lines and hose.
Drying them thoroughly will make it easier to check for leaks when you open the tap again.
Step 8: Flush the Faucet
Flushing the faucet is an important step. New faucets often contain sediment and other residues from the manufacturing process, which can be harmful if ingested. Fortunately, flushing is easy.
- Aerator nozzle: Start by removing the aerator from the nozzle. It should be easy to unscrew using your fingers. If you don’t remove it, sediment can’t be flushed out as the fine mesh aerator will trap it.
- Hot and cold supply: Once the aerator is removed, turn on the hot and cold supply valves.
- Open the tap: Open the tap and let the water run for a couple of minutes. Alternate between hot and cold.
- Sprayer head: If you have a sprayer head (such as a pull-down/pull-out) or side sprayer with integrated aerator, remove the nozzle entirely. Then, rinse it in a separate bath to remove sediments. Screw the head back on once you have finished flushing and it should be safe to use.
Step 9: Check for Leaks
After flushing, look under the sink. Inspect the supply lines and hose for any moisture.
We recommend rubbing a white paper napkin over the pipes to check for drips and spills. Water will appear clearly on the napkin if something is leaking. If you see any, check that you connected everything correctly and that nothing needs further tightening.
If you don’t find any evidence of leaks, congratulations! You have successfully installed your new kitchen faucet.
Old Supply Valves
How to Measure for a New Faucet
If you haven’t bought a new faucet yet, take your time because you need to get it right. Choosing a fixture that is incompatible with your current plumbing can be costly and time-consuming.
Keep these steps in mind to ensure you choose the right faucet:
1. Get the Right Measurements
Whether you’re buying a like-for-like replacement or a different style of faucet, accurate measurements are essential. Take a look at the current mounting configurations:
- The height: Measure from the bottom of the faucet (base plate) to the highest point on the spout.
- Spout height: Measure from the base of the faucet to the bottom of the spout or nozzle.
- Spout reach: Place the measuring tape on the middle of the neck and extend it to the nozzle. Try to align it to the center of the head.
You should also check that it will fit under any overhead cabinets and that it doesn’t overreach the sink. This also goes for backsplashes — ensure there is enough room behind the faucet to operate it properly.
2. Check for Holes
Check how many holes are in your sink — you may have to duck under it to find out. You can get some idea by checking how many handles your current fixture has. If there are two, your sink likely has three or more holes.
If your current faucet has a single lever, replacing it with a double handle can be a challenge. If there are no extra holes, consult a plumber for assistance.
3. Measure the Distance
If your current faucet has double handles, measure the distance between the levers.
When shopping for your new faucet, look for the minimum measurements in the specs. Avoid buying a faucet with a smaller width than your current sink can handle.
What Is Plumber’s Putty and Is It Necessary?
Plumber’s putty is a soft, pliable man-made compound, often composed of linseed oil and powdered clay. Other formulas may contain limestone, fish oil, or talc (1).
Plumber’s putty creates a waterproof seal wherever you apply it. It is easy to recognize on the underside of an old faucet — it looks like beads of clay. Unlike chalk or silicone, a plumber’s putty remains pliable for a long time; it is ideal for filling wide gaps due to its density.
Plumber’s putty isn’t adhesive. This means the faucet isn’t permanently sealed onto the sink, letting you remove it without doing any damage. For example, if you used chalk, you might have trouble removing your old kitchen faucet and have to cut through the chalk to remove the fixture.
Is It Necessary?
If you have a large gap to fill around the hole, a plumber’s putty is useful. On the other hand, many manufacturers include a gasket, which acts as a seal and prevents leaks.
If you decide to use plumber’s putty, it is inexpensive and straightforward to apply. It is effectively like using play-dough — you roll it out with your hands, then place it wherever you need it.
FAQs

How Hard Is It To Replace a Kitchen Faucet?
Replacing a kitchen faucet is one of the easier plumbing tasks you can undertake. Modern faucets are designed to be easily installed and removed, so you will only need a couple of basic tools to replace one. If the faucet is a wall-mounted or deck-mounted model, it will be more challenging and it might be best to hire a professional to avoid doing any damage to the area around your sink.

How Long Does It Take To Replace a Kitchen Faucet?
It should only take a couple of hours to replace a kitchen faucet and it could be even quicker, depending on the type of faucet. If your faucet is installed onto the sink itself, it should be a simple case of a like-for-like replacement. Wall-mount or deck-mount models will take longer, as you might need to cut into the area around your sink. The process of replacing a faucet itself is usually very straightforward.

Can I Replace a Kitchen Faucet Myself?
If you have a standard kitchen faucet mounted onto your sink, you should be able to replace it without much difficulty. Modern faucets are designed to be easily removed or installed by DIYers, and you will only need a couple of tools to perform the task. If your faucet is mounted on the wall or kitchen surface, you might need to hire a professional to complete the work for you.

Is It Better to Repair or Replace a Kitchen Faucet?
Certain things to look out for will tell you whether it’s better to repair or replace a kitchen faucet. You should repair the kitchen faucet if you see visible mineral deposits building up in the faucet (which causes a decrease in water pressure) or if the faucet is leaking.
You should replace the faucet if it’s extremely old or shows any rust. Also, if you constantly have to repair the kitchen faucet, it might be worth replacing it completely.

How Often Should Kitchen Faucets Be Replaced?
A kitchen faucet should be replaced once every 15 or 20 years, but it could require replacing sooner if it has constant problems or is damaged beyond repair.
The quality of the faucet, the water’s hardness, and how well it was installed will also contribute to the lifespan of the product.

How Much Does a Good Quality Faucet Cost?
A good quality kitchen faucet costs between $150 and $300 on the low end. Mid-range solutions, with more styling possibilities, start at about $500 and go up to $1,000. Prices can easily get into the thousands of dollars at the high end, but $1,500 is a fair starting point.

How Much Should a Plumber Charge to Replace a Kitchen Faucet?
Home Advisor says a plumber charges anything between $45 to $200 per hour to replace a kitchen faucet. Many factors influence the repair costs, including your ZIP code or the project’s complexity.
If your plumbing system also needs adjustments or repairs before replacing the kitchen faucet, that will add to the labor costs.

What Is the Lifetime of a Kitchen Faucet?
A kitchen faucet typically lasts between 15 and 20 years. Proper maintenance, avoiding hard water, and ensuring the faucet is installed correctly will lengthen the lifespan of the faucet.

What Brand of Kitchen Faucets Gives Free Replacement Parts for Life?
Some of the kitchen faucet brands that offer free replacement parts for life include names like Delta, Moen, Danze, American Standard, and KOHLER.