Knowing how to replace a garage door seal ensures that your garage retains heat in the winter and stays cool in the summer. Damaged seals allow air to escape, making it difficult to regulate temperatures.
Garage door seal replacement and knowing which type of seal you need are crucial to protecting your garage against the elements. Luckily, this article shows you how to install a garage door seal.
Key Takeaways
- Know the seal types: vinyl door stops, brush seals, reverse angle mount seals, threshold seals, and bottom seals (J-type, T-type, bulb, and beaded).
- Removing old seal: measure the old strip, locate and remove screws, remove the seal, and clean the track.
- Installing new seal: prepare the door, attach the seal, and trim any excess.
- Extra tips: work on a warm day, soak the seal in warm water, get help, leave a little excess, and measure twice.
Different Types of Garage Door Seals
Before we get into the details of lower garage door seal replacement, we first need to know about the different types of seals.
Vinyl Door Stop
Vinyl door stops attach to the sides of the garage door frame and run the length of the door. Their primary purpose is to seal the sides of the door against the elements. If you are replacing the side seals, a vinyl door stop is the best candidate to use.
Brush Seal
Brush seals attach to the base of the door and stop leaves and other debris from blowing into the garage. You can also install a brush seal on the sides of the door. This is the seal for you if you want to prevent dust and hard debris.
However, if you get a lot of rainfall, a brush seal is not the best choice because they are not weathertight.
Reverse Angle Mount Seal
The reverse angle mount seal is a great alternative to brush seals and vinyl door stops. It is mainly used for garage door sides and connects to the frame creating a track for the door to slide within.
Essentially, it is a U-shaped channel that the garage door fits into and is regularly employed in commercial buildings thanks to its robust nature. You would be unlikely to use this type of seal in domestic settings.
Threshold Seal
A threshold seal does as its name suggests: it attaches to the concrete base of the garage floor and seals against water ingress and debris. It consists of hard rubber material so that when you drive the car over it, it withstands the punishment.
Bottom Seal
Bottom seals come in four main varieties and are probably the most crucial of all the garage door seals. For that reason, we will look in a little more detail at the options available to you.
J-Type Seal
A J-type seal attaches to both sides of the base of the door and creates back-to-back J-shapes when the door is closed.
T-Type Seal
The T-seal looks like an upside-down T and slots into a single channel retainer at the base of the door. It creates a gasket-like seal when the door is closed and is similar to the J-type model.
Bulb Seals
Bulb-type seals are ideal for uneven concrete floors. It’s all thanks to a long rubber tube that slots into a single retainer and molds to meet uneven surfaces to create a seal.
Beaded Seals
Beaded seals are used in double channel retainers, with both sides of the strip bent to fit the circular grooves of the retainer. If you live in a rainy location, a beaded seal effectively keeps rainwater at bay.
How to Replace a Garage Door Seal
Replacing your garage door seal is simple enough. Before we get into the nitty-gritty, we must first remove the old seal. We focus on replacing a bottom seal for this article because it is the one most likely to suffer wear and tear.
Removing the Old Seal
Getting your old and tattered seal off should be a quick and easy job, but the task is faster with the right tools.
What You’ll Need
- Measuring tape.
- Flathead screwdriver.
- Phillips screwdriver.
- Tape Measure.
- Brush.
- Utility knife.
- Assistance (optional).
- Wood sealer.
- Hammer and nails.
1. Buy the Correct Door Seal
For the fastest results, buy like-for-like seals. It makes it easier to swap them, and you know it will fit.
Most door seals are rubber, which adequately stands up to the elements. However, silicone seals are better for extreme temperatures.
2. Measure the Old Strip
Measure the length and width of the bottom strip. If the seals on the sides are shot, you might want to consider measuring and replacing them too.
3. Locate the Screws
Find the screws that hold the old seal in place, commonly located at either end of the door. Grab the appropriate screwdriver and remove these screws. The screws are only short, so you will get this done in no time.
4. Remove the Seal
The difficulty with stripping the door seal depends on whether your garage door has a bottom track. Metal ones tend to, while wooden ones don’t. Without a track, the seal will need to be nailed in place.
To remove a nailed seal, insert the hammer’s claw end into one end and pull, and the nails will lift out. Do this all the way along until the seal is free from the door.
The easiest way for a door with a track is to slide out the seal until it comes free. Use a flathead screwdriver and utility knife to assist with this if it gets stuck. Also, you may need to remove it in a couple of pieces if it has badly perished.
5. Clean Out the Track
Once the old seal is gone, use the brush and screwdriver to clean the tracks of debris. Sweep away any loose bits that have fallen on the garage floor. If you have a wooden door, use wood filler to fill the nail holes.
You might want to consider installing a new track if your door doesn’t have one. Buy a new track and cut it to length. Now cut notches in the side to match up with the rollers.
Place a large dollop of caulk along the leading edge of the garage door and screw the track in place. You are now ready to install your new seal.
Installing the New Seal
Once the area has been prepared for the new seal, you are ready to begin. Let’s recap on the tools needed to complete the task.
What You’ll Need
- New door seal.
- Silicone spray.
- Measuring tape.
- Flathead screwdriver.
- Phillips screwdriver.
- Brush.
- Utility knife.
- Assistance (optional).
- Wood sealer.
- Hammer and nails.
1. Prepare for Your New Seal
Make sure the door is a comfortable height for you to work, which is typically eye level. It makes it easier to clearly see everything; plus, everything is at a convenient height to reach.
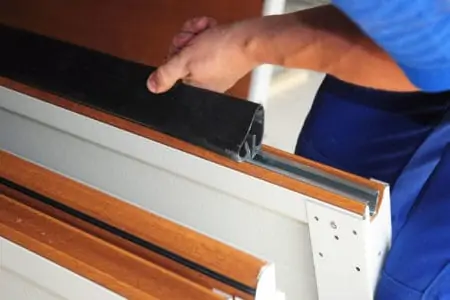
2. Attach the Seal
If you have a wooden door with no track, the best policy is to attach the seal with the hammer and nails. Before you do, make sure you measure it for size and check the dimensions twice to avoid an error.
If you have a track, look for the two grooves that hold the inverted T-section of the rubber seal. Use the silicone spray and lubricate the channel so the seal moves easier.
Fold the seal widthways so the two t-shaped ends fit into the track. Start feeding it with one hand while holding the seal with the other for support.
It’s a good idea to get some assistance as you feed the seal. You might struggle because it is too long to hold both ends. Plus, If the seal hangs loose, it may pull out of the grooves that hold it in place.
The seal will fit like a glove if you have the correct measurements.
Top Tip
For screw-secured seals, the ends typically become squashed by the force of the screws. Use the flathead screwdriver to force open the track so the new seal fits.
3. Trim Off Any Excess
Hopefully, you have the measurements spot on, but use the utility knife to trim the seal to size if you have miscalculated. Now secure both ends of the seal with the screws.
Extra Tips for Seal Replacement
There’s the hard way, and there’s the easy way. Pro hints and tips make our lives more stress-free. So, let’s share a few to get that garage door seal fitted in double-quick time.
Replace the Seal on a Warm Day
Working on a hot day makes the rubber seal more adjustable and easier to work with. It also means that you don’t risk rainwater getting in if you hit a problem.
Soak the Seal
In locations where sunny days are as rare as a cat with two tails, soaking your rubber seal in warm water makes it pliable. Pour the heated water into a bucket and submerge the seal. Wait 20 minutes, and then lift it out.
Your garage door seal should be ready to use.
Word Of Warning
Don’t use boiling water as this may perish the material.
Get Help
Having a second pair of hands is invaluable when feeding the new seal into the track. Taking a DIY approach might work for you, but given the seal’s length, it is easier with two people.
Leave a Little Excess
While it is important to cut the seal to length, leaving a slight excess at either end of the door helps create a better barrier. It stops the wind and rain from penetrating your garage.
Measure Twice, Cut Once
Always double-check your measurements because the seal could be too short if you get them wrong. That is a disaster because it lets heat out and water in; plus, it means you need a replacement seal.
How Much Does It Cost to Replace a Garage Door Seal?
On average, it costs between $95 and $500 to replace garage door seals. The costs vary enormously between the DIY approach and getting a contractor to do the job. Most of the higher price includes labor, and the possibility that the top and side seals also need replacing.
FAQs

How Long Do Garage Door Seals Last?
On average, a garage door seal lasts approximately two years. However, this can be reduced to just one year in extreme conditions.

How Do I Remove a Stuck Garage Door Seal?
The easiest way is to use a flathead screwdriver to pry under the seal and lift it off. You can use a hammer to give you extra purchase. Another reason your seal may be stuck is that the screw ends have narrowed the track.
Again, use the flathead screwdriver to pry them apart and widen the gap.

How Do I Stop My Garage Door Seal From Moving?
There are a couple of ways to tighten a loose door seal. First, you could grip the seal at both ends using screws. The second is to add a line of caulk for added security.
And if you have a wooden garage door, driving fresh nails to secure the seal does the job.

Do Garage Door Brush Seals Work?
Brush seals work by blocking debris from blowing into your garage. The thick bristles of the brush trap the dirt and sweep it away. However, brush seals are not suitable for stopping rainwater from entering your garage.

How Often Should You Replace Weather Stripping?
You should inspect your weatherstripping at least twice a year. It will probably need replacing annually, depending on the weather and the type of trim you have.
Seal the Deal
While the garage door provides security against intruders, the garage door seals prevent wind and rain from getting in. They help regulate heat in the winter and cool air in the summer.
So, keep your seals in excellent working order. You should include them as part of your yearly maintenance schedule and replace them when you see wear and tear.