Have you recently noticed wet patches around your water heater? It’s easy to go a long time without looking at your water heater, so leaks could go unnoticed for weeks or even months. Unless you already spotted a leak, you should go and check your heater and the surrounding floor before reading on.
Welcome back. Did you see any water? Whether or not you did, it’s worth reading on to find out what causes leaks and what to do if your water heater is leaking.
In this article, we will explore the potential hazards of leaky water heaters, how to detect leaks, and what to do about them. There are a few potential reasons for leaks and they will each require a different technique to repair.
Key Takeaways
- Water heaters can leak due to various reasons, such as loose connections, corroded parts, or excessive pressure in the tank.
- Leaks from the top may be caused by issues with the cold water inlet valve, pipe fittings, anode rod port, or expansion tank.
- Leaks from the bottom can result from a leaking drain valve, pressure relief valve, or a leaking tank itself.
- Regular maintenance and prompt repair of leaks can prevent further damage and ensure the safety and efficiency of your water heater.
Why Your Water Heater Is Leaking
Water heaters can leak for several reasons. It is important to conduct maintenance to prevent or fix this as leaks will usually only get worse with time. Even if a leak seems insignificant now, it should be dealt with as soon as possible.
Untreated leaks can lead to mold, which can affect asthma and other breathing difficulties (1). Mold can also be costly to clean up if it isn’t dealt with immediately.
However, despite appearances, there might not be a leak at all. Rainwater can sometimes get in through the pipes during a storm and drip onto your unit. To rule out rainfall, simply wipe down the unit and check it again after a few hours to see if there is any more water.
Leaks From the Overflow Pipe
You may notice that water is flowing through the pressure relief valve and exiting through the overflow pipe. If this occurs, it’s likely because there’s too much pressure inside the tank for the unit to handle.
Your unit’s pressure relief valve ensures the pressure is stable. It relieves excess pressure by draining water through the overflow pipe. If it doesn’t do this, your water heater could even explode from the excess pressure (2).
If you think this is your issue, here’s how to turn off your heater and deal with the problem.
- Adjust the thermostat to its lowest setting.
- Turn on the water supply and electric supply.
- Observe the heater over a short period.
If the problem persists, you will need to call a professional to come and inspect the issue.
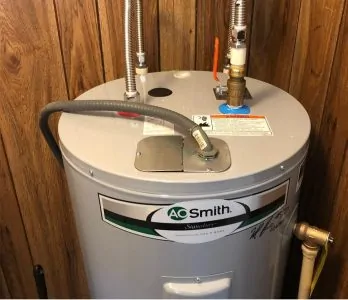
Leaks From the Top
If you notice water leaking from the top of your heater, there are a few possible causes. To find the culprit, start by turning off the electric supply to your water heater.
You shouldn’t turn off your water supply until you can find the source of the leak. To find the leak, here are a few simple tips.
- Dry the top of the water heater with a towel.
- Place a paper towel along the top to find the leak.
- Inspect the seals and pipes leading to the water heater.
- Once you find the leak, turn off your incoming water supply to prevent further damage.
Finding the source of the leak is your first task, but you also need to fix the issue. Here are the most common causes of tank top leaks and how to fix them.
1. Cold Water Inlet Valve
This is what allows cold water to flow into the heater. When it is turned off, it blocks the water flow. If you see water dripping from the top of your water heater, it’s probably an inlet valve leak.
To fix this issue, you might need to simply tighten the valve. This can be done easily using a wrench. If the issue persists, the part is probably damaged and needs replacing.
2. Pipe Fittings or Connections
In time, the fittings and connections around your unit can become loose or corroded. You can tell that it’s corroded if there’s a white substance in the area. Rust is also an obvious indicator.
If it’s loose, simply tighten up the connection causing the issue. However, if it’s corroded, you should replace the part.
To replace your pipe fittings, you should probably call a professional. However, if you’re confident, you can do it yourself by following these steps:
- Use a bucket to drain the hot water.
- Close your cold water shut-off valve.
- Turn on all hot water faucets in the house.
- Cut the pipe to remove the corroded connection.
- Use a pipe wrench to carefully remove the corroded part.
- Use Teflon tape to cover all the threads of your new connection piece.
- Connect the pieces and solder the connection points to prevent any leaks.
- Turn the water and power supplies back on.
3. Anode Rod Port
Anode rods are made of aluminum or magnesium and are used in water heaters to protect against corrosion. They will themselves corrode in time so they’re often referred to as “sacrificial anode rods” (3). As they will eventually corrode, they should be checked during regular maintenance.
If they aren’t replaced when you first notice corrosion, you will end up with a leak at the port where the rod sits. Fixing this issue is normally a simple case of replacing the rod. However, if you notice extensive corrosion, you may want to consult a professional.
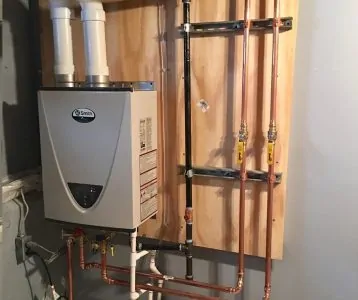
4. Expansion Tank
The main purpose of expansion tanks is to keep your water heater from bursting. They also help to maintain even pressure throughout your unit. Not all units have an expansion tank but they work similarly to a pressure relief valve.
They are designed to remove any excess hot water. When hot water expands and isn’t checked regularly, it can cause damage to your heating system. An expansion tank helps relieve that but if it has a leak, it can’t do its job properly.
If the leak is in the expansion tank, you will see it in one of three spots.
- The threaded connection: If this is the case, remove the expansion tank at the connection and apply thread sealer to the threads. Tighten the expansion tank again and the issue should be resolved.
- The air valve opposite the threaded connection: If the leak is here, you will need to call a professional to replace it.
- The actual tank: This is another situation that would require a professional.
Leaks From the Bottom
If you notice a leak from the bottom of the tank, your first task is to find the specific source of the leak. Here are some of the most common causes of bottom tank leaks.
1. Leaking Drain Valve
All water heaters will have a drain valve near the bottom of the unit. These are meant to assist in emptying the tank for removal or annual maintenance. It’s pretty easy to tell if this is where your leak is coming from because you will see dripping from the valve.
You may also find water around the spout. To fix this issue, turn the valve control clockwise to close it. If you’re still experiencing a leak, the entire valve probably needs to be replaced.
If you need to replace the valve and you don’t want to call a professional, there’s a simple process to do it.
- Connect the water hose to the tank and another external location.
- Turn off the tank’s water inlet. You can typically find this on the top of the water heater.
- Open the drain valve and let it empty.
- Once it’s empty, use a wrench to turn the valve counter-clockwise to remove it.
- Wrap the threads of the replacement part in plumbers tape.
- Screw in the new valve by hand until it’s tight.
- Use a wrench to tighten it more. We recommend a half turn or until you can’t tighten it anymore.
2. Leaking Pressure Relief Valve
The pressure relief valve is responsible for regulating your water pressure when the water gets too hot. This is an essential feature for safety, so it’s important to make sure it works properly.
The pressure relief valve is found on the top of your unit with a tube that channels water to the floor. You will know your pressure relief valve is leaking if there’s water on the floor beneath your tank.
In this case, check the thermostat and make sure it isn’t set too high. If the temperature is normal, you will need to replace the valve. You can do this yourself by following these steps (4).
- Turn off the power supply.
- Close the cold water shut-off valve.
- Open the bottom valve and the pressure relief valve for one minute to drain the area.
- Remove the overflow pipe from the pressure relief valve.
- Use a pipe wrench to unscrew the old valve.
- Wrap Teflon tape around the threads to prevent leaks and rust on the new valve.
- Reattach the pipe to the new valve.
- Open the cold water shut-off valve and check for any more leaks.
3. Leaking Tank
A leaking tank poses the biggest problem because it probably means you will need to replace the entire unit. If you don’t take care of your water heater tank, salt and other build-ups can cause the tank to corrode. This can then cause pinhole leaks in your unit (5).
The leak will start small but the amount of pressure on the hole will make it worse in time. If you have noticed these leaks, you will need to replace the entire water heater.
We recommend hiring a professional to do this. However, if you need to save money, it’s possible to do it yourself. Here’s how:
- Remove the plumbing connected to the heater.
- Disconnect the power from the access panel.
- If your water heater uses gas, make sure to turn off the gas supply to your unit.
- Disconnect the gas line from your unit.
- Replace the unit and reconnect the pipes and power.
4. Condensation
Condensation is another common issue with water heaters. Your boiler location should not be too cool and be well ventilated to prevent condensation from occurring.
If your water heater is old, condensation is more common. However, it can also occur with newer models if the insulation is damaged or the thermostat is set too high.
Here’s what to do if you see condensation:
- Let the unit sit idle with the power and gas shut off for a few hours.
- If the water stops, it’s condensation. Simply lower the thermostat and turn the power back on.
- If the issue doesn’t resolve, you might need to replace the unit with something better insulated.
Condensation can also occur briefly when a new unit is installed. If the water filling the tank hasn’t had a chance to heat up yet, give it time to catch up.
FAQs

Why Is My Water Heater Leaking?
There is no universal answer for why your water heater is leaking. Before you can find a specific answer, it’s important to determine whether it is your heater itself that is leaking or the connections and pipes around it. Hopefully, it is the connections or pipes, as these are usually easy fixes and often only require tightening a connection. If it is your tank itself, this is more serious and might require a complete replacement.

Can I Use My Hot Water Heater if It Is Leaking?
In most cases, there is no reason you can’t continue to use hot water when your heater is leaking. If, for example, the issue is being caused by a leaking pipe but you can’t get a replacement for a couple of days, you can simply wrap the pipe with a towel and continue heating your home. If the leak is severe and you can live without the heating, it might be best to turn off the heater and close any shut-off valves.

How Long Will a Water Heater Last After It Starts Leaking?
This depends on whether the issue is with your pipes and connections or the heater itself. If your leak is caused by a loose connection and you tighten it, there is no reason to worry about the heater itself. If leaks are coming from the water heater unit, it could be a sign that the heater is breaking down and nearing the end of its lifespan. When this occurs, you might need to start looking for a new heater unless it is still protected by its warranty.

Will a Leaking Water Heater Explode?
Yes, leaks might indicate that your water heater is about to explode due to excessive pressure build-up.
If the pressure inside the tank reaches extraordinarily high levels, the pressure relief valve opens, allowing water to escape while simultaneously reducing the pressure inside the tank.
Should the valve leak, it indicates an excessive amount of pressure or heat inside the tank. Either option poses a risk because it can result in an explosion.

Can a Leaking Hot Water Heater be Repaired?
A leaking water heater can be repaired if the leak doesn’t come straight from the tank. Depending on the leak’s location, the problem can be fixed rather than the tank having to be discarded.
Sometimes it is evident where the leak is coming from, but other times a puddle of water will appear some distance away from where the leak is happening. Before determining whether to replace the heater or attempt to repair the problem, it is important to locate the cause of the leak.

How Much Does It Cost to Fix a Leaking Water Heater?
The average cost to repair a leaking water heater is $501. The actual cost depends on the problem that needs to be fixed. For pipe leakages, you can expect to pay between $55 and $350.
If the leak in question is caused by mineral deposits, it should cost you between $150 and $450. For a broken ignitor, you can expect to pay between $175 and $485.
Conclusion
It’s important to perform annual maintenance on your water heater. This helps you prevent issues from occurring and means you can quickly address any that do.
At the first sign of your water heater leaking, identify the source and fix the issue. In most cases, you should only need to tighten a valve or connection. However, if you notice corrosion, some parts may need to be replaced.
Sometimes it will be a problem that you can’t resolve yourself. In these cases, whatever the cost, it’s best to consult a professional. The last thing you want to do is make the problem any worse.