Your gas control valve is one of the most crucial elements of your gas water heater. So, when it malfunctions, it can cause the entire system to shut down, which means no hot water.
Knowing how to replace a water heater gas control valve is essential if you want to keep the hot water flowing. We explain what a gas control valve does and how to troubleshoot problems.
Key Takeaways
- Gas control valves manage the pilot flame and gas flow in water heaters.
- Check the thermostat, heat limiter, and gas burner before replacing the gas valve.
- To replace a gas control valve, shut off gas and water supplies, drain the tank, and install a new valve.
- Do not attempt to repair a gas control valve; always replace it for safety reasons.
How Does a Gas Control Valve Work?
Before we get into the details of water heater gas valve replacement, we must first understand what the valve does and how it works. We’ve included a diagram to show you where the control valve is located on your water heater.
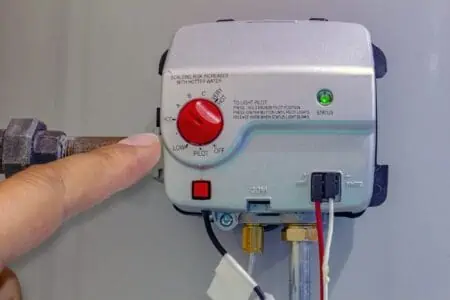
The gas supply pipe attaches to the gas valve, which controls the pilot flame. Inside the gas valve is a thermostat probe that senses the water temperature inside the tank. When you set the thermostat dial to the required setting, it tells the gas valve to open.
When the gas starts flowing, it ignites via the pilot light, and the water begins to heat. The pilot light heats the thermocouple, telling the gas valve to keep the supply coming. If the pilot light goes out, the unit shuts down the gas supply for safety.
Water Heater Gas Control Valve Troubleshooting
How do you check to see if your gas control valve is faulty? After all, it could be an issue with something else. Your thermostat, heat limiter, or gas burner is more likely to be the culprit.
It’s always a good idea to inspect the other components before replacing your gas valve because they rarely fail. It is more likely to be a faulty thermocouple telling the shut-off valve to cut the supply.
Another tell-tale sign is no hot water or not enough hot water. If the gas pilot light keeps going out, the thermocouple can’t heat and tells the valve to cut the gas supply. This may indicate a thermostat issue.
It’s cheaper and easier to replace a thermostat than a gas control valve. Likewise, you may need to replace one or both heating elements inside the hot water tank. Models like these Rheem elements are readily available and affordable.
If you’ve checked all possible causes and your water heater is still playing up, you will need to check the gas control valve. Push the pilot ignition to see if the button is operational. Sometimes they get stuck.
The same may be true of the thermostat dial on the front of the control panel.
Safety First
No matter what the issue with the gas control valve, don’t attempt to repair it. Swap it for a new one to be on the safe side, because you cannot mess around with gas.
How to Replace a Water Heater Gas Control Valve
So, you finally lost patience with your water heater, and today is the day it gets what it deserves. Before we get into the details, let’s list the necessary tools and supplies.
What You’ll Need
- Adjustable wrench.
- Pliers.
- Teflon tape.
- New gas control valve.
Removing the Old Valve
Before you can replace the valve, you’ll need to get the old one off. When ordering the new one, it’s always a good idea to take the old one with you. That way, you get a perfect match.
Alternatively, look on manufacturer websites for official parts. Companies like Whirlpool, GE, and Honeywell keep extensive stocks of spares that you can purchase.
1. Cut Off the Gas Supply
Cutting the gas supply is the most vital part of the entire process. Gas is highly flammable and poisonous, posing a health and fire risk. Turn the thermostat to the off position, and turn the gas supply valve so the lever is perpendicular (90 degrees).
Safety Note
Your nose is the best tool for smelling gas. If you smell rotten eggs or sulfur, you may have a gas leak and need to call the professional immediately.
2. Shut Off the Water Supply
Locate the water supply inlet and the valve. Flip the lever down by 90 degrees to shut the supply.
3. Drain the Water Tank
You cannot replace the gas valve without emptying the water tank. Open the nearest hot water faucet to empty the tank. Alternatively, attach a section of hosepipe to the drain valve and empty the tank.
4. Remove the Old Gas Valve
Start by disconnecting the pilot and thermal fuse wires. Grab the adjustable wrench and carefully unscrew the valve from the heater. You will need to hold the pipework still using a second adjustable wrench or pliers while you apply pressure.
This WORKPRO set comes with four wrenches, giving you plenty of choices.
Take Note
Don’t overtighten the wrench because you risk damaging the pipework, which could lead to a gas leak.
Installing the New Valve
Installing the new valve is a pretty simple process. The main thing is to ensure that the threads are secure and sealed.
1. Seal the Connections
Wrap the connecting threads in Teflon tape or another authorized sealant. Like this Dixon Industrial Sealant, Teflon tape sits around the thread to grip and seal against gas leaks.
Top Tip
Wind the tape in the same direction as the threads to ensure that it doesn’t unravel when you screw it on.
2. Attach the New Valve
Insert the new valve inlet and tighten it by hand. Finally, use the adjustable wrench to give the valve a couple of extra turns to secure the connection. Now, reattach the pilot and thermal fuse wires.
3. Fill the Tank
Ensure that the hot water faucets are turned off. Turn the water supply back on and wait while the tank fills. This may take a little while.
4. Turn On the Gas
Twist the gas supply valve lever back to the on position, and ignite the pilot light. You are now ready to heat the water in the tank.
Can a Gas Control Valve be Repaired?
The consensus is that you should not repair a gas control valve. They play such a vital role in keeping your water heater working efficiently and safely that you can’t afford to take chances.
Either call the professionals to deal with the problem or replace it following the instructions above.
How Difficult Is it to Replace a Water Heater Gas Valve?
Replacing your water heater’s gas control valve is simple enough if you follow the instructions carefully. The most significant risk involves gas leaks or failing to take safety seriously, like forgetting to cut the gas supply.
Playing around with gas is no joke. It should be treated with caution and respect. You should always consult a professional if you doubt your skills or confidence.
FAQs

How Much is a Gas Control Valve for a Water Heater?
Replacing your gas control regulator comes at a cost. You can buy them from hardware stores and online, like this Reliance model, but expect to pay between $80 and $200.

How Long Does It Take to Replace a Gas Valve on a Water Heater?
It will take you an average of one and a half hours to replace a gas control valve. Remember that you must drain the tank and shut off the gas supply first.

What Causes Gas Valve Failure?
Thermocouple failure is one of the most common causes of gas valve faults. If the pilot light goes out, the thermocouple signals to the gas valve to cut the gas supply.

How Long Do Gas Valves Last?
Gas valves are ultra-reliable and rarely go wrong. They can last up to 25 years, processing over 100,000 cycles in their lifespan. It’s why you should investigate other components when a malfunction develops with your water heater.

Are Water Heater Gas Valves Interchangeable?
You cannot interchange gas valves on natural and propane water heaters. Check the manufacturer’s recommendations when ordering your new valve to ensure it is compatible with your water heater.
Take Back Control
The next time your shower runs cold or you get lukewarm water from the faucets, explore the possible causes. Once you’ve exhausted all other avenues, the signs point toward a faulty gas valve.
Luckily, they are readily available and can be replaced in under two hours. So, if you’re comfortable about proceeding yourself, you’ve got this covered.