If you have recently noticed that your electric water heater is working less effectively than before, there are several possible causes. These issues include sediment buildup, the most common problem with water heaters.
However, your heater’s effectiveness and efficiency can also be significantly impacted by a worn-out or broken heating element. This is something that affects most electric heaters at some point but the element will need to be replaced.
Thankfully, it’s relatively easy to replace a water heater element. In this article, we will explain how to replace a heating element in a water heater and save money by ensuring your heater returns to perfect working order.
Key Takeaways
- Common water heater issues: Sediment buildup, power surges, air pockets, and worn-out heating elements can affect your electric water heater’s performance.
- Heating element lifespan: Low wattage elements generally last longer, and regular maintenance can extend their lifespan. Elements will eventually burn out, like lightbulbs.
- Replacing a water heater element: Ensure the power is off, drain the tank, remove the old element, install the new element, refill the tank, and reconnect the wires.
- Cost of a new element: A water heater element replacement typically costs around $150 to $200, much less than replacing the entire unit.
How Heating Elements Work
Electric water heaters use electric heating elements, whereas gas-powered units have gas burners. Most elements are made of steel wire with copper casing, and they are heated as an electrical current passes through them.
Elements will generally be heated to two degrees warmer than the water, to keep it at the chosen temperature. Each element is controlled by a thermostat.
There are normally two heating elements in a tank: the upper and lower. The lower element is the one that does most of the work, heating the water as it enters the tank. The upper element is only required when demand is high.
Electric water heaters tend to be less energy efficient than gas-powered units and take a little longer to heat. There is also a significant amount of standby heat loss, though improved insulation technology has reduced this on modern heaters.
When buying a new electric water heater, look for its thermal resistance rating (R-value). A high R-value means less standby heat loss. Models with an R-value between R-12 and R-25 are recommended by experts (1).
The cost of running an electric water heater is also usually greater than gas units, due to higher electrical bills compared to natural gas.
What Causes Water Heater Elements to Stop Working?
There are several issues that can impede a water heater element. Some can be fixed by cleaning, but others will require a replacement.
1. Mineral Buildup
Depending on the quality of your local water, it could have a significant amount of minerals in it, usually calcium or magnesium. Water with higher mineral content is known as “hard water” (2).
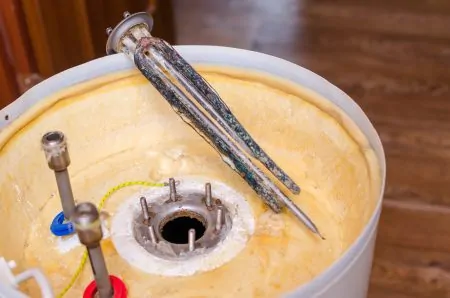
The minerals won’t harm you or your family but they can damage your water heater. As the cold water is heated, the minerals dissolve and settle inside the tank. They also settle around the heating elements, primarily affecting the lower ones.
When sediment gathers around the element, it insulates it, forcing it to work harder. This can cause the element to burn out or simply stop working. Regular flushing of the tank can get rid of sediment and other buildup.
2. Power Surge
Heating elements have a specific voltage rating. If the voltage exceeds this rating, the element will likely burn out. This can happen when there’s a power surge from your electrical supplier, or even during lightning storms.
3. Air
As the water heater heats the water, air pockets sometimes occur. They can also occur if the tank is not filled properly.
A water heater element can burn through its copper casing in less than a minute if it isn’t immersed in water. If there are large air pockets at the top of the tank, the upper heating element will be exposed. As it tries to heat, it will quickly burn through its casing, resulting in the element failing.
4. Wires
Heavy gauge wires deliver electricity to the heating elements. If the connection is bad or damaged, it can cause problems. For example, a wire can come loose from the terminal — this will stop the element from working.
It can also result in arcing or allowing a wire to ground through the metal tank, which is very dangerous.
5. Dry-Fire
Water heater elements are designed to heat while submerged in water. If the tank is empty or only contains a small amount of water, the elements can dry-fire. As mentioned previously, the elements will burn through their casing.
A dry-fired element can fail within 30 seconds. Dry-fire happens most frequently in newer models.
How Long Do Heating Elements Last?
It’s difficult to determine exactly how long water heater elements will last. It largely depends on how well the unit is maintained. Remember, heating elements have to work around the clock to heat the water.
Low wattage heating elements generally last longer than high wattage ones, because the heat is spread over a greater surface area (3).
Regular flushing and other maintenance can help to extend the lifespan of the water heater and its elements. Keep in mind that heating elements are similar to lightbulbs; they will inevitably burn out at some point.
How Can You Tell If a Heating Element Is Bad?
If you suddenly receive no hot water, it’s likely due to the elements. The lower heating element usually burns out first. To determine what exactly is causing the issue, you first need to know how to test a water heater element.
Turn off the power by either unplugging the unit from the wall or turning it off at the circuit breaker. Remove the wires connected to the element and push them aside. Unscrew the hardware using a screwdriver, then slip the wires out and bend them out of the way.
Set your multimeter to measure ohms (resistance), and set it to the lowest reading scale. Using the multimeter, touch a probe to each screw on the element. If there is no reading or a maximum reading, the element is bad (4).
A reading of 10 to 16 ohms is normal. Check the wattage of your element on the plastic block located between the two screws.
To discover if the element has shorted out, touch one probe to a screw and another to the bare metal tank. If you get any reading or notice any movement of the needle, the element has shorted out. You can check each screw on both elements using this method (5).
Warning
How to Replace a Water Heater Element
You shouldn’t encounter too many problems when trying to change a hot water heater element. There are two main types of elements: flange and screw-in. Screw-in is the most common. They are also fairly easy to attach but you will need a water heater element wrench.
1. Turn the Power Off
As you’re dealing with an electrical appliance, it’s critical you turn the power off before doing anything else. Cut off the power supply at the circuit breaker. If you’re still unsure whether or not the power is off, you can use a multimeter to check the wires.
2. Drain the Tank
Make sure you first shut off the cold water valve located at the top of the unit. You can then attach a garden hose to the drain at the bottom and open the drain valve. To drain the tank completely, turn on the hot tap closest to the heater.
You can drain the tank just enough to expose the broken element without draining it completely, or you can empty it to get rid of any sediment. Many experts recommend flushing the tank whenever you perform a repair.
3. Remove the Water Heater Element
Open the access panel and remove the plastic safety cover, if your unit has one. Disconnect the element wires — you can do this to both elements to save time.
If your heating elements are the screw-in type, you need to use the specialized water heater element wrench. An element tool is a socket that fits the hexagonal end of the element. It has holes on both sides where you can insert a screwdriver shaft.
This makes it easy to unscrew the element as you turn it counter-clockwise. Older elements may be more difficult to turn. Once the element is loose, lift it out of the tank.
If your unit uses flange-type elements, you will have to unscrew four bolts to get it loose. Once the bolts are loose, lift the element out.
4. Replace the Element
When you replace a water heater element, it’s important to also replace the rubber gasket. This will prevent future leaks.
The rubber gasket is placed over the threads in a screw-in element and placed around the base of a flange.
Once the rubber gasket is in place, you can install the element. First, fit it straight into the tank and hand tighten it. Then, use the tool to screw it in place going clockwise. In a flange type, secure the four bolts.
5. Refill the Tank
Start by turning off the drain valve at the bottom of the tank. Then, turn on the cold water inlet valve to allow new, fresh water to enter the tank.
If you’re worried about air in the tank, leave the faucet running. It will sputter as the tank fills, but once you get a regular flow the tank should be air-free. When you see a good flow, turn off the faucet.
6. Reconnect
Before you can turn on the unit, you need to reconnect the wires. Turn on the circuit breaker and inspect the tank for any leaks. Once everything looks good, reattach the safety cover and access panel.
Be Careful
Let the water heater stand for about an hour to heat the water. Check to make sure it’s heating properly, and again, check for leaks. Contact your local plumber if you experience any difficulties.
How Do You Get a Stuck Water Heater Element Out?
Removing a water heater element shouldn’t be too difficult, but they can get stuck. This is usually due to heavy sediment buildup.
You can use a descaling or de-liming solution to scrub the area around the element. We recommend using an old toothbrush because of its size. Gently move the wires out of the way before starting.
You can also use white vinegar and water to scrub the element loose. If it still won’t loosen, you can try soaking it in the solution. Use the wrench tool to further loosen it. If it’s stubborn, you might need to use a hammer to tap the handle of the socket.
How Much Is a New Water Heater Element?
When you first notice a decrease in hot water, you might think that it’s time to replace the entire unit. However, if the problem is due to a burnt-out element, it can easily be fixed.
A water heater element replacement cost is usually around $150 to $200, which is a fraction of the cost of a new water heater.
Choosing to replace a water heater element can also save you money on labor as you won’t need to hire a plumber.
FAQs

Do You Need To Drain a Water Heater To Change the Element?
You only need to drain a water heater enough to expose the element you want to replace. This means you won’t need to drain it much to replace the upper element but will need to drain it far more to expose the lower element. Although you don’t need to drain it to replace the element, it does provide a good opportunity to drain the tank completely and remove any sediment, so it’s worth doing as part of your repairs.

What Causes a Heating Element To Burn Out in a Water Heater?
A water heater element can burn out for several reasons. The most common of these is that the element has been covered with sediment and is being forced to work harder to heat the water. If the element is not submerged in water and tries to function, it can also burn itself out. Electrical surges and lightning storms can overload the elements. Ultimately, every element will eventually fail, so it could simply be wear and tear.

Are Upper and Lower Water Heater Elements the Same?
The upper and lower elements in a water heater are identical and perform the same task. The only difference is that the lower element is required to do more work as it performs the majority of the heating. There is no difference in the elements themselves, so you don’t need to worry about that aspect when buying a replacement. You should try to buy the same elements that are already in your heater, however, as elements, in general, are not interchangeable.

Is It Worth Replacing a Water Heater Element?
It’s worth replacing your water heater element because it will boost your water heater’s energy efficiency, allowing you to reduce your monthly expenses.

How Often Should Water Heater Elements be Replaced?
You should replace your water heater elements if they are older than 6 years. The average lifespan of a water heater is between 6 and 10 years; consequently, if your heater is older than this, you should anticipate that it will start having problems sooner rather than later.

Can You Replace a Water Heater Element Yourself?
It’s possible to replace a water heater element by yourself if you’re a handy person. The steps are pretty straightforward:
- Disconnect all power sources from the heater.
- Connect a hose to the drain valve.
- Disconnect the water supply.
- Gain access to the heater element by removing the access panel cover.
- Remove the heating element and put in the new one.
- Refill the tank, and you’re good to go!

Will a Water Heater Work With One Element?
The water heater can work with just one element, but it will be less efficient. It might not cover the water heating needs of your entire household.

Should You Replace Both Water Heater Elements At the Same Time?
You should only replace the water heater element that’s damaged. However, if both elements have been put in at the same time, it could be a good idea to replace them with new ones at the same time.