Table saws are among the most popular power tools in the world today. They are commonly used by carpenters and other woodworkers but they can also be used for other tasks if you have the right blade and enough cutting power.
These tools provide powerful, accurate cutting and they are straightforward to use. However, if you have never used a table saw before or it has been a while since you last did it, you might need some advice.
In this article, we will explain how to use a table saw. This includes learning the different parts of the saw, the various cuts you can make, and the safety precautions you need to take.
Key Takeaways
- Familiarize yourself with table saw parts, such as the base, table, blade, rip fence, miter gauge, and blade guard.
- Choose the appropriate blade for the material you’re cutting and the type of cut (crosscut, rip cut, or dado cut) you want to make.
- Always wear safety goggles and a face mask to protect against dust and debris, and use push sticks to keep your hands away from the blade.
- Follow safety precautions, such as unplugging the saw or removing the battery before changing the blade and maintaining proper body position while cutting.
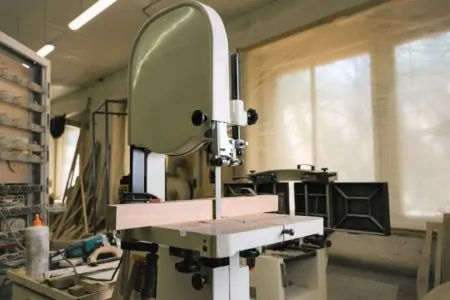
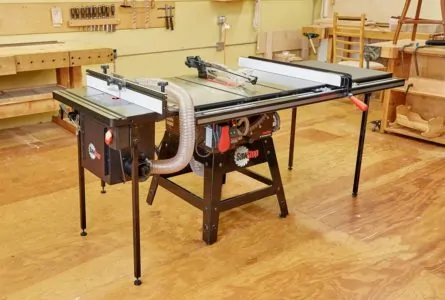
Parts of a Table Saw
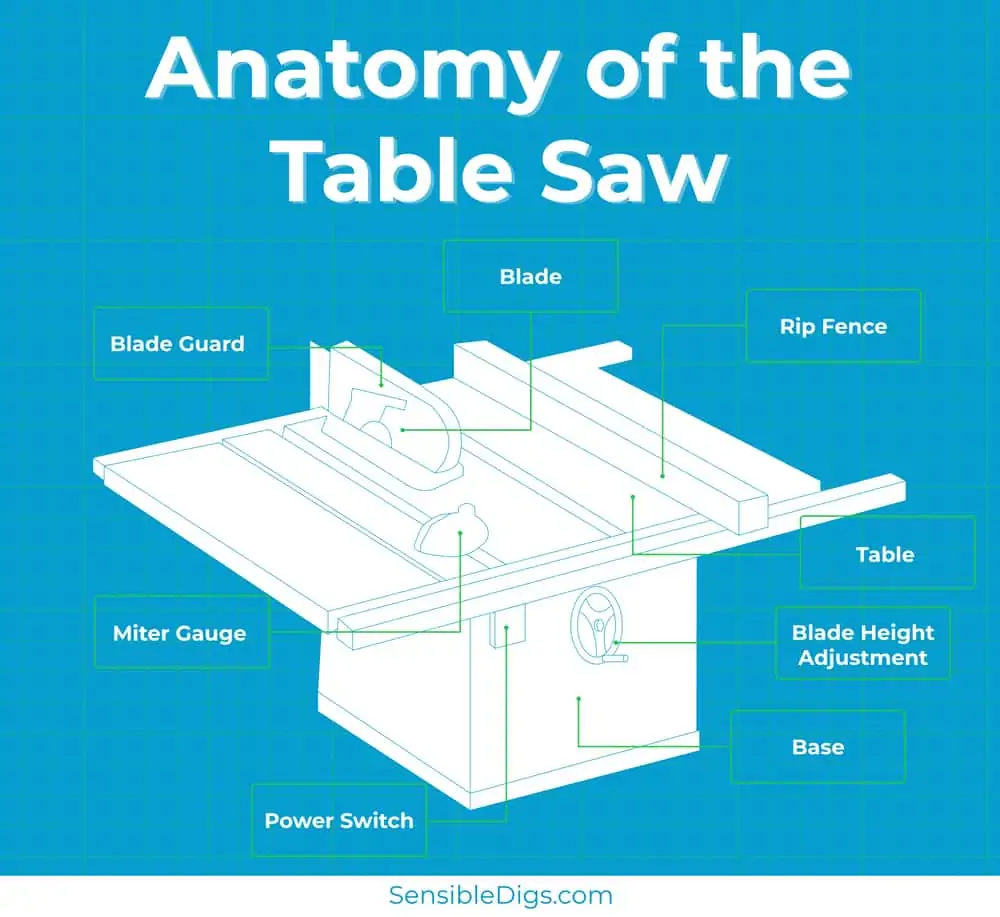
Learning how to use a table saw includes familiarizing yourself with each of its parts and what they do.
Base
The base supports the saw’s table and will either be mounted on legs to provide stability or, if it is a cabinet table saw, the base itself will reach the floor. The base contains the saw’s motor and other inner workings, so it is important that it is strong and sturdy. Some models will also have a dust extractor to keep your workspace cleaner and safer.
Table
The table is a smooth, flat surface with an opening that the saw’s blade protrudes through. On larger models, the table is usually made of cast iron or steel, making the saw very heavy. A cast iron table provides greater strength and stability, and reduces vibrations during use, which will make the saw quieter and more accurate.
Smaller models often have aluminum tables. Your table should have a surface area of at least 3 feet by 3 feet, but some tables have extenders that temporarily enlarge them, which is ideal for smaller workshops.
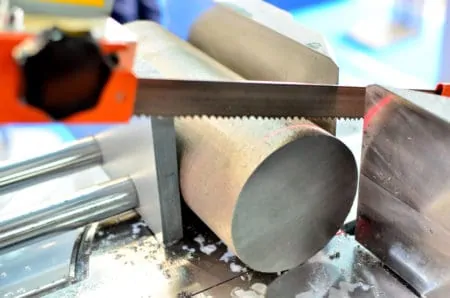
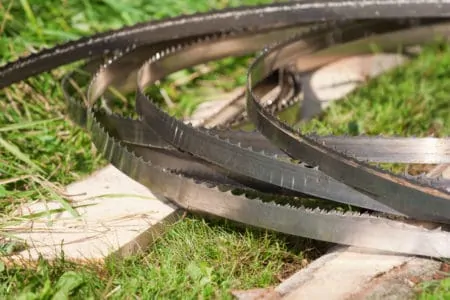
Blade
A table saw blade sits in the middle of the unit’s table, protruding through a slot. On most table saws, the blade can be angled to make 45 and 90-degree cuts. These blades are available in various designs and are typically 10 or 12 inches in diameter.
Before making a cut, you should determine whether or not your blade will be suitable for the material you are cutting and how you want to cut it. The most important aspects of this are the blade’s kerf and teeth per inch.
The kerf refers to the thickness of the blade and how much material it removes as it cuts. Consult your owner’s manual to see what kerf your table saw can accommodate. Saws with less powerful motors will struggle with the demands of thick kerf blades and could burn out.
The teeth per inch (TPI) is the blade’s tooth density of the blade and tells you which tasks and materials they are suitable for. If a blade has fewer teeth, it is better at cutting softer materials such as hardwood and making rip cuts, while a high TPI blade is better at cutting hard metals, veneers, and plywood.
Here is a quick reference chart:
| Blade Type | TPI | Total Teeth | Suitable For |
| Coarse | 3 to 8 | 40 to 60 | Lumber, hardwood, softwood, MDF |
| Medium | 8 to 18 | 60 to 80 | Lumber, hardwood, softwood, MDF, plyboard, sheet metals |
| Fine | 18 to 32 | 80 to 120 | Plyboard, frames, sheet material, non-ferrous metal |
Quick Tip
Rip Fence
A rip fence holds your stock in place when making rip cuts. It needs to be sturdy, easy to adjust, and lock into place once it is positioned correctly. If you want to make long rip cuts, look for a fence with a capacity of between 30 and 50 inches.
Miter Gauge
Making accurate angled cuts would be impossible without a miter gauge. The miter enables you to adjust your cutting angle between 45 and 90 degrees. This is ideal for cutting door and window frames as well as moldings.
Blade Guard
A blade guard covers the blade and prevents your hands from coming into contact with it. When the material you are cutting approaches the blade, the guard is raised to allow you to make your cut.
On/Off Switch
Every power tool has an on/off switch but table saw switches differ from other types. They are usually large paddle or bump switches with unique designs. These switches are primarily safety devices and immediately shut down the saw in case of an emergency. They are bright red and designed to be very obvious, but you should still familiarize yourself with the switch’s location before using the saw.

Common Table Saw Cuts
Table saws are surprisingly versatile tools and can make various cuts. Rather than list them all, let’s take a closer look at some of the most common cuts you are likely to need.
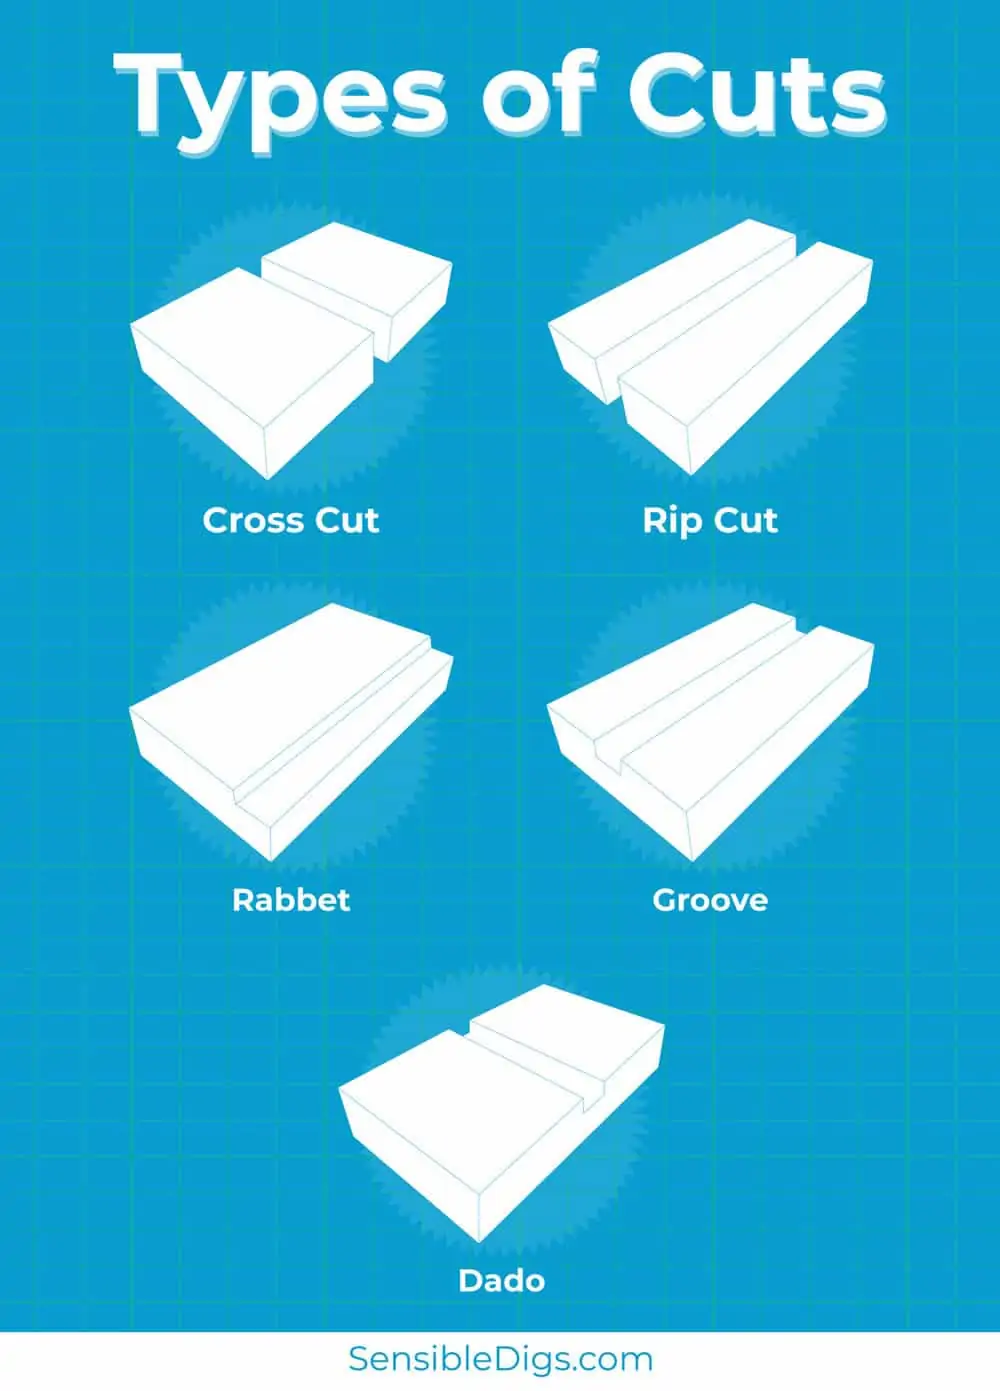
Crosscut
Cross-cutting refers to slicing the wood across the grain. This term is also used when cutting across any piece of material to shorten it to a specific length.
Rip Cut
Rip cutting is when you make a cut along the grain of a piece of wood, rather than across it. Rip cuts are used to make a piece of material narrower.
Dado Cut
A dado is a slot or trench cut across the material for use in joints. It differs from a groove cut, which follows the grain of the wood.
How to Make Cross Cuts Using a Table Saw
Before making a crosscut, you will need to remove the rip fence. If your stock presses against the fence, it will increase the risk of a kickback, which could be dangerous.
Before proceeding, make sure you are properly protected. Table saws can launch debris and release a lot of sawdust, so you should always wear an N95 face mask and safety goggles to protect your lungs and eyes.
1. Choose the Right Blade
Unplug the table saw and install a blade suitable for crosscutting. To do this, use the arbor wrench to loosen the locking nut. Slide the new blade onto the saw, making sure the teeth are facing forward as the blade will spin toward you.
Tighten the arbor nut so it is snug. Make sure the blade protrudes no more than a quarter-inch above the top of the stock you are cutting.
Top Tip
2. Adjust the Miter Gauge
Set the protractor on the miter gauge to make straight or mitered cuts.
3. Position the Material
Place your stock against the miter fence. Use clamps if necessary to hold the material in place firmly.
4. Power On
Make sure you are wearing your safety gear, then plug in your table saw and switch it on. Always wait for the blade to spin at full speed before pressing the material against it, as this will provide a smoother cut.
5. Make the Cut
Slide the miter gauge and material toward the blade by applying consistent pressure. Always move slowly and allow the stock to make a full pass of the blade to cut it.
6. Power Off
Turn the saw off and wait for the blade to stop completely before attempting to move any pieces of material or debris near the blade.
Top Tip
How to Make Rip Cuts Using a Table Saw
When making rip cuts, it is important to use the rip fence to guide you. Never make these cuts freehand as your accuracy will be reduced, the finish will be rougher, and you will put your hands in harm’s way.
1. Choose the Right Blade
Like any cut, it is important to use the right blade for the stock and your saw. For softer materials, use a lower TPI, and use a higher TPI blade for harder ones.
2. Fit the Rip Fence
If you have removed your rip fence, place it back on the table and use a tape measure to get an accurate width. You can use the ruler on the table saw, but you will usually get a more accurate reading with a tape measure.
Place the tape measure’s tip against the nearest edge of the blade and measure up to the stock. Saw blade teeth alternate left and right, so measuring to the nearest edge will account for the kerf.
3. Power Up
Turn on the saw and wait for the blade to reach full speed. If you press the stock against the blade as it gathers pace, it will likely cause a kickback. Put on your safety goggles and mask, then position the wood against the rip fence.
4. Make the Cut
Slowly but steadily push the stock toward the blade. Make sure the material stays snug against the rip fence at all times or your cut will be inaccurate. Use both hands on the material if necessary but keep them away from the blade and never lean over the saw.
If you are cutting larger pieces of material and they hang off the edge of the table, use either a table saw extension or an outfeed table to provide support and prevent them from breaking.
If you don’t have either of these items, you might need to simply ask a helper to hold the stock as you cut it.
Warning
5. Power Off
Switch off the saw and wait for the blade to stop spinning before removing any offcuts from the table’s surface.
How to Make Dado Cuts Using a Table Saw
Dado blades are thicker than standard blades, so you will need to remove the blade guard before you can use them to make cuts.
1. Choose the Right Blade
Remove the current blade by loosening the arbor nut, then replace it with a dado blade and retighten the nut. You might also need to swap the existing table insert for one that will accommodate a dado blade.
2. Set Up the Rip Fence
Adjust the rip fence until it is the required distance from the blade. You should use a tape measure when you do this as it will give you the most accurate results.
3. Power Up
Put on your safety gear and activate the saw. Make sure the blade is spinning at the set speed before you start cutting. Place your workpiece firmly against the rip fence and ensure it is flat on the table’s surface. Apply steady pressure to the material as you move it through the blade.
Quick Tip
4. Adjust the Rip Fence
To make the dado wider, move the rip fence by a quarter-inch. Then, pass the stock across the blade a second time, making sure the wood is in contact with the fence. Once the dado is at your required width, turn the saw off.
Table Saw Safety Tips
Table saws are among the more dangerous workshop power tools, due to their exposed blades and powerful motors. However, there are some precautions you can take to improve your safety when using them.
Use Push Sticks
Push sticks are designed to apply pressure to the stock as you move it through the blade while keeping your hands at a safe distance from the cutting edge. Push sticks also reduce the likelihood of kickbacks by helping you keep the material pressed down onto the table’s surface.
Adopt the Stance
Make sure your shoes have a secure grip on the floor and try to center your balance. Rest slightly more of your weight on your front foot and plant your back foot firmly on the ground. This will help you stay balanced and prevent you from stumbling. Don’t stand over the blade as this will put you at risk of falling forward onto it.
Wear Appropriate Clothing
Don’t wear loose or baggy clothes. T-shirts or sleeveless shirts are the safest options as you won’t need to worry about them getting caught on the blade and potentially yanking your arm toward it. This is one of the most important safety steps you can take when using a table saw.
Keep the Saw Clean
Sawdust can gum up your table saw, especially wood sawdust with high resin content such as oak and cherry. This resin can get into your saw’s inner mechanisms and cause numerous issues. Always use your saw’s dust extraction port if it has one, or use a dustpan and brush to remove away any shavings.
Wipe Down the Table
Kickbacks are among the main hazards associated with table saws, jerking your stock back and potentially causing injury. Keeping the table smooth and free from debris will help prevent the stock from binding and kickbacks occurring, so wipe it down and lubricate it.
Don’t Wear Gloves
Loose-fitting gloves pose the same risks as baggy clothes. They also reduce your control over the stock as it moves through the blade. It is usually better to go without gloves when using a table saw. If you want to protect your hands, you can use push sticks instead, which will help you control the material while maintaining a safe distance.
FAQs

Are Table Saws Worth It?
Yes, absolutely. Table saws are a worthy tool for all woodworking projects. They’re a bit of an investment but well worth it for personal use and professional carpentry and construction. Not only do they offer precise cutting capabilities, but they also give you the ability to make beveled edges, cut grooves, and more.
With the right accessories, like push sticks or push blocks, a table saw can become even more versatile and efficient.

Which Way Do You Push Wood Through a Table Saw?
Generally, when feeding wood through a table saw, it is best to always push the material forward with the grain.
Feeding the wood in this direction helps the blade to cut cleanly and evenly, resulting in better results overall. Always use an appropriate push stick or block for safety when pushing wood through a table saw.
Never force the material through the saw, as this could cause kickback, injuring you. Ensure that you have a firm grip on the material and your push device while feeding your workpiece.

Should the Fence Always be Used on a Table Saw?
The fence on a table saw should always be used when making a rip cut, as the fence helps to support and guide the wood. It ensures that the blade remains at a consistent depth and angle for each cut.
This helps minimize kickback and provides maximum accuracy when cutting. When using the fence, ensure it is parallel to the blade and fastened tightly before you begin your cuts.
It also may help to use an auxiliary fence with a micro-adjustment mechanism if you need even more precision.
Never attempt any type of rip cut without the fence in place; this could lead to dangerous kickbacks or poor-quality results.

How Do You Stop a Kickback on a Table Saw?
The kickback is one of the primary risks when using a table saw, but there are things to help prevent it. First and foremost, ensure you are positioned correctly; never stand directly behind the blade, and always keep your hands far away.
Ensure the saw blade is sharp and doesn’t have chips or breakages. Also, ensure that your fence is securely aligned to the blade before beginning a cut.
Lastly, if possible, use a push stick or block to move material through the saw instead of your hands, as this will help keep them out of harm’s way.
A riveting knife can help support the workpiece while making a cut but should not be used as an alternative to a standard push device, as doing so can cause kickback and injury.

What Should You Not Cut on a Table Saw?
A table saw is an incredibly useful tool for cutting wood, but certain things should never be cut on a table saw.
For example, metal of any kind should not be placed on the blade as this can cause sparks, damage to the blade, or even personal injury. You need special blades if you want to cut metal with a table saw.
Plastics, composites, and any material painted or treated with a chemical may cause damage to the blade and should be avoided.
Always keep fingers and hands away from the blade; if you need to push material through the saw, use a block or stick instead. Following these simple rules will help ensure you remain safe and productive when using your table saw.

What Types of Injuries are Commonly Caused By Table Saws?
Lacerations are the most common type of injuries caused by table saw blades. To help prevent such injuries, ensure your guard is properly in place and adjusted before beginning a cut, and always keep limbs away from the blade.
It’s important to work slowly and methodically: if something isn’t going right, stop and figure out what is causing it.
Lastly, always be aware of your body position so you can take action if needed to avoid contact with the blade. These precautions will help protect yourself and those around you using a table saw.