Furniture ages over time, just like everything else. Dressers and tables are the worst culprits, fading in direct sunlight and bearing the scars of everyday life. Scratches, bumps, and scrapes are commonplace within the home.
Knowing how to refinish a dresser or refinish a table is crucial if you want your furniture to stay looking its best.
Key Takeaways
- Signs your furniture needs refinishing: flaking/chipped finish, sticky surface after cleaning, watermarks/cloudy spots, and discoloration.
- Tools needed: dish soap, sponge, towels, tack cloth, paint stripper, paintbrush, power sander, sandpaper, paint scraper, epoxy putty, putty knife, wood sealant, facemask, and protective gloves.
- Steps to refinish: clean the furniture thoroughly, sand the surface, use paint stripper if necessary, fix blemishes and cracks, and finish with oil, stain, or varnish.
- Consider the condition and use of the furniture when deciding between staining and painting, as both methods have their pros and cons.
How To Know When To Refinish Your Furniture
There are tell-tale signs that your furniture needs refinishing. Here are some pointers to help you decide.
Is the Finish Flaking or Chipped?
Flaking surfaces and unsightly chips are good reasons to refinish your favorite pieces of furniture. Remember that your furniture is judged on its appearance, so imperfections slowly detract from how it looks.
Is Your Furniture Sticky After Cleaning?
If the top of your table feels sticky, even after you wipe it down, it could be a sign that the varnish is breaking down and no longer providing that impenetrable protection against moisture.
Heat, water, and food debris all contribute towards the damage to your table. Plus, thousands of fingerprints create a sticky coating that detracts from its overall appearance. If you recognize these signs, then it might be time for refinishing.
Watch for Watermarks and Cloudy Spots
Tables and dressers need constant cleaning, but tell-tale cloudy spots or watermarks might signify that your cleaning regime is inadequate. It could be that the mark is more profound than a surface blemish, penetrating the varnish.
If this is the case, refinishing may be your only option.
Watch for Discoloration
Sun fades old varnish, bleaching the wooden surfaces. A large table in a sunny kitchen will dull over time. This discoloration is a permanent condition and can only be restored using the right refinishing techniques.
Also, lacquer deteriorates with excess moisture, breaking down the protective coatings and exposing the wood beneath to the elements.
What You Need To Refinish Furniture
As with all skilled jobs, having the right tools and supplies to hand is crucial for the best outcomes. But what tools do you need to see the job through to completion?
- Dish soap, sponge, and towels.
- Tack cloth.
- Paint stripper.
- Paintbrush.
- Power sander.
- Multi-grit sandpaper.
- Paint scraper.
- Epoxy putty.
- Putty knife.
- Wood sealant, varnish or polyurethane.
- Facemask.
- Protective gloves.
How To Refinish a Dresser or Table
Before we get started, it’s a good idea to understand what it is you are refinishing. If you have a super-ornate piece of furniture, ask yourself if you possess the skills to carry out such a task. Detailed inlays and patterns could get ruined in the wrong hands.
There is nothing wrong with admitting defeat before you start by calling in the professionals. It might be costly in the first instance, but it could save you a packet in the long-run.
1. Clean Like Your Life Depends on It
The first rooky mistake people make is failing to clean the furniture before starting. Removing years of grime and grease is essential if you want the best results. Spend the time to do a thorough job.
If not, you risk grinding all that dirt into the wood stain as you sand. It also gums up your sandpaper, making it less effective.
This is where your dish soap, sponge, and towels come in handy. Also, make sure your dresser or table’s surface is completely dry before moving to the second stage.
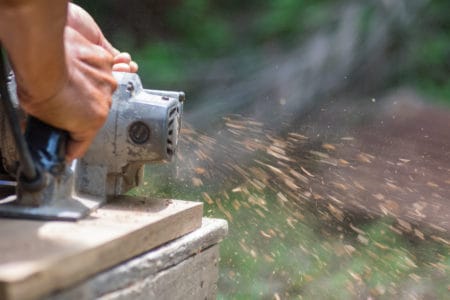
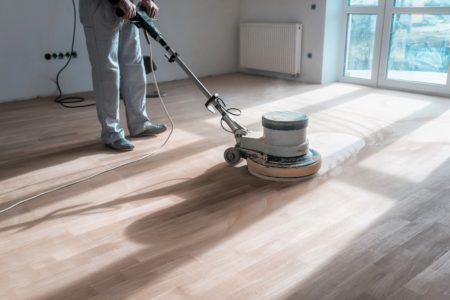
2. Start Sanding
You would only consider doing this if you are painting the surface. Using your roughest grit sandpaper (60 or 80-grit should be fine), start sanding with the line of the grain. This removes old varnish or wood stain and keeps you from scratching the surface against the grain.
You can undertake this job by hand, using a sanding block, but it would be far quicker to use a power tool like an orbital or bench sander.
Wipe the surface regularly, using either a tack cloth or a damp towel. When you have removed the debris, scale up the sandpaper to 120-grit for an even smoother finish.
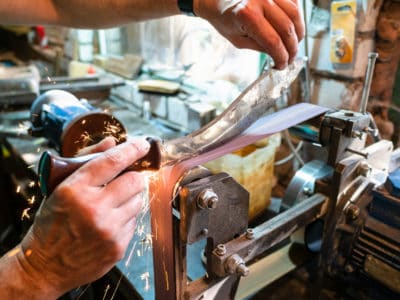
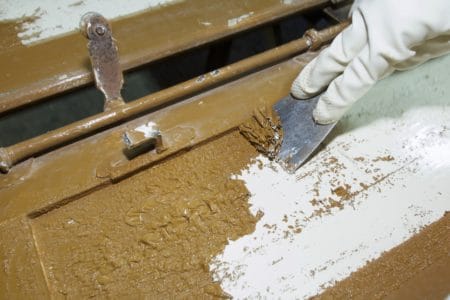
3. Consider Paint Stripper
For this section, putting on a facemask and protective gloves is necessary to protect you against the chemical contents of the paint stripper. You’ll know how severe it can be if you get some on your hands. It burns like hell!
If you have an old table or cabinet and want to take the top layer off in one go, a paint stripper is far more effective at getting down to the fresh wood layer. Layer a generous amount on the spot you want to work on and leave it to do its work for 10 or 15 minutes, or until you see the varnish start to bubble.
Grab the scraper and, using both hands, carefully push the tip into the varnish surface. It should split and wrinkle as you force it forward, revealing the wood beneath. Discard the debris safely because the paint stripper is highly corrosive.
Also, take care not to get any on your hands, and don’t breathe in any fumes as they can be highly dangerous.
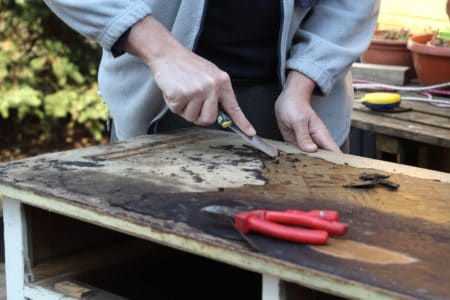
4. Look for Blemishes and Cracks
Once the natural wooden surface is exposed, you should use this opportunity to seek out blemishes to fill and sand them smooth. This is where your epoxy putty and putty knife come in handy. Try and fill the holes, so they are as smooth as possible.
Wait for the filler to dry (check your manufacturer’s guidelines), and when completely set, sand with high grit sandpaper until they are smooth and flush with the surface.
You might want to consider performing this stage by hand for the highest level of detail.
5. Finish With Oil
Now you have sanded, filled, and sanded again; you are ready to decide on the finish. You could use wood oil, which penetrates the wood, protecting it from within. This is the best approach when you want a natural look.
The downside is that you risk revealing any blemishes, especially the filled sections and noticeable scratches. Some might say these are part of the character of the piece, and this is true.
Furniture with age bears the scars of a colorful past with grace-like wrinkles on a face, but if you restore something to a brand new condition, you will want a near-perfect finish.
Teak or Danish oil is an excellent product to use on oiled wooden surfaces, providing high levels of protection and durability.
6. Finish With Stain or Varnish
Stain or varnish is more forgiving. It restores that rich luster of your grandmother’s favorite dresser. However, be aware that you will not replicate the old look exactly because to do so, you would need the benefit of age.
If you are using a transparent stain, make sure that you only work with the grain because if you mark the table against the grain, a lighter tint will reveal every scratch and blemish for the world to see.
Apply one coat of the stain or varnish with a clean paintbrush, making sure that you sand lightly using 360-grit sandpaper once it dries. Wipe clean with a cloth to remove all traces of dust.
Apply another coat, plus one more if you want to achieve a deeper color. If you are priming and painting, the technique is the same. Sand down the primer once it is completely dry, and then apply a couple of coats of paint to achieve the desired finish.
Just remember that paint gives instant results, but it is not as durable as stain or oils and will highlight scratches and blemishes over time.
Staining vs. Painting
Some people like the painted effect and some like to keep the natural wood grain visible by using a stain. What are the merits of both? Let’s find out.
The first thing to consider when deciding to stain or paint your dresser or table is the overall condition. A badly damaged piece of furniture will show all its scars when you use a light stain, so maybe it would be better to use paint.
Paint hides a multitude of sins. It covers filler, bad sanding, and scratches. Paint is ideal for upcycling old furniture, so if you have found a little treasure at a second-hand store, consider vamping it up with vibrant colors.
The beauty of paint is that it opens up a world of possibilities. You can change the character of any dresser or table with a splash of color creativity.
Some pieces need a gentler touch to enhance what they have, like a valued dresser, handed down and aged with beautiful patternation of the wood grain. To paint something like that would be sacrilege.
This is where a light stain enhances the appearance of the piece. And why cover up the best features of your furniture?
The second consideration is the use the furniture gets. Paint may hide the blemishes, but it scratches easily, making the furniture look distressed. Paint might not be the best covering for high-use furniture like tables. Cups, plates, and other table implements are not kind to paint.
Paint
Pros
- Instant impact.
- Hides blemishes and scratches.
- Easier to get a good result.
- Ideal for upcycling.
- Cheap.
- Vibrant colors available.
Cons
- Scratches easily.
- Hides the wood grain.
- Fades more quickly.
Stain
Pros
- Reveals the wood grain.
- Lasts for years.
- Hardwearing.
- Better for high-use furniture.
Cons
- Harder to master.
- Reveals scratches and blemishes.
- Reveals filler.
Top Tips for Refinishing Furniture
What are the secrets of the trade that make refinishing furniture so much easier? Let’s take a look.
Don’t Try and Match Colors
Don’t try and blend in colors when refinishing. Invariably, you will struggle to match that aged appearance and only highlight spots that look like they have been restored. The easiest way is to commit to an entire refinish rather than individual patches.
Make Sure You Have Time
Before starting a major restoration project, make sure you allocate the time to complete the task. And by time, we mean taking it slowly, working methodically, so nothing is rushed. The last thing you want to do is ruin the results because you ran out of time.
Safety First
When you start any project, you need to ensure that you take your safety seriously. Paint strippers and varnishes contain harmful chemicals. When you apply paint remover, you should wear a face mask and safety gloves to avoid injury.
Prepare Properly
If you fail to plan, you plan to fail. Make sure you invest the time and energy to get the basics right. Sand properly, removing unsightly blemishes. Use filler and putty to close any gaps or cracks. The more work you put in now, the better the result.
Use the Right Tools
Before starting, make sure you have the tools to complete the task. And try not to cut corners by making do. Using the wrong sander or filler can damage the furniture more than you might think.
FAQs

Can I Just Paint Over Old Paint on a Dresser?
You can paint over previously painted wood if that old paint coat is not chipped, cracked, or damaged. If you try to apply a new paint coat over an old one in poor condition, you will have a sloppy paint job.
The old paint layer will continue to peel, removing the coat of paint. Invest in a high-adhesion primer for old paint that’s still in good condition.
If you’re unsure whether to sand the surface before painting, check for dents, gaps, holes, scratches, peels, cracks, and any other surface imperfections that would still look terrible, even if you slap a new paint coat on top.

What Kind of Paint Do You Use on a Dresser Without Sanding?
Two types of paint can do wonders if you don’t want to sand your dresser: chalk paint and mineral paint.
Chalk paint is viable if you want to give your dresser a beautiful matte finish without the headache of prepping the surface. Mineral paint doesn’t need any primer and will stick to almost any surface you want.
Remember that there is another option for those who don’t want to sand a dresser the old-fashioned way: the liquid deglosser.
This is technically a mixture of chemicals you put on the dresser (or some other surface you want to sand). This reacts with the old paint, leading to an abrasive coat that you can remove with a rag.

Is It Better to Spray or Roll Paint a Dresser?
Both these painting methods have their ups and down. So, instead of telling you which is better, I can tell you what to expect from either and let you make your own choice.
Spray painting is great when you want to apply thin coats of paint. If you want your dresser to have a lacquer-like finish, you want to choose spray painting.
It provides even coverage and a durable finish and tends to dry much faster than roll-on paint. Spray paint is also the best for furniture with intricate carvings/details and many nooks and crannies.
But spray paint isn’t the go-to choice when dealing with large furniture pieces (like a dresser.)
It works better with smaller pieces, like stools, nightstands, or coffee tables. Rolling paint onto a dresser will result in a more beautiful finish. It’s a less expensive option; compared to canned spray paint, it brings forth more color options.
The drawback is that it takes more time and effort on your behalf. Also, note that rolling paint on carvings and details will be difficult. You will need a fine brush for this part.

Do You Have to Sand a Dresser Before Staining It?
If you want your dresser to look like it was made by a professional, you must sand it before staining it.
Whenever you’re ready to sand the dresser, remove all the drawers, take down any doors, and make sure you use face protection to avoid getting sand dust in your eyes, nose, and mouth.
After sanding, remove all the dust and debris from the dresser. Apply a thin and even coat of stain, working your way from the top of the dresser.
Allow the dresser to soak the stain for as long as the manufacturer suggests. Work your way into all the nooks and crannies and wipe off the excess when you’re done.

What Kind of Sandpaper Do You Use to Refinish a Dresser?
You need multi-grit sandpaper to refinish a dresser. Start by sanding the surface using coarse-grit sandpaper, preferably 60 or 80-grit.
When you’ve removed the old paint and sanded down the rough imperfections, clean the dresser and move to 120-grit sandpaper. This will help create a smoother finish.
Refinishing Done Right
If you have a piece of furniture like a dresser or a table that needs some TLC, why not try refinishing it. It protects the furniture for years to come and keeps it looking good as a decorative object.
It can be very satisfying to see an old table restored to its former glory. So what are you waiting for? Get started as soon as possible.