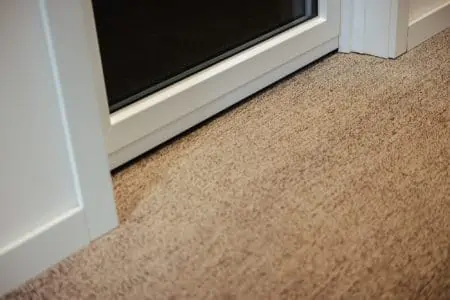
Is your white baseboard in desperate need of a new coat of paint, but there’s carpet in the way? Painting baseboards with carpet can be tricky, but it’s not impossible.
If you want to know how to paint baseboards with a carpet, you’ve come to the right place. I’ve got a way to do it yourself without the hassle or risk to your carpets.
Key Takeaways
- Prep the area with tape and drop cloths: Protect your carpet and walls before painting.
- Clean and sand the baseboard: Remove dust and roughen the surface for better paint adhesion.
- Use painter’s tape to cover the carpet: Tuck the tape under the baseboard to protect the carpet from paint.
- Paint the baseboard carefully: Use an angled brush and apply paint evenly with back and forth strokes.
How to Paint Baseboards with Carpet
If you’ve got carpet already installed over hardwood floors, removing it to paint the molding can be a nightmare, especially on stairs.
You would have to remove the baseboard and trims first, and then a simple job turns into a massive undertaking. Avoid all that by following these simple steps.
What You’ll Need
- Drop cloth.
- Masking tape (two to four inches in width).
- Painter’s tape.
- Optional: paint guard or shields.
- Damp cloth.
- Sandpaper.
- Putty knife.
- Paint can.
- Angled brush.
1. Prep the Area
This is one of the most important steps when painting baseboards with carpet.
Take the drop cloth and place it close to the wall, right where you want to paint. Press down on the carpet and try to tuck the cloth beneath the baseboard if you can. We like these polyethylene drop cloths from Frost King.
Some baseboards are installed too tightly for this, and that’s okay. We’ll cover that in step three. Just place the cloth as close to the wall as possible.
2. Clean the Baseboard
Grab a damp cloth and clean the entire baseboard. This helps remove the dust and grime off the surface. Leave it for about one or two hours to fully dry.
If there’s already a glossy finish, sand the wood so that the paint adheres better. A gentle, light sand will do. Give the area a quick vacuum just to grab any bits of dust.
Grab some painter’s tape and mask off the part of the wall that meets the baseboard or skirting.
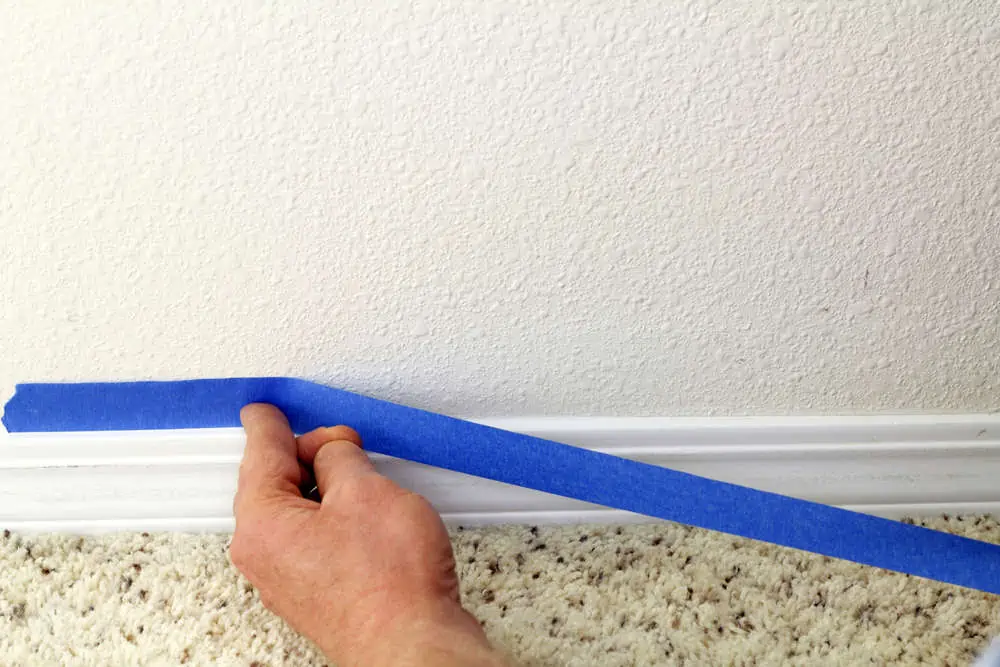
3. Cover the Carpet
Grab some wide masking tape or painter’s tape between two and four inches in width, like this Wide Blue Painters Tape. Stick it on the edges of the carpet, doing your best to tuck the masking tape under the baseboard.
4. Paint the Baseboard
Stand on your drop cloth to secure it in place. Take a flathead screwdriver to open the can of paint. Take a mixing stick and stir the paint to ensure the color is even.
Dip an angled brush in your paint can and tap it on your painting tray. Begin by painting the middle of the baseboard. You want to use back and forth strokes for better paint coverage.
Optional
When you’re painting the bottom of the baseboard, you might want to use painting guards. A paint guard will act as a protector that prevents the paint from bleeding.
How to Paint Trim with High Pile Carpet
Now that you know how to paint trim with carpet in the way, what do you do if it’s a high pile shag one? The long fibers will surely get in the way and are more difficult to keep in check than regular-pile carpets. Hopefully, these tips will help you:
- Use wider painter’s tape and make sure you trap all the fibers underneath the tape, pressing it down firmly.
- If you have old window blinds, stick them between the baseboard and the floor with the curved side up. They will act as a guard.
How to Paint Baseboards Without Tape
Many homeowners who have painted their walls or trim used blue painter’s tape to mark off the margins. But, unbeknownst to some, most professional painters work without tape.
However, we all don’t have the confidence or skills of a pro painter. So, if you don’t have any tape or don’t want to use it, here are some alternatives.
Use the Cut-In Method
This method of painting your baseboard will save you time and materials if and when you master the technique. It means painting the trim using a paintbrush and your steady hand. I’d recommend you practice in a low-traffic area first.
- Tuck some cardboard, old blind slats, or paint shields under the baseboard.
- Pour ½ inch of paint into a paint tray.
- Dip the paintbrush into the paint and remove the excess.
- Grab the paintbrush by its widest part near the bristles (not the handle).
- Set the bristles against the baseboard and press to form a wedge.
- When you begin to pull the bristles along the trim, you’ll notice them forming a fan shape.
- Move the brush in crescent shapes rather than a long line.
Worried your hand isn’t steady enough for the cut-in method? Here are some other options:
- Use paint guards or shields. They are inserted between the floor and the baseboard and can catch any running paint.
- If you have old window blinds, place them between the baseboard and the floor (curved side up).
- You can also try to catch running paint using a thin piece of cardboard.
Tips For Cleaning Paint Off Carpet
Paint dripped onto the carpet even after using plastic sheets, newspapers, or drop cloths? We understand the frustration! The good news is that most paint stains can be removed from the carpet using common household materials.
- Don’t scrub your carpet, no matter what. This forces the paint deeper into the fibers.
- Use paper towels and gently pat the carpet to get out as much paint as you possibly can.
- Make a mixture of warm water and dish soap. Dampen a cloth in this mixture and use it to blot the stain.
- Always use paper towels in the process to soak up any additional paint, cleaner, or liquid.
- Commercial carpet stain remover might also do the trick.
- You can also use a steamer to try and get the paint stains out of the fibers.
FAQs
Be absolutely sure about painting around your expensive carpets. These extra tips should provide some more clarity going into the project.

Can You Use Frog Tape on Carpets?
You can, but professionals generally recommend using multi-surface painter’s tape on the carpet.

Will Tape Ruin My Carpet?
A carpet tape that contains harsh adhesives, such as Polyethylene Resin, can completely ruin a carpet. After some time, the adhesive material disintegrates and reacts with the carpet. Also, when removing the adhesive tape, it has the potential to rip the fibers from the carpet.

Do You Paint Baseboards First or Last?
There is no correct method to approach this, so it’s mostly a matter of personal preference. Painting the trim first increases your chances of the wall color splattering and requiring additional touch-ups.
But, if you paint the wall first, the trim paint may bleed through and force you to repaint the wall to match the trim.

How Do Professionals Paint Trim?
In most cases, professionals paint the trim first, the ceiling second, and leave the walls for last. If you paint the trim first, you can later cover it while painting everything else, which is the easiest way.
In the End
Painting baseboards with carpet is intimidating for many people because they’re afraid the carpet will get stained with paint.
If you follow our tutorial on how to paint trim with a carpet, you should be fine. However, if you do stain the carpet, we’ve also added a few tips on how to clean it.