You may not be familiar with edge joints, but you’ve probably seen one before. It is the art of joining two boards end to end without leaving any visible signs of the joint. Gluing boards together increases the surface area of the wood, creating larger pieces of lumber for other projects.
We show you how to join two boards lengthwise using several techniques, highlighting the tools and materials needed for a successful outcome.
Key Takeaways
- Gluing boards: Use wood glue and clamps to join two boards lengthwise, creating an invisible joint. This method is easy but not the strongest.
- Cut dowels: Dowels provide added strength and flexibility to the joint, but require a high degree of skill and precision to execute properly.
- Kreg Jig (pocket-hole screws): This method is commonly used in furniture construction, creating strong joints. Requires a specialized tool and some skill.
- Bevel cut scarf joints: By cutting each edge of the wood at a corresponding angle, you increase the bonding surface and create a stronger joint. Requires a table or miter saw.
Different Methods of Joining Two Boards Lengthwise
Let’s look in detail at how to join two pieces of wood, the tools and materials you’ll need, and the rough timescales to complete each task.
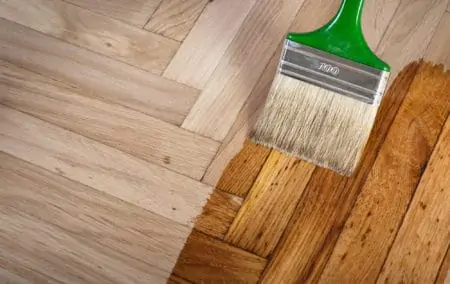
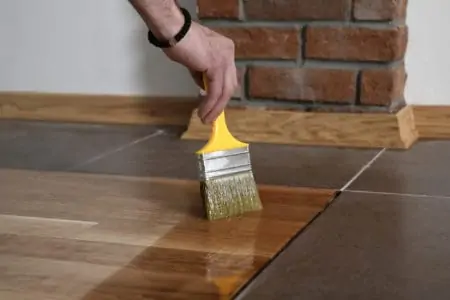
Gluing the Boards
Gluing boards is the most accessible and easiest to master technique for joining two boards together. If done correctly, it creates an invisible joint. The advantage is that wood glue is easy to apply, but the disadvantage is it is not the strongest joint.
This might restrict its uses, and bowing can frequently occur if you don’t clamp the wood properly. This is one of the quickest methods of joining boards, as it should only take 30 minutes.
Here’s what you will need:
- Wood glue.
- Two boards with straight edges.
- Clamps.
- Wood chisel.
- Chalk.
1. Arrange the Boards
Place the two boards down on a flat surface, carefully matching the wood grain pattern as best you can. When you are happy, grab the chalk and draw a large U-shape across both boards, with the lines of the “U” running across the join on both panels.
It makes realignment a lot easier when you are ready to clamp the wood together.
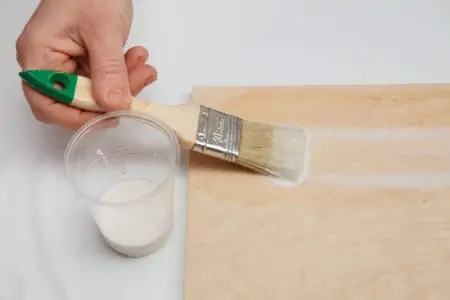
2. Apply the Glue
Lay your preferred board on its edge, making sure that you apply the wood glue to the side you will join. Run a continuous line of wood glue along the length of the board, keeping it to about 0.188 of an inch to prevent excess spillage.
3. Fix and Clamp
Push both edges of the wooden board together, using the chalk marker as a guideline. Once aligned, clamp the boards in place and leave them to set for about 20 minutes.
4. Remove the Excess Glue
If you want an invisible joint, you need to scrape off the excess glue. The best time to do this is when the glue is starting to set but is still malleable. Grab the wood chisel and shear it off.
Cut Dowels
Using cut dowels gives the joint added strength and flexibility. This is one of the most widely used techniques in the woodworking industry, so it is popular and effective; however, it requires a high degree of skill and precision.
This technique takes a little longer to complete, so you may need to set aside about an hour to give yourself plenty of time to get it right.
Here’s what you will need:
- Two boards.
- Pre-cut dowels.
- Masking tape.
- Pencil.
- Ruler.
- Depth gauge.
- Mallet.
- Clamp.
- Adhesive.
- Drill and drill bits.
1. Measure the Dowel Locations
Grab your ruler, depth gauge, and pencil to mark a series of equal locations, evenly spaced apart. These points should account for the width and the board as well as the size of your dowels. As with all woodworking measurements, you should check them twice, so you only drill once.
2. Drill and Test
Size up your drill bit to match the diameter of your dowel and insert it into the drill. Wrap some masking tape around the drill bit to a distance roughly half the depth of the dowel. Now make the first test hole.
Clear out the sawdust and test that the dowel fits. It should be snug, so use the mallet if you need to.
3. Repeat
Repeat this process until all the dowel holes are drilled and tested. Make sure all the remaining dowels are in place.
4. Clamp and Set
Add a drop of wood glue to the exposed ends of the dowels and offer up the other board, matching up the holes. Push the two pieces together and apply pressure until the gap between the panels has closed. Now clamp it in place until the glue sets.
Kreg Jig (Pocket-Hole Screws)
This is a common method used in the construction of furniture, and it utilizes a Kreg Jig to mark the locations of the screw holes.
Essentially, it creates an angled template to insert the screws while hiding them from view and maintaining the integrity of the joint.
The advantage is these joints are super-strong, thanks to the metal screws, but the disadvantage is you need to buy the specialized tool, which is money spent on a device that you will rarely use.
The time taken to complete this task varies depending on skill levels, but in the average person’s hands, it should only take 30 minutes to an hour to complete.
Here’s what you will need:
- Two lengths of board.
- A Kreg jig.
- Compatible screws.
- Drill and drill bits.
- Measuring tape.
- Screwdriver.
- Clamps.
1. Measure the Spaces and the Depth
Measure the width of your plank, and use this measurement to adjust the depth collar on your drill. If you lack a depth collar, you can use the same masking tape technique you used before.
You may find an appropriate measurement on the base of your jig. Once you have positioned your guide holes, you can then make any adjustments that you need.
2. Clamp and Drill
After carefully lining up the guide holes, clamp the wood. Now insert the drill into the guide holes after matching up the correct size of drill bit.
Make the hole and repeat several times until you have two or three sets of pocket holes for added stability and grip.
3. Join the Boards
Grab the other plank and line it up. Clamp the second plank, insert the screws into the guide holes, and start tightening with the screwdriver until the screw begins to bite into the other plank and the gap closes.
Strap Joint
Strap joints are straightforward because they are easy to fit, with all material concealed beneath the two boards. This is great when appearances are not that important because they are quite quick to make.
You should set aside about 30 minutes for this task.
Here’s what you will need:
- 0.25-inch thick plywood straps.
- Appropriate screws.
- Screwdriver.
- Drill and drill bits.
- Pencil.
1. Match the Width to the Workpiece
Cut the 0.25-inch thick ply to a size that almost matches the project piece. To make the joint, glue and screw onto the board, with an equal amount of the strap protruding, so you get the same amount of purchase on the other board.
Wait 20 minutes while the glue begins setting, clamp the other board to the strap, lining up the edges of the board.
2. Attach the Second Board
Now glue and screw the other half of the strap to the other piece of wood and clamp in place while the glue sets. Make sure it dries on a completely flat surface. The wood glue should set solid in about 30 minutes to an hour.
Biscuit Joint
Biscuit joints are not as popular as other methods because they require a special tool and a degree of skill to get it right. A biscuit joint uses a range of long and thin channels in each section of wood to join them together.
A biscuit-shaped piece of wood is then inserted into each channel to lock it in place. This method is not for the novices out there and takes several hours to get it complete. The advantage is you get a neat joint, but the disadvantage is they are not that robust and prone to bowing.
Here’s what you need:
- Two lengths of board.
- Correctly sized biscuit pieces.
- A biscuit joiner tool.
- Pencil.
- Ruler or tape measure.
- Spray water bottle.
- Clamps.
1. Align and Mark
Align the boards and mark out a minimum of three locations where you would like the biscuit joints. These points should be equally spaced apart. Now separate the boards and mark the actual locations of the biscuit slots on both board sections.
2. Set the Joiner
Once you know where the biscuit joints are located, grab your biscuit joiner and adjust the appropriate settings. Ideally, the slots should be half as deep as the biscuits are wide. Set the plunge depth and center the joiner, and begin making the cuts.
3. Insert the Biscuits
Clear away any excess sawdust and insert your biscuit into the bottom-most slot in the arrangement and do the same with the rest of the slots. Once properly set in place, spray each one with water to activate a proper seal. Now slot the two boards together. Clamp the panels and allow the biscuits to set. This could take several hours.
Half-Lap Joints
Half-lap joints are super-strong joints because they give a generous overlap for the wood glue to adhere, and you also get face-to-face joints.
You might need some machinery to make these joints, and it should take you an hour or two to complete.
Here’s what you will need:
- Router or table saw.
- Dado set.
- Pencil.
- Ruler.
- Two pieces of board.
- A square.
1. Mark Your Cuts
Using the square, place both pieces of wood side by side, ensuring that both ends are flush. Now mark where you want to make the cuts with an X on both pieces of wood. Draw a line across both sections of wood, extending from one edge to the other.
2. Install a Dado Set
Next, install a dado set measuring 0.625 inches wide in your table saw and set the blade to cut half the thickness of your board. You can test the thickness of the lap joint by cutting a test piece out of a scrap of wood and offering it to one of your boards.
The face-to-face edges should be entirely flush, with no gaps, and the surfaces should be level.
3. Make the Cuts
Using a miter gauge extension, cut a dado on each piece of wood along the marked joint line. The gauge positions each pass and reduces tear-out. Remember that one piece will be dadoed with the appearance side down.
4. Test the Fit
Marry the two pieces together, checking for gaps and uneven surfaces. If you are happy, apply the glue and clamp the wooden boards together. Allow an hour or two while the glue sets hard.
Tabled Lap Joint
This joint has all the attributes of the half-lap joint but adds the strength of interconnecting pieces. It forms a locking joint that can withstand a lot of pressure. So, if you are joining two pieces together to make a bench or a table, this joint will really help.
It will take a few hours to complete it, and you should only attempt this kind of joint if you know what you are doing. Again, we will need the services of a table saw and a dado cutter.
Here’s what you will need:
- Table saw.
- Dado set.
- Pencil.
- Square.
- Two pieces of board.
1. Add to the Width
To make this joint, we need to increase the width of the workpiece by 0.25 inches. It gets removed later as we refine the joint. Measure the distance from the end of the workpiece.
Using the same technique as the half-lap joint, mark both pieces of wood at the same time. It’s a great idea to have an identical scrap piece of wood to gauge the depth and length to get the joint right the first time.
2. Install the Dado
As before, install the dado in your table saw, but this time we set the blade height to one-third of the thickness of the board.
Now Rabbet both pieces of wood and the test sections from your edge markings to the end.
3. Reset the Dado
Reset the dado to two-thirds of the thickness of the workpieces. Using your test wood, check and adjust the depth of the dado until it is completely flush with the surface of the board.
4. Measure Again
Measure from the shoulder of the dado exactly one-half the width of the workpiece and make a mark there with the pencil. Clamp both boards side by side to the miter gauge and make two passes along the dado to define the width. Now cut the remaining dados.
5. Adjust and Fit
To ensure an exact fit, trim and adjust the ends of each piece separately until they are tightly fitting. Now glue and clamp them in place and wait for an hour or so while the adhesive sets.
Bevel Cut Scarf Joints
This simple joint extends the bonding surface of the wood by cutting each edge at a corresponding angle. The sharper the angle, the better the bonding area and the stronger the joint.
You will need a table or miter saw for this, and it should only take a couple of minutes.
Here’s what you will need:
- Table or miter saw.
- Two wooden pieces.
- A square.
- Pencil.
1. Make Your Mark
Draw a line across the width of the wood to set where you want to cut. Do the same to the second board. If you line them up so the ends are flush, it makes life a lot easier. Set the table saw blade at 45 degrees to increase the bonding surface by 40 percent.
2. Make the Cut
Switch on the table saw and pass one section of wood on one side of the blade and the opposing piece on the other side. It doesn’t matter which is which because the two parts will match when you join them together.
3. Clamp and Set
Add wood glue and clamp the lower half to a flat surface and the upper half against the lower part’s bevel. Allow the wood glue to dry for an hour or two for a strong bond.
Other Ways To Join Two Pieces of Wood
There are several methods to join two pieces of wood other than the ones already listed. But what are they, and are they any good? Let’s find out.
How To Join Two Pieces of Wood With Brackets
L-shaped brackets are the most common type used to join two pieces of wood together. Simply drill pilot holes where the brackets pre-marked holes are and screw the bracket to each section of lumber.
You can buy T-brackets and flat brackets that mimic the style of the strap joint, only constructed from metal.
How To Join Two Boards on Top of Each Other
The easiest way to join two boards on top of each other is to get a drill and drill bit and make a pilot hole, ensuring the bit cuts through the top board and halfway into the bottom piece of wood.
Then grab the appropriate width and length of screws and insert them into the pilot holes. Make sure you space them evenly across the surface of the board, with screws at either end and some situated in the middle.
If you want the neatest possible outcome, use a countersink to get the head of the screws flush with the board’s surface.
Tips on Joining Two Boards End to End
So, what are the hints and tips that professionals use every day to make their lives easier? Here are a few pointers to get you moving in the right direction.
Increase the Bonding Surface
The more surface you have to glue and bond, the better the joint and the stronger it holds. If you angle the wood, even by 45 degrees, you can increase the surface area by 40 percent. Not only that, but you also make it easier to disguise the join.
Create a Simple Strap
You can create a strap from off-cuts of plywood. Ensure it is a minimum of 0.25 inches thick, and simply screw it to both ends of the wood. If you want a powerful bond, combine the 45-degree angle with a strap.
Insert Dowels
Using long dowels is another trick to securing to ends of wood without revealing the join. You could even use metal rods. All you need to do is drill pilot holes into each end of the wood and insert the rods, and then a drop of wood glue should secure it.
Ever Thought About Splines?
Fitting a spline is a neat trick for adding rigidity to your join, and it creates a face-to-face gluing surface that resists flexing. You need a dado setting on a table saw to make the two matching grooves at the end of the wood, and the spline slots into each end and is glued in place.
Once set, it provides extra strength to the join.
FAQs

What Is the Best Method for Joining Long Boards Lengthwise?
The best and most accessible method is to use wood glue and clamps to hold it in place while it sets. Run a bead of glue along the edge of the plank and then push the other edge to meet the adhesive. Clamp it in place and wipe away any excess glue that squeezes out of the joint. Wait while it sets hard, and you have a neat joint.

How Can I Make Seamless Wood Joints?
The secret is to try and match the shade and wood grain so that it looks like a seamless flow between one board and the other. Try and select two boards that match in color to make it an easier process.
Lay the boards side by side and look for straight wood grain if possible because that’s easier to match.

Which Is Stronger-Dowels or Biscuits?
Biscuit joints are excellent for alignment but provide very little support when it comes to strength. Dowels are much more robust because they anchor the wood together from the inside, providing added support.