Knowing how to insulate a garage ceiling helps trap heat in the winter and keeps your garage cool in the summer. This is useful when using your garage for another purpose, like a gym or games room.
We show you the best garage ceiling insulation techniques, discuss R-values, and look at the general costs.
Key Takeaways
- Decide if insulating your garage ceiling is necessary based on its usage.
- Choose the appropriate insulation type, such as foam core or fiberglass, considering factors like R-value, cost, and ease of installation.
- Always install a vapor barrier to prevent moisture from affecting the insulation.
- Measure the ceiling area and cut the insulation material to fit, then secure it in place using a staple gun or other suitable method.
- Should I Insulate My Garage Ceiling?
- What R-Value Do I Need for a Garage Ceiling?
- What Type of Insulation Is Best for a Garage Ceiling?
- How to Install Insulation In a Garage Ceiling
- How to Insulate a Garage Ceiling Without Drywall
- What Does It Cost to Insulate a Garage Ceiling?
- FAQs
- It’s Great When You Insulate
Should I Insulate My Garage Ceiling?
If you use your garage to store your car, it might seem like a waste of time. But some garages are far from just car storage facilities. There are several good reasons why you should insulate your garage ceiling.
They can be home offices, gyms, cinema rooms, and so much more, and regulating the interior temperature helps to make them comfortable spaces. It stops heat leaking and reduces your energy bills.
If your garage is integrated, it could also help maintain a steady temperature inside your home. It will also improve your HVAC system’s efficiency and cost less in energy bills.
If you have converted your garage into a studio or recreational room, insulation offers excellent soundproofing qualities.
However, insulating a garage ceiling can be costly, primarily if you only use yours for storing the car. It could also be a fire hazard, especially if you insulate over an electrical box.
Plus, it’s a pointless exercise insulating the ceiling without covering the door because it doesn’t address heat loss. This increases your costs further.
What R-Value Do I Need for a Garage Ceiling?
R-value is the measurement of your insulation against resisting the transference of heat. The greater the number scored, the better the insulation is at retaining heat and reducing your energy costs.
It all depends on the applicable guides for your particular zone. As a rule of thumb, if your rafters are the standard 10 to 12 inches deep, you would need an R-value of between 30 and 40.
If you are unsure, add two layers of R-19.
What Type of Insulation Is Best for a Garage Ceiling?
Before you dive straight into insulating your garage ceiling, you first need to know which type of material is best and why. They all have the primary purpose of regulating heat gain and loss, but some are better than others.
Cellulose Insulation
Cellulose insulation is constructed from recycled paper, making it one of the best eco-friendly options. The material is treated to make it fire retardant and safe to use. To apply it, you need a blowing machine to fire the insulation onto finished surfaces.
It isn’t the easiest to apply, and it can be very messy; plus, it loses performance as it ages.
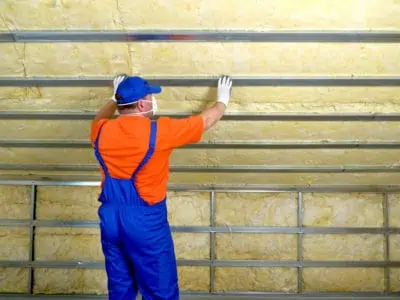
Fiberglass Insulation

Fiberglass insulation is cheap, easy to install, and commonly used to cover garage ceilings. If you are a novice DIY enthusiast looking for ideas, this insulation is perfect for learning the ropes.
It comes in blanket form to easily fit garage ceiling joists or as loose fiberglass. It can be blown into hard-to-reach places and used for filler in wall and ceiling cavities.
Safety Notice
Follow recommendations and always wear protective clothing and a face mask because fiberglass is toxic and irritates your eyes, lungs, and skin. It is also a fire risk if incorrectly installed.
Radiant Barrier
Radiant barrier insulation works by reflecting heat to keep your spaces cold in the summer and warm in the winter. They consist of sandwiched sheets of paper wrapped in reflective foil. You can cut them to size to cater to any shape.
These barrier sheets are also perfect for attics in warmer climates. However, they are not subject to the same R-value ratings because it uses reflective technology to insulate.
Word Of Warning
Reflective barriers work better in warmer climates. If you live in a cold environment, you would be better off trying a different material.
Spray Foam

Spray foam air seals and offers the best R-value of all the insulation types. It is perfect for coating unfinished walls and ceilings.
However, it requires the use of a specialist blowing tool, which means calling in the pros. This makes it an expensive option; plus, it shrinks over time.
Foam Core

Foam core insulation has a high R-value, is easy to install because it can be shaped, and offers excellent soundproofing. It is also relatively cheap and perfect for inexperienced DIY enthusiasts.
However, it may form a barrier that might be too airtight for some buildings, causing them to sweat. Also, rodents and other pests like to eat this material.
Air Sealing
Air sealing is the art of minimizing air leaks, where heat and cold loss occurs. Think windows, doors, and inadequate insulation. Even the holes for your wiring, plumbing, and heating are culprits for leaking air.
Air sealing takes a more holistic approach, looking at a range of critical areas to be improved, so the costs could soon rack up using this method.
However, garages are notoriously drafty places, so using the air sealing approach may not work. Garage doors are constructed for practical uses rather than insulating qualities, and cold concrete does not afford the best heat insulation.
| Type of Insulation | Pros | Cons |
| Cellulose |
|
|
| Fiberglass |
|
|
| Radiant Barrier |
|
|
| Spray Foam |
|
|
| Foam Core |
|
|
| Air Sealing |
|
|
How to Install Insulation In a Garage Ceiling
We will use the foam core method for this instructable because it has a high R-value, is cheap to install, and is one of the easiest methods. Getting the insulation right on your garage ceiling is crucial because heat rises.
However, before we get into the nitty-gritty, we must gather the correct tools.
What You’ll Need
- Stepladder.
- Construction tape.
- Utility knife.
- Tape measure.
- Screws.
- Drill/driver.
- Staple gun and staples.
- Vapor barrier.
- Expanding foam.
- Sealant gun.
- Plywood or drywall.
- Drywall screws.
- Face mask.
- Goggles.
- Gloves.
1. Take Safety Seriously
Safety is paramount when performing DIY. Ladders can cause injury, as can knives and other tools. Don your face mask, gloves, and safety goggles. Extend the stepladder so that it stands on a flat surface.
2. Prepare Your Garage
Before starting, make sure your garage is ready. Lay down a vapor barrier using the staple gun to tack it to the ceiling. It prevents excess moisture from soaking through and contaminating the insulation foam.
Fill any gaps that might allow heat to escape and moisture to get in.
Keep In Mind
Don’t cover electrical boxes because it is a fire hazard. Mark out five inches from switches and lights to keep the insulation at a safe distance.
3. Measure the Ceiling
Measure the length and width of your ceiling to determine the dimensions. Multiply the length and width to get the square footage. Now measure the distance between the joists to determine the sizes you need to cut.
Using a utility knife, cut the insulation foam to the desired dimensions. Typically, they are between eight and 10 inches in length.
4. Install the Insulation
Push the insulation into position and hold it in place using the staple gun. For awkward shapes, cut the insulation to size.
Top Tip
Use expanding foam instead of cutting. The foam expands to fill the gaps and just needs trimming when set.
5. Cover the Ceiling
Measure and cut the plywood or drywall to size, and secure it to the ceiling with the screws. You will need the drill/driver to gain traction with the screws.
Finish the ceiling by joining the exposed drywall using drywall tape for a better seam.
Important Point
Use drywall screws if installing drywall because they are designed to cut through with minimal damage.
How to Insulate a Garage Ceiling Without Drywall
The process for insulating a garage ceiling without drywall differs because you would use a different material. R-19 insulation rolls are the best for exposed rafters because they are easy to fit and offer soundproofing qualities.
You would follow the same procedure as before, using the staple gun to fasten the fiberglass to the ceiling. However, you would need to take precautions because fiberglass is highly toxic and can damage your lungs and irritate your skin and eyes.
What Does It Cost to Insulate a Garage Ceiling?
It all depends on the size of your garage and the type of insulation used; the cheapest are core foam and fiberglass. Expect to pay between $0.50 and $2.00 per square foot. It is also cost-effective to do the work yourself.
If you employ a professional to complete the work, you will have to add labor costs, accounting for over 50 percent of the overall price. In the case of spray foam insulation, most professionals charge between $50 and $100 per hour.
FAQs

Should You Insulate the Garage Roof or Ceiling?
You should if you care about heat loss, energy bills, and helping the planet. Converting your garage into a home office or gym requires an upgrade in the insulation. Without it, all the heat escapes out of the roof.
However, if your garage is just where your vehicle sleeps, there isn’t much point in insulating the ceiling.

What is the Cheapest Way to Insulate a Garage Ceiling?
The cheapest way to insulate your garage ceiling is with foam board or fiberglass rolls. They are also the best material if you leave the ceiling open with exposed rafters.

How Much Insulation Do I Need for a Garage Ceiling?
It depends on the size of your garage. The easiest way to calculate it is to measure the width and length and multiply the two together. That gives you the square footage.
You will also find the typical coverage of your chosen insulation written in small print on the packaging. From there, you can work out how much you need.

Do I Need to Heat My Insulated Garage?
It depends on how you use the garage. If it is a home office or games room, heating would be a good option in the winter months.
It also depends on the climate where you live. Undoubtedly, as winter bites, you will need some form of heating if you want to continue using your garage.
It also depends on whether your garage is attached or detached. The heat from your home may help warm an integral garage.
It’s Great When You Insulate
There are several benefits to insulation: it retains heat, keeps out the cold, and makes it easier to regulate the temperature. It isn’t challenging to install, and you can do it on a budget. If the benefits are so great, what are you waiting for?
By installing insulation in your garage ceiling, you will be helping the planet and saving money. It’s a win, win!