Framing a door is a straightforward process once you learn the terminology and how different door frame components are connected. Hiring an expert can be costly. That’s why the DIY route is so tempting, and I’ll show you how.
But I won’t just teach you how to frame a door. We’re going to talk about how to build a door frame as a DIY project. Plus, what different parts of a door frame are called, and how to measure a door’s rough opening.
Key Takeaways
- Measure the rough opening by adding 2 inches to the door width and 2.5 inches to the door height.
- Assemble the door frame using king studs, jack studs, header, cripple studs, top plate, and soleplate.
- Insert the header between the king studs and secure it on top of the jack studs.
- Remove the soleplate within the door opening using a handsaw.
Door Framing Diagram
Want to learn how to install a door frame? You’ll first have to know the different components of a frame. There are a few terms here that I’d like to explain first.
Then, every time you encounter them, you’ll know exactly which part of a door frame they’re referring to.
Cripple Stud
A cripple stud is a non-structural stud situated above a door that serves as a nailing platform for interior wall coverings or siding. They are spaced 16 or 24 inches apart and extend the standard wall stud pattern across the framed aperture.
Wall Top Plate
The top plate is the horizontal framing that spans the top of a stud wall. It is usually the same width as the bottom plate and studs.
The top plate is constructed of stress-graded dimensional lumber, most frequently 2×4 or 2×6. This improves the efficiency and precision of the manufacturing process for wall panels.
Header
A header is a beam that is used to support the door frame. These header beams are frequently used to construct bearing walls and exterior door frames. They distribute the load from the opening mentioned above to the jack studs that support it.
King Stud
A king stud is used to support a window or door opening in post and beam construction. It’s installed vertically and adjacent to the opening on either side. Most construction standards require the use of king studs to reinforce openings and promote overall structural stability.
Jack Stud
The jack stud is similar to the king stud in appearance. But it is shorter because it supports the structural header used for doors in non-load-bearing walls.
Wall Soleplate
A soleplate is represented by the bottom part of the frame and acts as a support for attaching the vertical members.
Should You Buy or Build a Door Frame?
When you want a new door frame, the first thing to ask yourself is whether you want to buy it or build it. Constructing your own door frame can save you money. But you are going to have to put in the time and effort.
If you’re unsure, it’s usually simpler to purchase a door frame, as they can be acquired as pre-hung door units or frame door assemblies.
Typically, pre-made sets are not significantly more expensive. And they will save you time and some potential frustrations if you don’t want to learn how to build a door frame.
However, the biggest benefit of building your own door frame is customizing the size. This is especially great if you’ve got odd-sized doors.
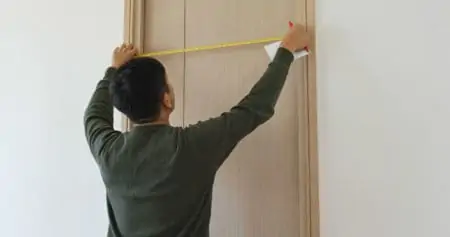
Measuring a Rough Door Opening
Getting the preliminary opening size correct the first time will save you time and stress during the door installation process. Framing rough opening sizes is a rather straightforward process.
Simply add two inches to the width and 2.5 inches to the height of the actual door. This will allow for sufficient clearance between the door frame and the sub-floor.
For example, if the door you want to frame is 32 inches wide and 80 inches high, the rough opening will be 34 inches wide and 82.5 inches high.
How to Frame a Door Opening
Whether in a basement or in a hallway, it’s pretty easy if you have the right steps.
What You’ll Need
- 2×4 wood.
- Handsaw.
- Measuring tape.
- 12D nails.
- Hammer.
1. Gathering Materials
Decide whether to purchase or build a frame. You can make your own door frame if you have the time, skills, and supplies necessary to do the work properly.
Determine the dimensions of the framing pieces in the wall where the door will be framed. This will tell you exactly what to buy at the hardware store.
Most interior wall wood studs are 2x4s. If you’re dealing with an exterior wall, go for 2×6 studs to allow room for insulation (if needed).
2. Cutting the Materials
Trim the sill plate and studs to the appropriate width. Trim the door header, as you’ll need to cut two 2x4s to the same width as the original opening and secure them together with nails.
Don’t Cut The Top Plate
The top plate is meant to bear the weight of the joists or rafters above. If cut, it can compromise the integrity of your whole house.
3. Assembling the Frame
To assemble the frame, you’ll have to do the following:
- Utilize 12D nails to secure the top plate into the ceiling joists or blocks.
- Nail the soleplate to the floor joists or blocking, forcing the nails into the joists.
- Nail the king studs in place with 12D nails. Drive the nails at an angle to create a toenailed junction or use metal connectors to secure the studs.
- Nail the jack studs against the inside of the king studs.
4. Inserting the Header
Cut two 2x4s to the width of your door’s original opening. Utilize them to create a header for the area above the entrance. Once in position, fasten these header pieces with nails. Between the king studs, the header should fit tightly atop the jack studs.
5. Inserting the Cripple Stud
Cut one or two studs to the appropriate length to make them fit between the top plate and the header. Use toenails to secure the cripple studs.
6. Removing the Sole Plate
Grab your handsaw and remove the part of the soleplate located inside the jack stud edges.
How to Frame a Door in a Corner
When framing a door in the corner of the wall, the two primary considerations are structural soundness and providing a satisfactory nailing surface for wall covering and interior sheathing.
The “three-stud corner” is a common approach for interior wall corners. The corner is formed with three studs fastened together or two studs sandwiching blocking that acts as a spacer.
FAQs
Didn’t get the answers you were looking for? Here are some common questions I often hear.

Can You Install a New Door in an Old Frame?
Yes, you can, and there are two methods to do it. Use a “pre-hung” door that is already set into a finished frame to replace the old door and jamb.
Or use the existing jamb and set a new door into the hinges. Either method necessitates considerable carpentry expertise.

How Do You Put a Frame in a Load-Bearing Wall?
To cut an opening in a wall designed to support weight, you will have to redistribute that weight above the door frame. You are basically going to have to install a header across the new opening to support the weight.

Can You Frame a Door Without Jack Studs?
Jack studs are not structurally necessary. However, they are preferred for various other reasons, like the fact that they help strengthen the door opening.
Final Words
Now that you know how to frame a door, the only thing that’s left to do is grab your materials and tools and get at it!