Have you ever wanted to hang a swinging chair from the ceiling but have no idea how to locate a stud? Or maybe install some hanging plants?
Finding ceiling studs doesn’t always require a stud finder, as there are other methods you can try. And sometimes a stud finder won’t even work, depending on the type of ceiling you have.
I will show you how to find studs in a ceiling structure using several tricks that you might not have heard of.
Key Takeaways
- Studs are vertical beams in walls, while joists are horizontal beams in ceilings and floors.
- Ceiling joist spacing can be 12, 16, 19.2, or 24 inches apart, depending on the house style and construction date.
- A stud finder is the easiest and most effective way to locate ceiling joists, but magnets, measuring, and outlets can also be used.
- 2×4 ceiling joists can typically support 15 to 20 pounds, depending on the hanging hardware used.
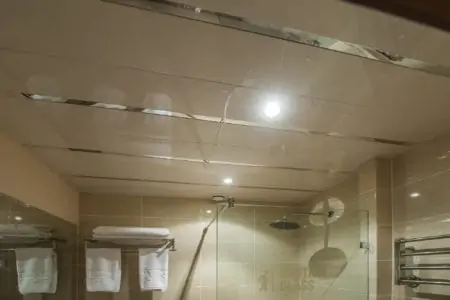
Are there Studs in the Ceiling?
Whether you live in a house or in an apartment, you might find yourself in a situation where you need to locate ceiling studs. But let’s clarify something first.
A stud is a vertical beam, whereas a joist is a horizontal beam. Studs are located in the walls, and joists are found in ceilings and floors. However, they are very similar, and you can spot both with a stud finder.
So, technically speaking, a ceiling doesn’t have studs; it has joists. While joists may be visible in some rooms of your home (like the garage), they are typically hidden underneath your drywall.
Ceiling Studs Spacing
The standard spacing for ceiling studs is 16 inches. The joist spacing in this design method incorporates a variety of wood species, including southern pipe, hemlock fir, and Douglas fir.
Additionally, you can find spacing in various increments of 12 inches, 19.2 inches, and 24 inches.
It really depends on the style of house you have, and when it was built.
How to Find Studs in Ceiling
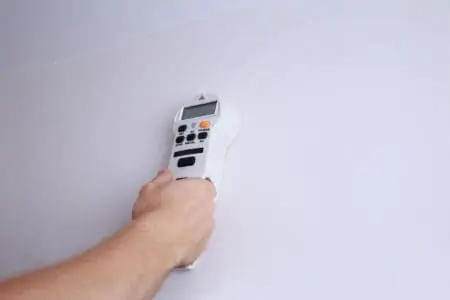
In this next section, I’ll show you a DIY method on how to detect studs in the ceiling using a stud finder. It’s the easiest and most effective way.
What You’ll Need
- Ladder.
- Stud finder (if you don’t have one, I’d suggest this Craftsman Stud Finder).
- Pencil.
- Tape measure.
1. Calibrate the Stud Finder
Get your ladder and place it next to a wall. Climb up the ladder and hold your stud finder to the ceiling, a few inches away from the wall. Look at the device’s manual and calibrate it accordingly.
2. Locate the First Stud
Take your tape measure and calculate 16 inches from the wall, across the ceiling. Run the ceiling stud finder at that spot.
It should light up when you find the edge of a stud. Alternatively, measure 24 inches away from the wall and run the stud in that area.
3. Find all the Studs
Depending on where you found the first stud, measure the same distance from that spot to find the next stud. Run the stud finder over that area once more to locate the next joist. Repeat the process until you find all the studs in the ceiling.
How to Find Ceiling Studs Without a Stud Finder
If you don’t have a stud finder at hand, that’s okay. Learn how to detect studs in the ceiling using other techniques without a stud finder.
With Magnets
Magnets are super handy for several DIY projects around the home, including finding studs because studs have metal nails in them. I’d suggest using a strong magnet, though, like this Neosmuk Fishing Magnet.
What You’ll Need
- Ladder.
- Magnet.
- Tape measure.
- Nail.
- Hammer.
1. Find the First Stud
Take your ladder and place it against the wall. Since ceiling joists usually have screws, nails, and other metal hardware, so you can use a magnet to find them.
Start where the wall meets the ceiling and move the magnet across the ceiling to locate the first stud.
2. Nail the Stud
Once you see the magnet react, hit the nail to locate the joist.
3. Repeat the Process
Take your tape measure and measure 16 or 24 inches away from the stud to locate the next one. Repeat the process: use a magnet, find the stud, nail it, then measure again.
By Measuring
There are some older homes with thick plaster covering the ceiling joists. Using a stud finder is inefficient and impossible with this construction approach.
What You’ll Need
- Ladder.
- Tape measure.
- Nail.
- Hammer.
1. Find the First Attic Stud
Go to your attic. Locate the nearest stud to the wall and nail as close to the joist as possible. Then strike the nail with the hammer until it penetrates the ceiling.
2. Measure the Spacing
Determine the distance between your ceiling studs while considering the standard spacing. Then return downstairs and locate your nail.
Measure 16 or 24 inches from the nail using the tape measure depending on the measurement taken while you were in the attic.
With Outlets
This method works quite well for walls, and if your ceiling has outlets, you can easily locate the remaining joists.
What You’ll Need
- Ladder.
- Tape measure.
- Nail.
- Hammer.
1. Locate the Outlet
Outlets are screwed into the studs. They are often joined to wall studs but occasionally to ceiling joists. Once you’ve located the outlet and the direction in which the studs are running, measure 16 inches.
2. Find the Stud
Note the measurement and get the nail and hammer. Place the nail on the mark and strike it with the hammer. If the nail readily penetrates the ceiling, you have missed the stud.
You must then reposition the nail about an inch left or right and try again, continuing to poke holes in the ceiling until you come across a stud. Alternatively, you must measure 24 inches to locate the stud.
In a Popcorn Ceiling
Stud finders use density to locate beams and are ineffective on popcorn ceilings. But here’s a method you can use.
What You’ll Need
- Ladder.
- Tape measure.
- Nail.
- Hammer.
1. Hammer the Ceiling
Hammer a short nail into a popcorn ceiling 16 inches from the wall to check for a joist. If your nail enters the ceiling but does not come to rest on a solid surface, check an inch away.
If that does not work, measure 24 inches from the wall and check there instead.
Take Note
This method is also effective in locating a joist under plaster ceilings.
Why Can’t I Find the Ceiling Joist?
Lightly tap the ceiling with your knuckles. Listen for the hollow sound. This signals the presence of a space between two ceiling studs. When it hits a joist, it’s a solid sound.
When you believe you have identified a ceiling joist, pierce the wall or ceiling with a small nail to confirm your suspicions. If you are correct, you have located the ceiling joist. If you are incorrect, you will have a small hole to repair.
You can also do a little bit of detective work to find your joists.
Begin by inspecting the room’s trim. Shoe and crown moldings, as well as baseboards, are all attached to studs. If you notice a telltale indentation where a piece of trim is affixed, you’ve almost certainly discovered a stud.
Alternatively, unscrew the cover from a light switch or an electrical outlet to inspect the electrical box. One side of the box will be secured to a stud, which will be visible at a glance.
You can also look for an air duct. These are often located between two studs.
FAQs
Unsure about nailing holes in your ceiling and still don’t have a stud finder? Here are some common questions I often see when discussing how to locate studs in a ceiling.

How Do You Know Which Way a Ceiling Joist Is?
A critical point to remember about joists is that they often run parallel throughout a house. If the visible joists in your attic or basement go east to west, you may be quite assured that the unseen joists do the same.

How Much Weight Can a Ceiling Joist Hold?
Depending on the hanging hardware used, the average 2×4 ceiling joists cannot safely support more than 15 to 20 pounds.

What’s the Difference Between Joists and Rafters?
Joists are parallel horizontal beams that span an open space, connecting opposing walls in a structure and supporting both the ceiling and the floor. A rafter is a structural component that runs diagonally from the wall plate to the roof structure’s peak.

Can I Use My iPhone As a Stud Finder?
Yes. There are plenty of apps for both Android and iOS phones that will help you find studs on the walls or joists in the ceiling.

Can I Hang a Swing from My Ceiling?
Yes, as long as there is a ceiling joist to support the weight.
The Wrap Up
Now that you know how to find studs in the ceiling, you understand that you aren’t limited to a stud finder. Some methods are faster and more efficient than others, but a stud finder is, indeed, the fastest and most accurate way.