Wood is a renewable, versatile material that can be used as fuel, for building, decoration, and various other purposes. With the right tools, wood can be cut into just about any shape you need.
However, what if you don’t have access to the right tools? There are various ways to cut wood without the use of a saw, including some familiar techniques and others that might surprise you.
In this article, we will explore how to cut wood without a saw using eight different methods. At least one of these should prove useful for the task you need to tackle.
Key Takeaways
- Use a sharp knife to slice wood: Hold the blade against the wood and make an angled cut. Repeat on the other side to create a V-cut.
- Drill multiple holes to cut wood: Draw a straight line on the wood and drill several holes along the line, weakening the material until it breaks.
- Chop wood with an axe or machete: Mark the cutting spot and swing the tool at a 45-degree angle. Alternate cuts on both sides to create a V-shape until the wood breaks.
- Cut wood with a chisel, router, lathe, or plane: Secure the wood and use the appropriate tool to remove material or shape the wood as needed. Always wear safety gear and follow proper techniques.
Why Cut Wood?
The ability to cut wood has been an essential skill throughout human history. The earliest rafts and boats, buildings, and even firewood required a method of cutting wood long before the saw was invented.
Today, cutting wood remains essential for furniture, decoration, and building projects, especially as people increasingly turn to renewable material sources. If the angles are inaccurate or the cuts are out of place, it can have a significant impact on the project as a whole.
A saw can quickly cut clean lines but it won’t always be the best option, especially if you are shaping or sculpting a piece of wood. These other techniques can achieve different outcomes.
Let’s explore some of the tools you might need to use when cutting wood without a saw.
What You Need
- Sharp knife
- Drill
- Sharp axe
- Sharp machete
- Chisel
- Router
- Lathe
- Plane
- A sharpening block or stone
These tools can be dangerous in the hands of an inexperienced user, so it is important to protect yourself before you try them. Make sure you have the following safety equipment before you start working:
- Gloves
- Safety goggles
- N95 face mask
- Sensible work boots
How to Cut Wood Using a Sharp Knife
Unlike some methods, you shouldn’t need much safety equipment when using a knife to cut wood. Gloves, which are usually a reliable form of protection, might impede your ability to handle a knife properly. You probably won’t need a safety mask while cutting but you should wear one while sanding.
A sharp knife is an excellent tool for cutting wood, as long as the wood isn’t too hard. It will be suitable for cutting the wood into pieces or shaping it. A buck knife is a good option as they have the strength and sharpness necessary to cut into the material.
Here are the steps you will need to follow:
1. Sharpen the Knife
You won’t have much success trying to cut wood with a blunt knife, so make sure you sharpen it before starting your work. You can keep it sharp using a wet and dry stone or a sharpening block.
2. Use the Correct Technique
Use the slanting technique by holding the blade against the wood and making an angled cut. Do the same on the other side to make a V-cut. Keep repeating the process until the wood splits in two.
3. Try Different Methods
Another effective way to cut wood with a sharp knife is to make small chip cuts along a line around the surface of the material. As you work, chipping away material as you go, the wood will eventually become thin enough to snap with your bare hands.
4. Sand Smooth
Once the wood has been split apart, grab some sandpaper and rub the surface to smooth it.
How to Cut Wood Using a Drill
Using a drill to cut wood is simple enough that almost anyone can do it accurately. As drilling will release wood dust, it is important to wear goggles and a face mask to avoid breathing in hazardous materials. An Auger drill bit will remove more wood and help you get the job done faster
1. Mark Your Line
Use a pencil to draw a straight line along the surface of the wood, precisely marking your cutting line.
2. Drill Multiple Holes
Carefully follow the cutting line you marked and drill several holes along the surface of the wood. Drill the holes closely together as you are trying to weaken the material. Aim for something that resembles the perforations between sheets of toilet paper.
3. Repeat
Repeat this process until the wood becomes weak enough to easily break apart.
4. Sand Smooth
Rub the rough surface of the cut with sandpaper until it becomes smooth.
How to Cut Wood Using an Axe
Axes were among the earliest tools humans used to cut wood, with evidence that they were used in Australia over 49,000 years ago (1). Their designs have changed in that time but their method of hacking through wood has largely remained the same.
It is important to protect your eyes from flying debris by wearing safety goggles. You should also wear tough work boots to protect your feet in case you accidentally drop the axe or a piece of wood falls onto them.
1. Mark Your Spot
Mark where you want to cut the wood by drawing a line, or by simply using an x. Swinging an axe is one of the less accurate methods, so it won’t be suitable for precision cutting.
2. Angle the Axe
Hold your axe at a 45-degree angle if you are chopping against the grain of the wood. Always adopt a wide stance when swinging an axe as this will provide greater stability when working.
If you are cutting with the grain, hold the axe at 90 degrees. Make your first mark with the axe just above the line on the wood.
3. Alternate Your Cuts
Every second or third swing, switch your cutting to the other side of the line to create a V-shaped cut in the material, much like you would if you used a sharp knife.
4. Repeat
Repeat this process until the wood is thin enough to break. As you approach the final few cuts, you can aim the axe to strike directly at the weakest part of the wood to snap it. This will speed up the process and results in a neater break with fewer splinters.
How to Cut Wood Using a Machete
If you want to cut wood with a machete, it will need to be very sharp, like a knife or axe. This will make the task of cutting wood much easier. You should wear goggles and tough footwear to protect you against any debris that flies off the wood as you hack at it.
1. Mark Your Spot
Decide where you want to make the first strike with the machete and mark it with an x. You could draw a cutting line, but a machete is far less accurate than using a drill or knife, so it is unlikely that you will be able to hit it.
2. Angle the Machete
Hold the machete using the “pinch grip method” and swing it at a 45-degree angle to strike the surface of the wood. This will cut more effectively than trying to cut across the grain. Like an axe, if you are cutting with the grain, a 90-degree angle is the best for splitting the fibers of the wood.
3. Swap Cuts
Once you have made some progress, start cutting the other side of the mark to make a V, steadily working your way deeper into the wood.
4. Break the Wood
When you are confident that the wood is thin enough to break, either snap it by hand or use the machete to slice through the thinnest part of the material to achieve a cleaner cut.
How to Cut Wood Using a Chisel
Chisels are ancient tools and staples in the toolkits of carpenters and woodworkers as they are very versatile and can be used with great precision. You should always wear safety goggles when chiseling to protect your eyes against flying debris.
1. Secure the Material
As you will be applying downward force, you need to clamp the wood in place to prevent it from moving when you strike the chisel with the mallet.
2. Get the Angle Right
Hold the chisel at a 20-degree angle, making sure the flat side is in contact with the wood and the beveled edge faces up.
3. Be Firm but Controlled
Tap the end of the chisel with a mallet, making sure you maintain a tight grip. Gently direct the movement of the blade by levering the cutting edge upward to remove slithers of wood.
If you don’t have a wooden mallet, you can use a hammer instead. You can even use another piece of wood to tap the chisel if you need to.
4. Repeat
Repeat this process until you have removed the required amount of wood.
How to Cut Wood Using a Router
Routers are versatile tools, so it is no surprise that they are also effective for cutting wood. You should wear a face mask and goggles if you cut wood with a router.
1. Install the Router Bit
Install the router bit and adjust the gauge to achieve the desired depth.
2. Mark a Line
Use a pencil to draw your cutting line and avoid any guesswork. Lower the router bit onto the wood and pull the trigger, allowing the bit to engage with the material.
3. Direct the Cut
Move the router along the material to follow the cut, ensuring you follow the line you drew earlier.
4. Release the Router
When once you have finished your work, release the router trigger and lift the bit out of the cut. Using a router provides the option of switching the bit to work at different angles, so you can make whatever cuts you need.
How to Cut Wood Using a Lathe
Lathes are amazing tools if you want to add fine details to your project. They are a favorite of cabinet and furniture makers as they are perfect for shaping intricate legs for tables and other items.
1. Find the Center
Find the center of the piece of wood and place it between the centers of the lathe. It is essential that you complete this step carefully if you want the cuts you make to be uniform and accurate.
2. Start Slowly
Turn the lathe on at its lowest speed setting until you get a sense of how the wood feels to cut.
3. Apply Steady Pressure
As the lathe spins, apply steady pressure with the cutting tool to remove the desired amount of material. You can make circular and angled cuts using this technique.
When you are cutting comfortably, you can increase the speed to leave the wood smoother. Once you are done, switch off the lathe and remove the piece you have been working on.
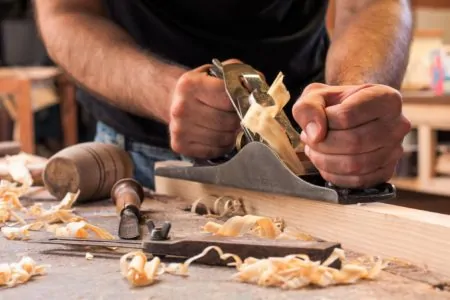
How to Cut Wood Using a Plane
There are few tools that are as satisfying to use as a hand plane, watching material curl off with a familiar sound each time you move it forward. Use a Jack plane for the quickest and smoothest results.
1. Secure the Wood
Before you start planing the wood, secure it. It must not be allowed to move when you apply pressure as this could ruin the quality of the finish. Clamp it to the work table.
2. Keep it Sharp
Like any other cutting tool, it is essential you keep the plane’s blade sharp if you want a neat outcome. Use a wet and dry block or a grinder.
3. Follow the Grain
Set the depth of the blade by adjusting the plane. Once it is ready, push the plane forward in a straight line, applying gentle downward pressure. Follow the grain of the wood and work in sweeps that cover the entire piece. Don’t stop halfway, as this will result in rough patches or an uneven finish.
4. Flip and Repeat
Turn the wood over and repeat the process, ensuring the blade doesn’t the surface of the material until you reach the edge. Once you have achieved the finish you want, remove the wood from the clamps.
FAQs

Can I Use a Diamond Blade to Cut Wood?
Diamond saw blades are unsuitable for cutting wood, but they are excellent for cutting hard stone-like materials and tiles. The diamond grit of the blade won’t be able to cut the soft fibers of the wood effectively.

Can I Cut Wood With Scissors?
You might be able to use scissors to cut wood but it depends on the type of wood and the scissors you use. Balsa wood can be cut using standard scissors because it is a soft, lightweight modeling material. There are industrial scissors that can cut plywood up to a certain thickness but these scissors are very large, over 12 inches in length.

Can a Tile Cutter Cut Wood?
It is technically possible to cut wood using a tile cutter, but this will result in a very low-quality cut. The fine grit on the blade would rip and splinter the wood, leaving you with a tear rather than a neat cut. This will also take longer, so it isn’t worth it if you have any other options.

Can I Use an Angle Grinder to Cut Wood?
Angle grinders can cut wood. If you hold the cutting disc against the surface of the stock and maintain a firm grip, you can apply gentle pressure as the disc cuts through. It will be tricky to control and may jump, but you will be able to cut the wood. Angle grinder blades are aggressive and spin at 15,000 RPM, so don’t expect a neat finish.


Does Home Depot Cut Wood?
Home Depot does cut wood. They only use course-cut blades, whatever the type of wood, so they might not provide the neat finish you want. However, for general cuts, Home Depot has a large wood-cutting department.

Can You Cut Wood with a Sword?
Contrary to popular belief, cutting wood with a sword is impossible. Although a sword is a sharp weapon designed for battle, its function is far from that of an ax or saw, which can properly slice through wood.
Attempting to use a sword for such purposes is discouraged due to its ineffectiveness and high risk of damage.

Can You Cut Wood with Sandpaper?
The answer is yes and no; while sandpaper cannot completely cut wood, you can use it to shape or guide a piece of wood when cutting it with a saw or other tool.
Sandpaper’s grit removes excess material and creates fine details that are difficult to achieve with a saw or knife.
For example, you can use sandpaper to gradually slope out corners and curves in the surface of the wood. It may not be the best for making major cuts into the material. Still, its more delicate benefits make it an invaluable tool for crafting beautiful wooden objects.

Can a Hammer Chop Wood?
Many people falsely assume that hammers are meant solely for pounding nails. In reality, hammers can be surprisingly versatile tools for construction projects.
While it is technically possible to use a hammer to chop wood, it is not the ideal method and should only be used as a last resort due to the dangers associated with such a practice.
Such hazards include kicked-up wooden splinters, uncontrolled swings of the hammer, and potential injury due to fatigue from repetitive motion. If at all possible, tools specifically designed for cutting wood should be utilized instead of a hammer for the sake of safety.