Your home should be as energy-efficient as possible to reduce energy usage and save you money. It all starts with properly caulked windows because air leaks and moisture make it impossible to maintain heat levels.
Showing you how to caulk a window means you can take care of those little maintenance tasks and keep your home toasty warm.
Key Takeaways
- Choose the right caulk: Exterior windows require weatherproof caulk like industrial silicone, while interior windows can use household silicone or latex and water-based products.
- Prepare the surface: Remove old caulk and debris, repair any damage, and clean the surface before applying new caulk for better adhesion.
- Smooth application: Use a caulk gun and cut the nozzle at a 45-degree angle for a smoother application. Apply steady pressure and use both hands to guide the gun.
- Let it cure: Wait at least 24 hours for the caulk to dry and cure properly. Avoid disturbing the caulk during this time.
Best Caulking for Windows
So, the time has come to caulk those drafty windows, but which caulk is the best? With so many products available and so many claims made by the manufacturers, it can be a challenge to figure it out.
For Exterior Windows
When caulking exterior window frames and other dissimilar surfaces, you should use a caulk that can withstand the rigors of mother nature.
Industrial silicone like this Gorilla Clear Silicone and expandable spray foam like this Loctite Tite Foam bond to almost any material.
Filling cracks around trim or window panes requires a caulk that resists UV. Expandable foam is better for larger gaps and only resists the sun when it is painted. Butyl rubber like this Red Devil Pro Rubber Sealant lasts 10-plus years and is paintable after a week.
For Interior Windows
The inside of your windows get less punishment than the outside, so the caulk doesn’t need to be so resilient. Household silicone or latex and water-based products like this Dap White Caulk will seal your window frames to stop air leakage.
Interior caulks are better at sealing smaller cracks, and because they are typically water-based, they clean up easier with soap and water. They also don’t emit VOCs (volatile organic compounds), which release low-level ozone into the air as the sealant dries.
Type of Caulk
Household Silicone
- Recommended use: Seals joints between the bath and sink. Adheres to tile, metal, and gutters.
- Cleanup: Dry cloth and mineral spirits.
- Shrinkage: Minor shrinkage.
- Adhesion: Excellent.
- Cost: $$$$$
- Handy Notes: Flexible: enables one-half width expansion and three times length stretch.
Industrial Silicone
- Recommended use: Seals metal, wood, masonry, flashing, and stone.
- Cleanup: Dry cloth and mineral spirits.
- Shrinkage: Minor or no shrinkage.
- Adhesion: Excellent.
- Cost: $$$$$
- Handy Notes: Allows flexibility and compression of joints. Sticks to painted surfaces but cannot be painted.
Expandable Polyurethane Foam
- Recommended use: Ideal for window and door frames and areas with non-friction. Also suitable for larger gaps.
- Cleanup: Solvent-based lacquer thinner if immediate.
- Shrinkage: None: expands significantly.
- Adhesion: Excellent.
- Cost: $$$
- Handy Notes: Fills larger and irregular-shaped gaps. Must be painted on exterior surfaces because UV will damage it. The manufacturing process produces greenhouse gasses.
Water-based Foam Sealant
- Recommended use: Works well on window and door frames with small cracks.
- Cleanup: Soap and water.
- Shrinkage: None: expands by 25 percent.
- Adhesion: Excellent.
- Cost: $$$$$
- Handy Notes: After 24 hours, it cures to a soft consistency. It isn’t harmful to the environment and needs air to cure. Not suitable for large gaps.
Butyl Rubber
- Recommended use: Seals most dissimilar materials like glass, wood, metal, roof tiles, plastic, flashing, and concrete.
- Cleanup: Mineral spirits.
- Shrinkage: Between 5 and 30 percent.
- Adhesion: Good.
- Cost: $$$
- Handy Notes: Lasts 10+ years. It is paintable after one week. May need two applications to combat variable shrinkage. Doesn’t stick to painted surfaces, and it is toxic.
Latex
- Recommended use: Fills joints around sinks, bathtubs, and showers. Ideal for smaller gaps in plaster, tile, and plastic.
- Cleanup: Soap and water.
- Shrinkage: Between 5 and 10 percent.
- Adhesion: Excellent.
- Cost: $$$
- Handy Notes: Water-resistant when dry and is easy to use. Can be sanded and painted, and it lasts between two and 10 years. Needs to be painted when used externally.
Oil or Resin-based
- Recommended use: Seals exterior seams and joints on different building materials.
- Cleanup: Mineral spirits.
- Shrinkage: Between 10 and 20 percent.
- Adhesion: Good.
- Cost: $$
- Handy Notes: The most commonly used variety. It tends to dry hard and only lasts one to four years. Poor adhesion to porous surfaces like on brick and masonry. Needs to be painted, and it has a limited temperature range.
How to Caulk a Window
When caulking, the process differs for interior and exterior windows. Latex caulks are not good in high-moisture environments, and they don’t respond favorably to temperature changes.
Working with silicone is the best option for exterior windows because it has excellent moisture resistance. It also responds well to temperature changes. So, the first difference is you need to choose your caulk wisely.
Exterior gaps tend to be more significant because of weathering, so you might need an expandable filler. Polyurethane expandable foam is an excellent filler, but it has a weak spot: it doesn’t resist UV radiation. It needs a coat of paint to stop it from turning to dust.
Another difference between interior and exterior windows is the temperature. You shouldn’t attempt to caulk when the temperature is below 45 degrees Fahrenheit. This could be a problem outdoors, but the heating inside keeps conditions more comfortable.
Now we’ve covered which caulk is right for the job, let’s get into the detail of how to caulk your windows.
What You’ll Need
- Caulk (for the particular application).
- Caulk gun.
- Water or mineral spirits.
- Dish soap.
- Bucket.
- Clean rag.
- Putty knife.
1. Start on the Ground Floor
Locate the windows that need caulking on the ground floor first. You can always switch to the top floor later. This gives you a head start because the windows are easier to access for exterior work.
2. Remove the Old Caulk
If the surfaces are clean, you get a better bond, so grab the putty knife and remove the old caulk. The putty knife should be all you need to get all the old caulk out. You may need to apply a bit of brute force on the stubborn bits.
3. Prepare the Surface
Once the surface is caulk-free, it’s time to perform any necessary repairs. Remove rotted wood, clean away debris, and wash the surface down with dish soap and water. Flaking paint will stop the caulk from bonding and cause it to lift off the surface.
4. Load the Caulk Gun
Place the nozzle end of the caulk tube into the yoke of the caulk gun. Squeeze the trigger, so the plunger makes contact with the base of the tube. This holds it in place and leaves your hands free to cut the nozzle.
Size up the gap you are caulking and cut the nozzle accordingly. The ideal is about 0.25 inches back from the tip. Cut the nozzle at a 45-degree angle to help you guide the caulk and to get a smoother application.
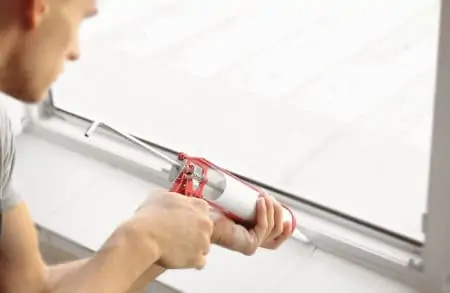
5. Start Caulking
Place the tip against the corner where you want to begin. Squeeze the trigger and gently move the caulk gun along the seam, maintaining steady pressure on the handle. Use both hands to guide the gun.
When you get to the middle, depress the gun’s thumb release and lift the caulk free. Place the nozzle in the opposite corner and repeat the process until both caulk lines meet in the middle.
Repeat over all four sides of the window.
Always start in the corner, never the middle. It makes the caulk gun easier to control and allows you to lay down an even line of caulk.
6. Smooth the Caulk
Use a smooth object like the putty knife to spread the caulk, or use your finger. Dip it into the water and smooth the caulk, starting in the corner and ending opposite. Wipe the excess off your finger using the rag.
Caution
Only use your finger if you use acrylic or water-based silicone. Silicones that contain solvents or oils could irritate your skin.
7. Curing Time
Wait at least 24 hours while the caulk dries. After a few hours, it may have a thin film on the surface, but the material beneath will still be wet. The caulk needs to be undisturbed for it to cure correctly and bond with the surface.
Tips for Caulking Like a Pro
Unlike you, the pros do this every day of the week. If you are a beginner, getting an insight into professional techniques will improve your caulking skills. So, what are the hacks and cheats they use to get a super-smooth caulking finish in double-quick time?
Tape Off Your Seams
One of the simplest ways to get a straight seam is to tape off with decorator’s tape. It helps keep the caulk in line, and it creates a neat edge. Try using this technique if you suffer from shaky hands or just want the smartest way to a perfect finish.
Attach two strips of decorator’s tape approximately 0.125 inches from the seam on either side. Now run the strip of caulk between the tape and smooth the caulk as directed above. Then remove the tape and you will have a perfect 0.25-inch caulk seam.
Don’t Use Caulk As a Filler
Caulk seals narrow seams about 0.25 inches wide. Trying to fill more significant gaps will only result in the filler sagging under its weight. It’s better to use expanding foam for bigger gaps and then caulking on top of that.
Use Both Hands
To use a caulk gun properly, you need two hands. Your dominant hand controls the gun and trigger while your other hand steadies the nozzle.
Keep your wrists straight and move your elbows and body while laying down a seam of caulk. It ensures a smoother outcome and better accuracy.
Cut the Tip Correctly
You should cut the tip about 0.25 inches from the top of the nozzle. It’s better to underestimate the size than cut too much. You can always widen the opening if you need it rather than getting it wrong and cutting too wide.
Don’t Caulk Over Old Caulk
Old caulk pulls away and leaves gaps as it perishes. If you caulk over an existing caulk, all you do is increase the chances of the old filler pulling the new silicone with it. This defeats the point of caulking to fill gaps.
How Often Should I Caulk my Windows?
Caulk lasts around five years on average, although this can vary depending on the weather conditions. It’s why you should check your caulk every two years to be on the safe side.
If you feel the temperature drop in your home or your heating bills rise, it could be a sign of leaky windows.
FAQs

Is It Easy to Caulk Windows?
Caulking windows is easy and surprisingly affordable. With a bit of practice, almost anyone can get a semi-professional finish and seal their windows for winter.

Can You Caulk Over Old Window Caulk?
You have to remove the old window caulk before applying new silicone. If you lay a seam on top of cracked and dried caulk, it pulls away from the surface and drags the new caulk with it, exposing more gaps.

Where Should You Not Caulk Around Windows?
You should avoid caulking movable parts on your window and the ledge above the window frame. This part above the window has a drip edge to channel rainwater away from the window.

How do You Fill the Gap Between a Wall Sill and a Window?
Gaps larger than 10mm between the window frame and the wall should be filled using expanding foam. Caulk won’t work for these bigger gaps because it tends to crack, bringing you right back to where you started.
The expanding foam will seal any crevices between the wall sill and the window. And, once it’s set, you can trim any excess.

What Is the Easiest Way to Smooth Caulk Down?
The easiest way to smooth caulk is to use a jointing tool like this Ailevant 5-in-1 Caulking Tool. It scrapes, smooths, and removes old caulk. Failing that, try using your finger as long as the caulk is water-based.
Let’s Talk Caulk
The secret to successful caulking is to select the right caulk for the job. Interior caulks are less robust and generally better for sealing thinner gaps. Exterior caulk has weatherproofing qualities that make it impervious to water, heat, cold, and UV.
Most caulk will last for five years, but inspecting your windows regularly for leaks could save you a lot of money this winter.