Building a shower bench is an excellent idea if you have elderly relatives coming to stay or you are fed up with standing while grooming. Constructing a built-in shower bench probably sounds daunting, but it is easier than you think.
We show you how to build a shower bench and highlight the pros and cons of why you should.
Key Takeaways
- Building a shower bench: Ideal for elderly or those with limited mobility, making showering more comfortable.
- Best materials: Teak, bamboo, or cedar with preserving agent; other options include marble, ceramic tiles, porcelain tiles, and granite.
- Construction process: Create a box frame, attach to shower wall, attach plywood seat, waterproof with membrane, install backer board, and tile the bench.
- Alternative options: Ready-made shower benches, kit benches, or teak corner seats for smaller showers.
Pros and Cons of a Built-in Shower Bench
Not convinced that a built-in shower bench is for you? Let’s take a look at the reasons why you should build one against the reason not to.
Pros
- Helps make your shower experience more comfortable.
- Easier to sit and shave your legs.
- Better for the elderly.
- Ideal for people suffering from illness or instability.
- Helps those with limited mobility.
Cons
- Need a shower large enough.
- Restricts floorspace.
- Added expense to build.
What Wood Is Good for a Shower Bench
The best wood for building a walk-in shower bench is teak. It is dense and handles moisture well, so it shouldn’t rot. You can also use bamboo and cedar as an alternative. Remember that whatever wood you use needs to be treated with a preserving agent.
Another alternative to teak is pressure-treated lumber. It contains preservatives that repel moisture and insect infestation.
Other great materials to use for your new shower bench include:
- Marble.
- Ceramic tiles.
- Porcelain tiles.
- Granite.
The worst wood to use is pine. It is softwood, so it soaks up moisture like a sponge. You also want to avoid using acrylic and fiberglass. They may seem like good options because of lower costs, but they will crack, sag, and perish over time.
How to Build a Shower Bench
Making a basic shower bench with a sloping seat is pretty straightforward. We could build a floating seat but prefer the sturdiness of a box design. Before we begin, you’ll need to gather the right tools and materials.
What You’ll Need
- 2×4 pressure-treated lumber.
- 3/4-inch pressure-treated plywood.
- Nail gun.
- Measuring tape.
- Spirit level.
- Circular saw.
- Drill.
- Waterproof shower membrane.
- Tile trowel.
- Tiles.
- Backer board.
- Tile adhesive.
- Grout.
- Tile float.
- Damp sponge.
- Decide on the style and design of the seat. Are you building a box seat or something open-plan?
- Measure the seat’s height, ensuring that the back is higher than the front. A 1/4-inch drop for every foot will suffice. To get the correct dimensions, use your toilet as a guide. Most toilets are between 15 and 20 inches high.
- Cut all the lumber to the correct sizes before you begin construction. Nail the pieces together using the nail gun to build a box frame.
- Screw the box frame to the shower wall. You can either remove existing tiles and screw the seat frame into the shower framing or backer board, or screw it directly to the tile. For the best results, remove the tiles.
- Cut the plywood seat to size and screw it in place.
- Attach the shower waterproof membrane. Start at the base of the seat, working your way up. Ensure there is an overlap of at least six inches on the shower wall.
- Install the new backer board using galvanized screws to prevent rusting. Work from the bottom up.
- Spread thinset tile adhesive to the backer board and lay your tiles using spacers for even seams.
- Wait for 24 to 48 hours for the adhesive to dry before using the tile float to apply the grout.
- Wipe away the excess grout with a damp sponge.
- Wait for 24 to 48 hours while the grout dries.
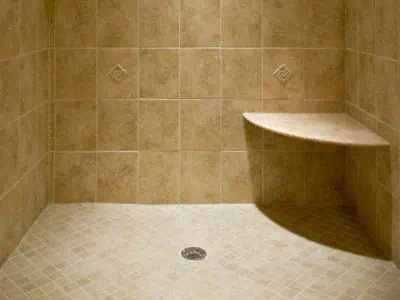
How to Build a Corner Shower Seat
Corner shower seats are ideal for smaller showers because they occupy less floor space. However, building one is more complex because you need to get the angles right. It’s easier to build a floating bench.
Assuming your shower walls meet at 90-degrees, you will need to cut a strip of lumber with opposing 45-degree ends. Cut two lengths of wood to the desired depth of the seat and screw them to the walls. Now attach the front baton and screw the angled ends to the wooden studs.
Add two vertical strips of wood from the floor to the underside of the seat for additional support.
Cut the plyboard to the correct size and slot it onto the seat frame. Secure it with screws.
Now it’s time to waterproof the seat with liquid rubber. Wait while the membrane sets, spread thinset mortar and press the tiles in place. The final step is to grout.
How to Waterproof a Shower Bench
Once you’ve constructed your shower bench, you will need to protect it against water damage. You’ll need a liquid rubber or marine-grade wood sealer.
Both of these products stand up to water damage, protecting the wooden structure of your shower bench. You can also buy rolls of polymer membrane to coat your shower seat structure.
Keep In Mind
You may need to use waterproof membrane tape, like XFasten, to seal the joints.
How to Build a Shower Bench With Concrete Blocks
Using concrete blocks to construct your DIY shower bench is an excellent idea. It is probably the easiest shower bench construction project. But you will need to reinforce the shower base beneath the blocks because concrete is heavy.
What You’ll Need
- Concrete blocks.
- Mortar.
- Trowel.
- Bucket.
- Power drill.
- Mixer attachment.
- Water.
- Thinset mortar.
- Marine-grade plywood.
- Spirit level.
- Start by mixing up the mortar in a bucket. Use a drill with a mixer attachment to get a smooth consistency. For the correct ratios of water to mortar, consult your particular brand.
- Pour the mortar into the unfinished shower base. Use the trowel and spirit level to even out the surface. If you get this wrong, your shower bench will lean.
- Lay the first block in the mortar and continue until you have the required dimensions.
- Add another layer of mortar to the first set of blocks and place the second layer of blocks on the top. Keep doing this until you’ve reached the height you want.
- Now comes the tricky bit. You will need to layer the mortar on the top of the bench to slope 1/4-inch for every foot. This allows water to run off. Use the spirit level to help you find the angle.
- Allow the mortar to set. This could take 24 to 48 hours.
- Cut the plywood seat and attach it using concrete screws.
- Coat the concrete in liquid rubber and wait while the membrane cures.
- Spread the thinset mortar over the structure and start applying the tiles.
- Wait while the adhesive sets before grouting.
- Use a rubber float to spread the grout into the seams and wipe away the excess with a damp sponge.
- Wait 24 to 48 hours while the grout dries before using the bench.
Ready-Made Shower Benches

Don’t fancy getting your hands dirty constructing a shower bench inside your walk-in shower? The alternative is to purchase a ready-made shower bench or one that comes in kit form.
Here are a few ideas to get you started:
Ready-to-Tile Bench Seat
This is a great option if you don’t want the hassle of building a bench seat but still want to personalize your bathroom design.
It comes as a ready-made box seat that you can lay your adhesive and tiles directly onto without voids beneath the seat where mold can grow.
While this is a good choice for those looking for a middle ground, it is expensive compared to other shower seats.
Lightweight Adjustable Seat
If you have elderly relatives or family with mobility issues, Dr. Kay’s Adjustable Height Bath and Shower Chair covers all the bases. It has large rubber feet for grip and a curved seat for better posture.
You can pop it in the shower for one person and remove it for the next. If you have a limited budget, this chair ticks the boxes. It costs a quarter of the ready-to-tile model.
Medical Transfer Seat
This Medline Transfer Bench takes all the best attributes of the lightweight and adjustable model and ramps it up a notch. You get an extra-wide seat, with an armrest on one side and a backrest for better comfort.
It still has adjustable legs and rubber feet, but it will accommodate larger family members with ease. It also doubles up as a bath transfer seat when getting in and out of the tub.
Teak Shower Seat
You cannot feature shower seats without including a classic teak option, like this TeakCraft model. It looks stylish in a cool Scandinavian way, is hard-wearing, and withstands the ravages of water damage with ease.
It takes a maximum weight of 300 pounds and comes ready-made. It has a curved seat with teak slats, and it stands 21 inches high.
There is a downside, and that’s the price. This seat costs four times the adjustable model, making it one of the most expensive.
Teak Corner Seat
Sticking with the teak theme, ALA Teak has a corner seat option. Even smaller showers can have a seating option because they take up less floor space.
This corner seat has two tiers, so you can store shower gels and other wash accessories, and because it’s free-standing, it can be removed for other family members.
FAQs

How Much Does It Cost to Build a Bench In a Shower?
You will spend between $800 to $1,000 completing your self-build shower bench. The type of materials you use affects the price, with tiles and granite costing more than other materials.
If you opt to have the bench built professionally, you can probably add another $500 in labor costs.

What Size Shower Do I Need for a Bench?
You should consult your local building code to find the minimum and maximum sizes. Also, consult the Americans With Disabilities Act (ADA) because they state the minimum height is 17 to 19 inches and the seat depth 15 to 16 inches.
If your shower cannot accommodate these dimensions, you should consider getting a shower seat or installing a larger shower.

Do Bamboo Shower Benches Get Moldy?
While bamboo is a great material, it is more susceptible to mold and mildew than teak. Teak is the best wood because it is so dense, making it hard-wearing and resistant to moisture.

How Do You Build a Floating Shower Bench?
You will need to secure a sheet of marine-grade plywood to a baton on the back and sidewall. This gives it the rigidity it needs. You should then waterproof the plywood using a liquid membrane and thinset mortar. Finally, you will need to apply the tiles and grout.
Build That Bench
Knowing how to build a bench in a shower will transform the way you and your family use it. Kiss goodbye to leg shaving disasters and say hello to a relaxing shower experience. And all from the comfort of your new bench!