Building a roof over a deck has many benefits. It protects you from the sun and rain, making it a more usable space. However, not everyone knows how to build a roof over a deck.
This article discusses deck roof construction, explains the benefits, and runs through the likely costs.
Key Takeaways
- Consider deck’s weight capacity and light exposure before building a roof.
- Choose a roof design that suits your deck and house, such as gable, slanted, hip, or flat.
- Follow proper construction steps, including planning, preparing the house, and installing posts, beams, rafters, and roof covering.
- Expect costs to range from $2,000 to $10,000, depending on size and materials.
Should I Put a Roof Over My Deck?
Before we answer that question, maybe you should ask if your deck is suitable for taking the weight of a roof? Adding a roof to a deck increases the overall weight. If your deck lacks the necessary supports, you could do more harm than good.
You also need to consider the aspect of your house and whether the roof will block light coming into your home.
Advantages
As with everything, there are pros and cons, and here are a few to consider:
Increases Value
You could potentially add value to your home if you create a family-friendly space that can be used all year round.
Year-Round Use
Who cares what the weather reports say when arranging that family barbecue. You can grill your favorite steaks with wanton abandon, laughing wildly as Mother Nature dumps the wet stuff on everybody else.
But not you! You are bone dry under your deck roof.
Helps Plants Grow
Enclosing your deck with a roof creates a greenhouse-like effect, which plants love. All that extra heat means you can actually increase your growing capacity and maybe cultivate some more unusual plants.
Dry Clothes
Spin dryers are expensive to run, but they are necessary for winter. Having a pitched roof over your patio means you can hang your clothes out to dry, no matter what the weather does.
It saves expensive electricity bills and reduces your carbon footprint.
Disadvantages
There are also a couple of disadvantages to adding a DIY roof to your outdoor space.
The Cost
It isn’t cheap to build a roof over your deck. There’s the cost of support posts, additional wood, and the particular design you opt for. Installing a gable end increases the price, while a flat roof would be less expensive.
Skill Level Needed
Depending on your plans, building a roof over your deck requires a degree of skill. While we show you the easiest methods, you still need some basic woodworking experience. If you have to pay a pro, it will dramatically increase the amount you spend.
Blocks Out Light
If your covered deck is free-standing, it won’t affect the amount of light coming into the house. But if your deck is an extension of your home, where you place the roof could darken adjoining rooms.
This is especially true of north-facing aspects, where sunlight is already limited.
Will the Deck Take the Weight?
A deck alone will not take the weight of a new roof. You will need to lay concrete footings to support the posts and beams. Your local building code will decide on the size of the beam, so be sure to check.
Can I Build the Roof Myself?
If you have zero experience working with wood or roofing, you will probably benefit from getting some assistance from an experienced friend. They can show you the ropes, and you will learn on the job.
Failing that, consider building the posts and supports and get a professional roofer in to complete the roof.
Constructing a deck roof is not as simple as other woodworking tasks, but you can do it as long as you follow the steps laid out below.
How to Build a Roof Over a Deck Attached to a House
This article covers building a roof over a deck attached to a house, but several plans and designs are available. Remember that these instructions may vary depending on your deck plan and roofing type.
The time has finally come to cover that deck, but before we get into the nitty-gritty of the detail, we first need the right tools and materials.
What You’ll Need
- Two 6×6 posts.
- Beams.
- Rafter brackets.
- Post beam connectors.
- 16d nails (3.5 inches long).
- Hammer.
- Circular saw.
- Tape measure.
- Spirit level.
- Face mask.
- Goggles.
- Safety gloves.
1. Make a Plan
Never enter into this project without a clear plan. The structural integrity of your deck and roof depend on it. You will need detailed CAD drawings or call in a professional to draw up your design.
You can purchase software to make detailed designs, but unless you have building experience, it might be better to get a pro to do it. Your local building department also needs a copy of the plan to issue a permit.
Once you gather the materials and tools, it makes sense to break out the circular saw and cut all the pieces of timber to size. It makes construction a lot easier and speeds up the process.
Safety Notice
Always take safety seriously. Don your face mask, goggles, and gloves before cutting wood. It protects you from dangerous particles that irritate your lungs and eyes.
2. Prepare the House
The new rafters of your sloped roof will need to follow a similar gradient as the existing roof for aesthetic purposes. Building out from the house also means attaching your new rafters to your house trusses and rafters.
You need to remove a section of your existing roofing (that means making a hole in your roof), including sheathing, soffits, and fascias. You’ll also need to remove any gutters.
If you attach the deck roof to a flat exterior wall, you need a ledger board fastened to a rim joist. The ledger board supports the weight of the beams and ultimately holds up trusses and rafters.
If you install a ledger board, you will need flashing to stop rainwater from getting in. The flashing should cover the top surface of the ledger board and provide a stable base for the rafters to sit on. Install it up and under the existing siding and attach it to the sheathing with adhesive.
3. Install Post-Base Connectors
You will need to dig new concrete footings to install your post-base connectors. Dig down beneath the frost line and install 10-inch Sonotubes (reinforced cardboard tubes) to hold the posts.
The frost line varies depending on the climate where you live. It can be as deep as 72 inches and as shallow as six inches. Fill the holes with concrete and top it off with 6×6-inch post brackets.
Take Note
Use the spirit level to ensure that posts are vertical while the concrete sets.
4. Install the Posts
You should use 6×6-inch posts to take the weight of your new roof. Attach them with the recommended fasteners that your brackets dictate.
5. Install the Beam
The size beam you need depends on the design and the local building codes. The beam sits on top of the 6×6-inch uprights. Use the correct fasteners corresponding with your post beam connectors. We are using 16d nails (3.5 inches long) with our connectors.
Top Tip
You can be super-professional and notch the ends of the beam, so it sits flush with the top of the posts.
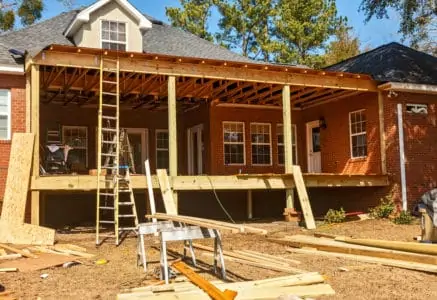
6. Install the Rafters
Once the beam is fixed in place, you can begin attaching the rafters. Because you’ve already stripped away a section of your roof, you can attach the rafters directly to your existing framing.
Depending on the slant of your roof and deck height, you can fasten the rafters to the house with rafter brackets and 16d nails.
7. Install the Sheathing
You will likely need to install sheathing depending on what you cover your rafters with. Use 4×8-foot sheets of 0.5-inch plywood.
8. Install Roof Covering
This final step is no different from fixing roofing material on your house or shed. Take care to follow the manufacturer’s instructions when integrating your deck roof with your existing one.
Costs to Build a Roof Over a Deck
A lot depends on the size of your roof and the materials you use. The average deck roof comes in around $5,000, but it could range between $2,000 and $10,000.
Deck Roof Design Ideas
There are several different designs of roofs to cover your deck. A lot depends on the deck’s location and obstructions that prevent you from using one layout over another.
Gable
A gable design is perfect when you have a low roofline, like a mobile home. Building a gable roof is more complex than other types because it requires two perpendicular beams that follow the original roofline.
The beams must be connected to the house framing, and you can use rafters or trusses to support the roof.
Slanted
Slanted roofs are the most common; they slope downward from the original roof, typically following similar gradients. The support comes from posts and a large beam. The whole structure attaches to the existing house framing via rafters.
Slanted roofs are simpler to construct because they only require one beam instead of two.
Hip
A hip roof is a mix of slanted and gable roofs using rafters, trusses, or both. One beam supports one end, while two beams connect either side of the roof to the existing house framing.
Finally, rafters connect the beams to a ridge beam, which also fixes to the existing house roof framing.
Flat
Flat roofs are similar to slanted varieties, but instead of a gradient, they are (you guessed it) almost flat. The construction is similar, but you can use trusses to hold the weight of the roofing material instead of rafters.
The most common material used is polycarbonate because it allows the natural light to penetrate the deck below. A flat roof still has a slight gradient to allow the water to drain away.
Take Note
Flat roofs require more maintenance because moss and mildew growth is more common. This is due to the water draining more slowly.
FAQs

What is a Roof Over a Deck Called?
An open roof over your deck is called a pergola, while a covered entrance is a portico. It was first used in ancient Greece and is still as popular today.

How Long Will It Take to Build the Roof?
It should only take between one and two days to complete your new deck roof. It also depends on the type of roof you are building. A gable roof will always take longer to complete than a slanted or flat design.

Do You Need a Permit to Build a Roof Over a Deck?
There is a strong chance you will need a permit to complete your deck roof. Check with your local building department before commencing.

How Many Posts are Needed for a Porch Roof?
If the porch is free-standing, you will need four posts. Two posts and a ledger support beam should suffice if it attaches to the house.

How Do You Support a Roof Over a Deck?
The easiest and most common way to support a deck roof is with two or four 6×6-inch posts. You will also need between one and two beams and rafters or trusses. The structure’s base should have a concrete foundation to secure the posts.
Raise the Roof
Enclosing your existing deck or patio with a roof is a great idea. It means you can use it all year round and host garden barbecues while the neighbors look on, green with envy. Why let the rain spoil your fun?
The key to success is planning, planning, planning, and then planning some more.