Why turn your basement into a gym when you can build a bar and be the envy of all your friends. Building a basement bar makes you just about the coolest human around, and they are a lot of fun to construct.
We show you how to build a basement bar, including some neat bar ideas, the average costs involved, and where to find design ideas.
Key Takeaways
- Compare DIY and professional costs: Building a basement bar can cost between $500 and $20,000, depending on design and materials.
- Consider standard dimensions: A typical basement bar height is 42 inches, with a counter width of 16 to 20 inches and a stool space of 2 feet per seat.
- Search for free DIY plans online: Numerous websites offer free basement bar design ideas and plans to help you get started.
- Reuse materials: Repurpose items like pallets or old kitchen cabinets to build an affordable and environmentally friendly basement bar.
How Much Does It Cost to Build Your Own Bar?
The costs vary depending on the design, the complexity of the project, and the materials used. Another significant influence on price is whether you do the work yourself or hire a professional.
Building a basement bar will make a dent in your bank balance. The costs range from a simple bar design for under $500 to a professional all-singing-and-dancing bar for up to $20,000.
How Big Should a Basement Bar Be?
A standard bar height is 42 inches. There should be an eight-inch overhang for the bar top, with 16 to 20 inches counter width, including moldings.
Most bar stools are 30 inches high, and you should allow a minimum of two feet per bar stool. So, if you want three seats, the bar should be a minimum of six feet long (although the more room, the better).
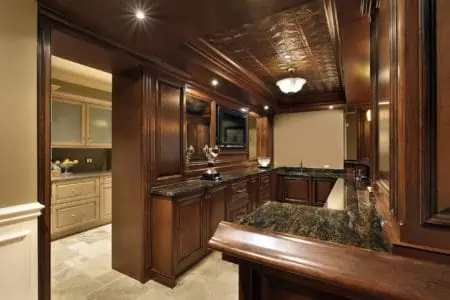
Free DIY Bar Plans
Finding plans for your new bar idea is as simple as typing “free DIY bar plans” into your search engine. You’ll be inundated with options like this wetbar, so it’s a matter of personal preference. And it isn’t just basement bars that are popular; many people convert their garage into an outdoor drinking den.
How to Build a Basement Bar On a Budget
Your new bar doesn’t need to cost a fortune. Necessity is the mother of invention, so having a limited budget forces you to get creative.
What You’ll Need
- Six pallets.
- Pack of 3.5-inch wood screws.
- Piano hinge.
- 4×8 sheets of plywood.
- Primer.
- Paint.
- Roller and paintbrush.
- 220-grit sandpaper.
- Electric sander.
- Circular saw.
- Countersink.
- Hammer drill and masonry drill bits.
- Cheap tiles (optional).
- Tile adhesive (optional).
- Trowel (optional).
- Safety goggles.
- Face mask.
- Gloves.
1. Screw the Pallets Together
Safety First
Before picking up tools and materials, don your face mask, gloves, and goggles. Working with wood creates dangerous sawdust particles, which irritate your nose, throat, eyes, and lungs.
One of the simplest ways to construct your bar is to use old pallets. Pallets come in a standard size of 48×40 inches, so you may have to make the bar slightly lower than the usual 42 inches. But, what’s two inches when you can buy a used pallet for less than $10?
Stand them on their end and screw three or four together to create the front of the bar. Stand another pallet on its end and screw it to the existing pallets at a right angle to make the side of your bar.
The final pallet attaches to the other side of the bar front, but instead of screws, use a piano hinge. This gives you access behind the bar.
Once the structure is complete, drill pilot holes in the basement walls and drive screws in to secure it to the wall. You will need a hammer drill and masonry drill bits to achieve this.
2. Cover With Plywood
Plywood is an affordable and durable material to cover the front of your basement bar. Cut the 4×8-inch sheets to size and screw them to the front of your bar. Use a countersink drill bit to get neater screw holes.
Repeat this process until you’ve covered the entire bar front and sides.
3. Make the Bar Counter
Use the same 4×8 sheets of plywood to create the countertop. Use the circular saw to cut the sheets to size, ensuring an eight-inch overhang. Countersink the screw holes and drive in the wood screws to secure the countertop.
Only attach the plywood to one side of the bar. The hinged side should be left empty to swing open and closed.
4. Time to Sand
Load the sandpaper into the sander, and remove all the rough edges and splinters. Pay particular attention to the sections making contact with hands and elbows.

5. Time to Prime and Paint
First, lay down a layer of primer, and once dry, coat the bar in two paint layers. You can use any color you like, but matte goes on better than gloss.
Take Note
To waterproof the countertop, you can always tile using cheap white tiles and ready-mixed adhesive.
How to Build a Basement Bar Using Kitchen Cabinets
Repurposing old kitchen cabinets is not only a cheap way to build a cool basement bar, but it is also environmentally friendly. Plus, it makes the entire build easier because the basic structure is already there. What better way to give potential landfill items a new lease of life?
What You’ll Need
- Chalk.
- Tape measure.
- Spirit level.
- Wood screws.
- Flashlight.
- L-shaped floor brackets.
- Drill/driver and driver bits.
- Hammer drill and masonry bits.
- Circular saw.
- Sander and sandpaper.
- 4×8-foot plywood sheets.
- Countersink.
- Primer.
- Paint.
- Brush and roller.
- Trim.
- Face mask.
- Goggles.
- Safety gloves.
1. Plan the Bar
Starting a project without a plan leads to a chaotic build and ultimately failure. You will need to know the dimensions of your kitchen cabinets, including the height. You can get plenty of design ideas from free online sites.
You will also need to decide on the number of people you want to sit at the bar. Remember that the standard is to allow two feet between each bar stool.
Kitchen cabinets come in standard sizes ranging from 36 inches to 42 inches. So, if your cabinets are 42 inches, you have the perfect height.
Take Note
Don’t try to stack cabinets to increase the height of the bar counter. You risk injury if they topple. If your cabinets are too small, you may need to think about using different materials to build your bar.
2. Time to Assemble
Grab the tape measure and chalk to measure and mark the bar location. Use the spirit level to check that the floor is level. Typically, your bar will butt against a basement wall for added stability.
You can play with different layouts before settling on a design that suits you. Place the cabinets into position, and drill pilot holes for the screws to secure them to the floor. Use the hammer drill and masonry drill bits.
Screw L-shaped brackets to the back of the cabinets and drive a screw into the floor. Place the next cabinet and so on, so they line up to create your bar shape. Use the rest of the L-shaped brackets to secure them to the floor.
To attach the cabinets together, open the doors and switch on the flashlight to give you a better view. Drive wood screws where the two cabinet walls meet and tighten them.
Top Tip
Kitchen cabinets come with a standard wall thickness of 0.75 inches, so be sure to use the corresponding size screw. If the screw protrudes, it could cause serious injury to your hand.
3. Add the Countertop
Use 4×8-foot sheets of 0.50-inch plywood for the countertop. Most bars have a counter width between 16 and 20 inches, although some can be as wide as 30 inches.
Using the tape measure, mark and cut the sheets to size. Lay the plywood on top of the cabinets, ensuring an eight-inch overhang. You will need to double-check the depth of your existing cabinets.
They can range from 12 to 24 inches, but you will have to cut the plyboard accordingly if your cabinet is deeper. Use the countersink and drill to make neat screw holes and drive the screws in place roughly every seven inches.
Top Tip
Don’t forget to add trim to the front-facing edge of your countertop. It gives your bar a professional finish and hides any screws or rough edges.
4. Time to Sand
Use the sander to smooth any rough edges of the countertop. Focus on counter edges where the risk of splinters is most significant.
5. Prime and Paint
Lay down a layer of primer to protect the countertop, and then add two coats of your chosen color paint. Satin and eggshell are excellent at repelling moisture and easy to wipe clean. Paint the cabinets the same color, and now you are ready to serve drinks.
How to Build Bar Shelves
Nothing quite makes your basement bar look finished like a set of shelves. You can keep all your bar kit, bottles of spirits, and store your collection of novelty glasses.
What You’ll Need
- Wood screws.
- Lengths of 2×4-inch wood.
- Plywood sheets.
- Drill/driver and drill bits.
- Circular saw.
- Sander.
- Safety goggles.
- Face mask.
- Gloves.
1. Make a Plan
Decide on the depth of the shelves you want. A depth of one foot should hold all the bar accessories and bottles of spirits you need. Next, decide how many shelves you want. Just remember that the added weight will put a strain on your structure.
For this exercise, we have decided that two shelves will suffice.
2. Cut Your Timber to Size
Before making the first cut, put on your face mask, goggles, and safety goggles to protect you from splinters and poisonous sawdust.
Measure the length of your bar and mark and cut your 2×4-inch wood to size. Next, cut four one-foot lengths to create the depth of your shelves. The final thing to do is cut the plywood to the correct length and width.
3. Assemble Your Shelves
Attach the first two side pieces of the base frame to the bar structure with wood screws. Now, screw the front section of the shelf frame to the two side pieces. Insert the plywood shelf and screw it to the frame.
Repeat the same process for the second, higher shelf. For support, screw a length of 2×4 wood to the base shelf, on the left, right, and middle. Now attach the second shelf in the same way to create a series of support legs.
4. Time to Sand
Grab the sander and smooth away any rough edges. It’s up to you whether you want to prime and paint the shelves. They are concealed behind the bar.
DIY Home Basement Bar Ideas
When custom designing a home basement bar, the only boundary is your imagination. Anything is possible, giving you the chance to let your creative side run wild. From funky modern lighting to mirrored surfaces, the sky’s the limit.
Mood Lighting
Whether you want soft lighting or disco neon, LED strip lights, like these DAYBETTER 100ft Color-Changing Lights, are easy to fit and fairly cheap to buy. They come with remote app control and can be programmed to sync with the music.
Lighting can make a small bar seem cozy and inviting or create a lively atmosphere when you want to party.
Epoxy Counters
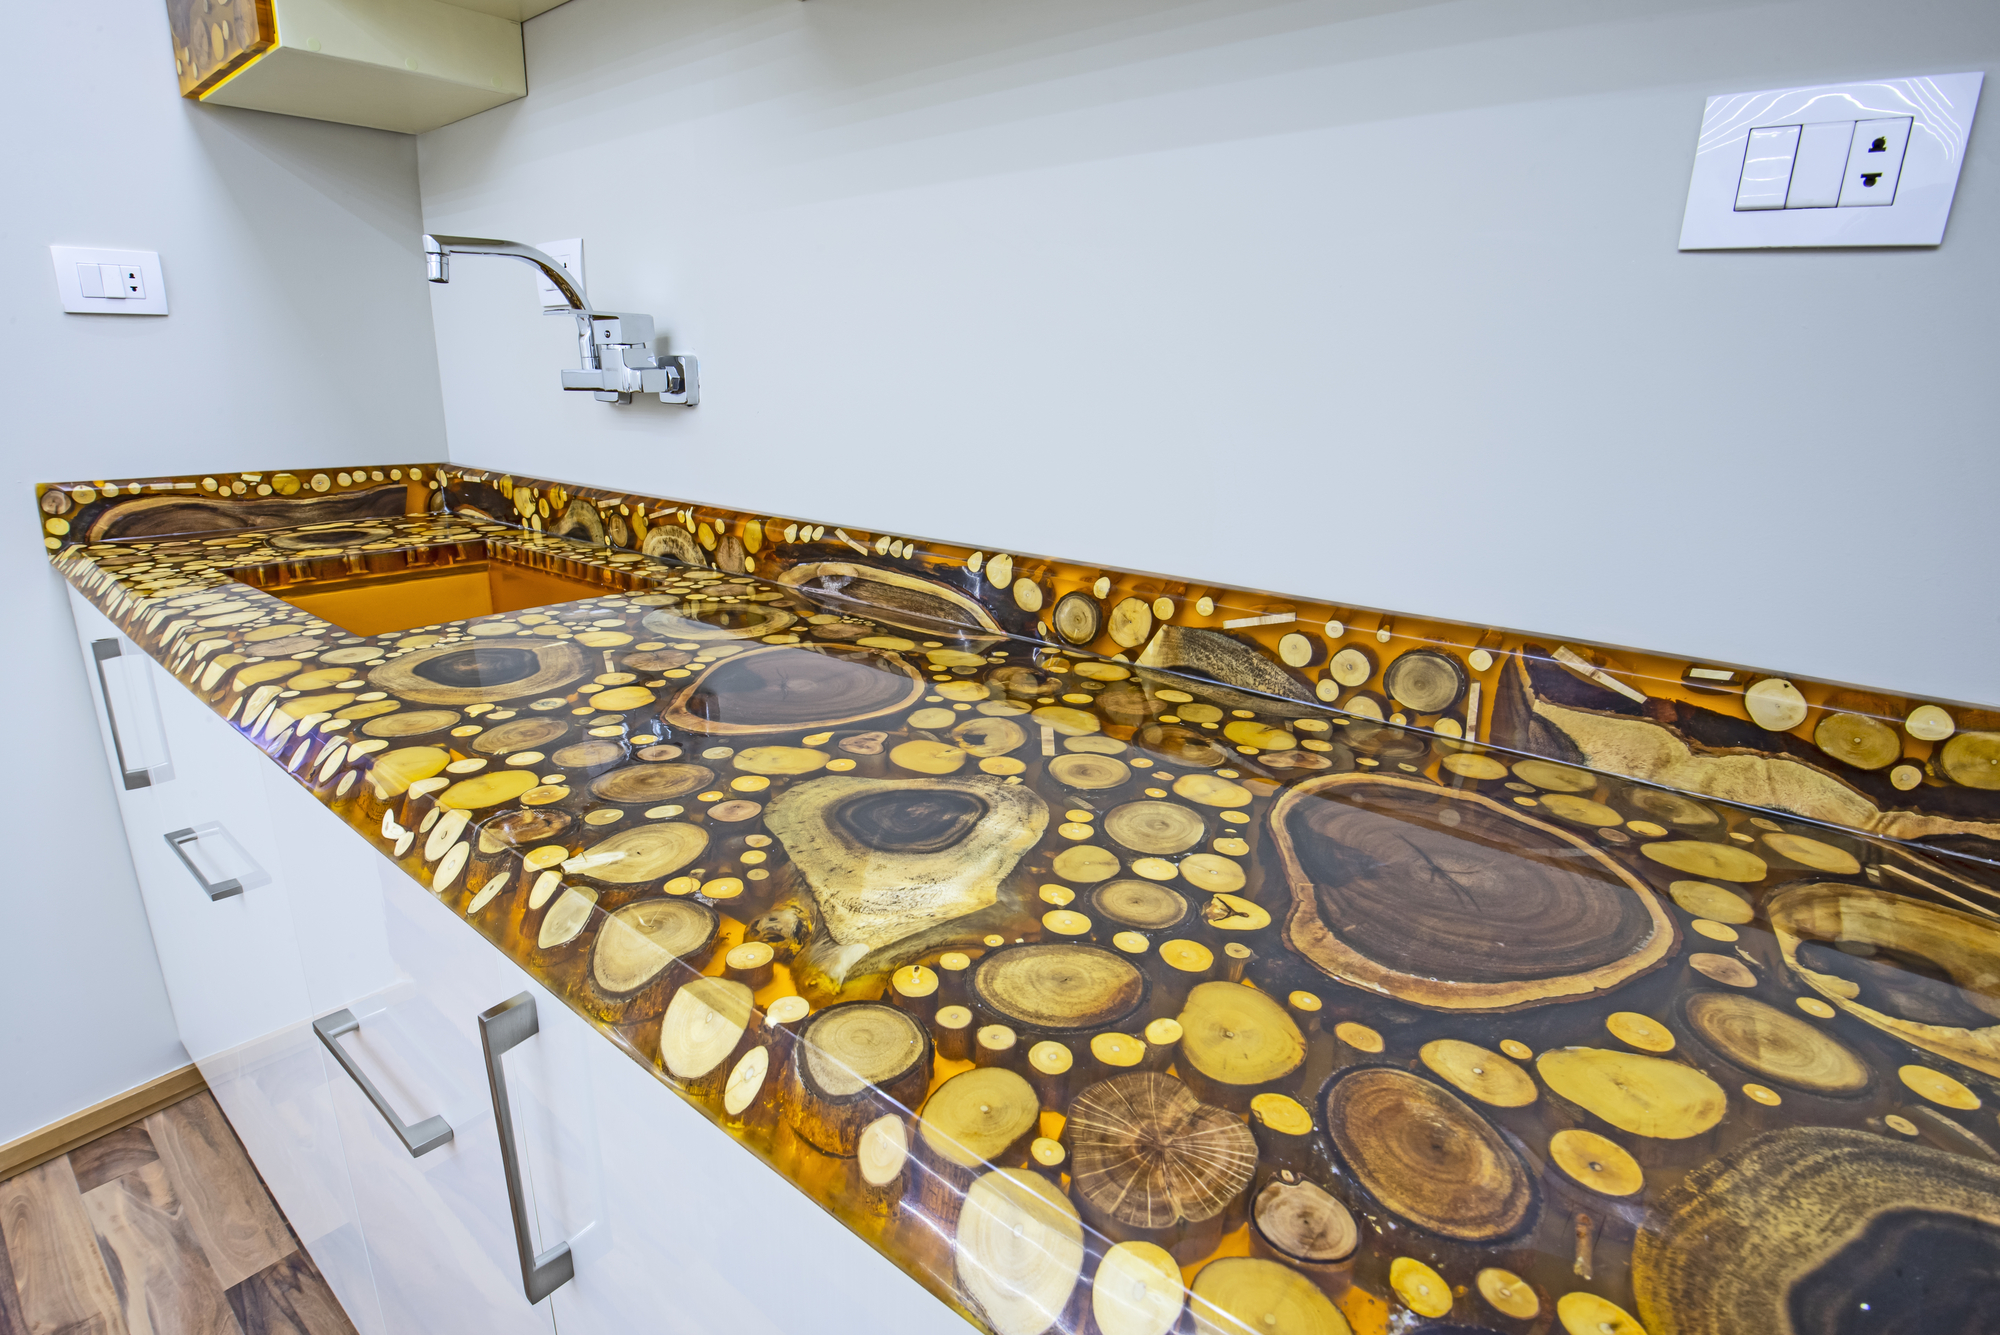
Epoxy resin is hard-wearing, wipes clean, and dries rock hard. It is also crystal clear, meaning that you can pour it over any surface to preserve whatever lies beneath.
To give your countertop some eye-catching detail, you can encase coins, toy cars, models, and even baseball cards. Or, why not add a splash of color to the mix and create patterns and swirls if you are feeling artistic.
Fish Tanks
Fitting a fish tank into the structure of the bar creates a point of interest. What better way to while away the hours with your favorite drink watching a calming underwater scene?
You can fit any size fish tank, but to make a statement, the bigger, the better. Just remember that fish tanks are heavy, so you may need additional supports in your structure to cope.
Custom Signs
A custom sign gives your home bar a touch of style. From traditional bar signs to neon versions, the look you choose should match the style of your space. Also, giving your bar a quirky name like The Beer Cellar or It’s Five O’Clock Somewhere and immortalizing it with a sign is fun.
Old Bar Style
You can accessorize your basement bar by attending garage sales and auctions to pick up old chairs and tables. They don’t need to match because you are looking for an eclectic mix.
You can also pick up old pinball machines, pool tables, and other traditional bar games to set the right atmosphere.
Use Mirrors
Hanging lots of old mirrors on the walls behind the bar gives the illusion of space. It also reflects any natural lighting in your basement. You could also couple the mirrors with photographs of family and friends to make it even more interesting.
FAQs

How Long Does It Take to Build a Bar?
Depending on the complexity of the bar you want, you should get the work done within one to two days.

What is a Dry Bar Vs. a Wet Bar?
A dry bar has no plumbing or sink. It is just the bar, without any means of washing your hands. A wet bar (you guessed it) has a sink and plumbing to provide running water.

Where Should I Put My Bar In My Basement?
Most basement bars attach to a wall for added stability. You can build more elaborate layouts, but a simple three-sided bar installed straight in front of a wall is one of the most popular designs.
Set the Bar High
Converting a basement into a usable room is one thing, but building a basement bar is off-the-scale fun. You can get creative, add finishing touches, and make a space everyone wants to be in.
You might need a spare bedroom, a gym, an office, or a laundry room, but what you want is a basement bar. There is no competition. Period! Now get to work and pour us a cold one.