Drilling through glass feels like a coin flip, but the failures are predictable. The pane cracks when the bit skates off your mark, when the drill spins too fast, or when friction heat builds quicker than water can carry it away.
Control those three things and the glass survives. You need a spear-tipped carbide or diamond core bit, a slow trigger, and water sitting on the cutting point from start to finish. Glass is ground away, never cut, so speed and pressure both work against you.
This guide covers the tools, how to choose between the two bit types, the speed each bit size wants, and the one kind of glass you must never put a bit into.
Key Takeaways
- Use a glass-specific bit: Only a spear-tipped carbide bit or a diamond-coated core bit will cut glass; standard wood or metal bits shatter it.
- Match the speed to the bit size: Run a small spear bit at or below about 400 RPM, and slow a diamond core bit down further as it gets wider, since heat is driven by the speed of the bit’s outer rim.
- Cool it constantly: Keep water on the bit the entire time, because dry friction causes the thermal shock that cracks glass.
- Never drill tempered glass: Tempered panes burst into small granules the instant you pierce them, so check the corners for an etched stamp before you start.
What Tools Do You Need to Drill Glass?
You need a spear-tipped carbide or diamond-coated core bit, a variable-speed drill, water or cutting oil for cooling, masking tape, a flat backing board, safety goggles, and a diamond file to smooth the finished rim. Standard wood and metal bits will not do the job, because they bite into the surface instead of abrading it and the pane cracks; a masonry bit is a poor substitute for the same reason.
Gather these before you start:
- Safety gear: Always wear safety goggles and a face mask to protect against glass dust.
- Masking tape: This gives the drill bit some traction to start the hole.
- Backing board: A flat piece of scrap wood or plywood to support the glass.
- Cushioning: Newspaper or an old sheet to place between the glass and the backing board.
- Lubricant: Plain cool water covers most jobs, while glass-cutting oil or coolant helps on thick pieces and long cuts.
- Power drill: A variable-speed drill, so you can hold the trigger well below its top speed.
- Glass drill bit: Either a spear-tipped carbide bit or a diamond-coated core bit.
- Diamond file: A 600-grit file helps smooth rough edges after drilling.
How To Drill a Hole in Glass
1. Prepare the Workspace
Lay your piece of plywood on a flat, stable table. Cover it with newspaper or a sheet to create a soft, non-slip buffer. Place your glass flat on top of this surface.
Ensure the glass is fully supported. If there is a gap underneath the area you are drilling, the pressure will flex the pane and snap it.
2. Mark Your Spot
Glass is slippery, and drill bits love to skate across the surface. Place two strips of masking tape in an “X” shape over the area where you want the hole.
Mark the precise center of the X with a felt-tip pen. The tape protects the surface and keeps your bit centered.
Avoid The Edges
3. Start a Pilot Hole
Fit a small (1/8-inch) spear-tipped carbide or diamond bit into your drill and put on your safety gear.
Set a low speed, roughly 400 RPM, then rest the bit on your mark with very light pressure. You are grinding a shallow divot to seat the bit, not punching through it. If the tip still tries to skate, tilt the drill to about 45 degrees to cut a small starter groove, then bring it upright once the divot catches.
4. Lubricate and Drill
Friction creates heat, and heat breaks glass, so the drilling site has to stay wet the whole time. Build a small “dam” around the mark with plumber’s putty and fill it with water, or have a helper spray the bit continuously.
Drill slowly and let the tool do the work. White powder or a wisp of smoke means the water has stopped reaching the tip, so stop, cool everything down, and start again.
5. Switch Bits and Finish
If you need a wider hole, switch to the larger bit once the pilot hole is established, and slow the drill as the bit grows rather than holding one trigger speed all the way up. Heat is driven by how fast the bit’s outer edge travels, so a wide bit run at a small bit’s speed cooks the glass. A manufacturer speed chart puts a 1/2 inch core bit near 800 RPM, a 1 inch bit near 500 RPM, and a 2 inch bit near 250 RPM (1).
As you near the back of the glass, ease off the pressure even more. This is the moment that decides the job. If you push through hard, you will “blow out” the back of the glass, leaving jagged chips.

6. Clean Up
Once the hole is complete, wipe away the glass dust and remove the tape. Use a diamond file to gently smooth any sharp chips around the rim. Rinse the glass with cold water to clear the remaining grit.
Pro Tip
Why You Cannot Drill Tempered Glass
Warning
You might see tutorials claiming you can drill tempered glass, but they are misleading. Tempering locks the outer skin of the pane in compression and its core in tension, and that stored energy is exactly what makes the glass strong.
Grinding, cutting, or drilling after tempering releases the tension all at once, so the whole pane fails instantly into small granules instead of cracking in one spot (2).
If you need a hole in tempered glass, the cutting and drilling must happen before the tempering process. There is no way to modify it afterward, which is why a glass shop asks where the holes go when it takes the order.
How to Identify Tempered Glass
Check the corners first. A tempered pane usually carries a small etched or sandblasted stamp, called a “bug,” that names the manufacturer and the safety standard it meets, often a CPSC reference or the words “Tempered,” “Temp,” or “Safety” (3). If you see one, put the drill away.
Feel the edges too. Because the edges are ground and polished before heat treatment, tempered panes come out smooth and slightly rounded rather than sharp or raw. Catch light across the surface at an angle and you may also spot faint distortion or roller-wave lines that annealed glass does not have.
How Do You Drill Glass Without Breaking It?
You drill glass without breaking it by grinding instead of cutting. That means a carbide or diamond bit, a low speed, water on the tip the whole time, a fully supported pane, and pressure that gets lighter as the bit reaches the back face.
Bit choice does the first half of the work. Standard metal or wood bits bite and chip the surface, while carbide and diamond bits scrape it away as fine dust, which keeps physical stress off the pane.
Speed does the other half, and the right number falls as the hole gets wider. A 1/4 inch bit can run near 3,000 RPM, while a 4 inch core bit belongs down at 300 to 500 RPM, according to a published core bit speed chart (4).
Lubrication is the step people skip. Dry drilling causes thermal shock, and thermal shock is what splits the pane. Whether you use glass-cutting oil or plain tap water, keeping the bit cool lets the glass expand and contract evenly instead of cracking.
Which Drill Bit Is Best for Glass?
The best bit for glass is a spear-tipped carbide bit for small holes up to about 1/2 inch, and a diamond-coated core bit for anything wider or for curved surfaces such as bottles.
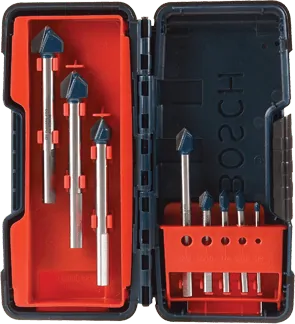
Both types abrade rather than cut, so the real decision is hole size and the shape of the surface. Here is how the two glass drill bits compare.
1. Spear-Tipped Carbide Bits
These are the most common bits for small holes (up to 1/2 inch). They look like a small arrow or spear and do their best work on pilot holes, mirrors, and tile. They cut slowly but give you good control, and they are cheap enough to treat as a consumable.
2. Diamond Core Bits
Also called hole saws, these are hollow cylinders coated in diamond grit. They suit larger holes, such as the ones needed for aquarium plumbing or bottle lamps. They grind a ring out of the glass rather than boring a solid hole, so they leave a cleaner edge, but they wander until the groove catches and they want the lower speeds listed above.
Can You Cut Glass with a Dremel?
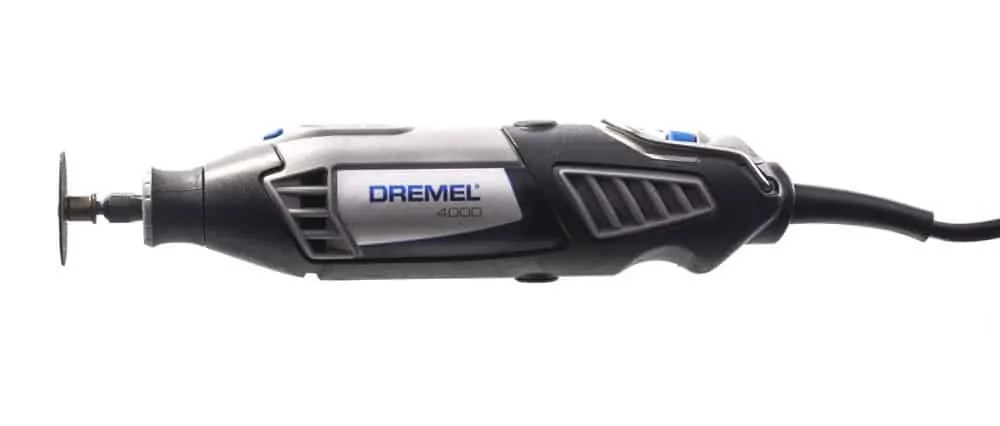
Yes, a rotary tool like a Dremel cuts and carves glass well, especially for enlarging an existing hole or shaping an edge, as long as you fit a diamond-grit bit.
The technique matches drilling. Run the tool at a low to medium setting, keep the work wet, and stop often. A Dremel spins far faster than a drill, so heat arrives quickly and the glass needs time to shed it.
Rotary tools are the better choice for odd-shaped openings and for smoothing the sharp rim a spear bit leaves behind. They are the wrong choice for a clean round hole in thick glass, where a core bit gives a truer edge.
FAQs
In Conclusion
Drilling glass is mostly a test of patience. Match the bit to the hole, keep the speed down, keep the water running, and check the corners for a tempered stamp before the bit ever touches the surface.Do that and a wine bottle becomes a lamp, or a planter finally gets drainage, with the pane still in one piece.