Having total control over your air compressor and your pneumatic tool is crucial if you want the best results. Part of that control comes from understanding how to adjust your air compressor pressure regulator.
Join us as we get to know the pressure regulator and what it does.
Key Takeaways
- Adjust air compressor pressure regulator to match air tool’s PSI for best results and to avoid damage.
- Regulators typically have a knob or lever to increase or decrease pressure by turning clockwise or anticlockwise.
- Check your air tool’s manual for its maximum PSI and ensure compatibility with your compressor’s PSI capacity.
- Maintain and replace pressure regulators as needed to prevent issues like cracks, leaks, and loss of pressure control.
How Does a Pressure Regulator Work?
Essentially, the airflow is controlled inside the regulator by a large screw. It does this with the help of springs connected to the set screw via a shaft. The springs have enough strength to force open the valve to allow air to flow.
A small tube allows the pressure to move inside the chamber. When the force changes, a diaphragm moves in harmony with the air pressure to maintain a steady level. Without the correct compression, hot air gets transmitted through your compressor, which could increase the moisture levels and damage your air tool.
The correct airflow must be maintained through your air hose to avoid this pressure drop. Ensuring the correct CFM (cubic feet per minute) is also important when matching the PSI of your air tool to increase its longevity.
Components of a Pressure Regulator
Pressure regulators consist of three elements; the regulator body, the regulator handle or knob, and the pressure gauge. Once activated, the valve springs into life to control the flow of air to your pneumatic tool.
Why Is Pressure Adjustment Important?
Without the correct pressure levels, you run the risk of damaging your air tools and the compressor. It could also lead to both the compressor and the device underperforming, which ultimately affects how you do your job.
Adjusting the PSI means your tool and compressor work in harmony rather than against each other, leading to a smoother and more efficient outcome.
What Pressure Should I Set My Air Compressor?
Every pneumatic tool is different. Check the manual to see what the maximum PSI of your chosen air tool is. It is vital that the two devices should be compatible because any imbalance in the PSI could result in damage to the tool, as well as underperformance.
Most air tools are rated between 70 and 90 PSI. Typically, modern air compressors have a maximum PSI of about 135. As long as the air compressor has the PSI capacity, you can set it to match the air tool.
Some people disregard the recommendations and see nothing adverse in running an air tool with the incorrect pressure setting on the compressor. This could result in irreparable damage to the air tool, a shortening of the compressor’s life, and a slower work rate.
You should always set your compressor so that it has a minimum of 20 percent above the air tool’s PSI rating. It ensures the efficiency of the device and the correct airflow without any pressure drops.
How To Read a Pressure Regulator?
Keep an eye on the arrow when you power up the air compressor. As the PSI rate increases, so does the arrow. When the compressor reaches the maximum PSI level, it’s time to check your chosen air tool to match the compressor’s PSI, so that they correspond.
As already said, this is crucial for the effective use of the tool and the compressor.
How To Adjust Your Air Compressor Pressure Regulator
This can be done in 8 simple steps. So, what is the correct procedure?
1. Power Up
Plug the air compressor in and turn it on.
2. Fill the Tank
Wait while the tank fills and the air pressurizes correctly. It might take a couple of minutes, depending on the capacity of your air compressor. Make sure the tank is full. You can tell the tank is filling by the sound the compressor makes.
3. Maximum Air Pressure
When the tank reaches the maximum air pressure, check the compatibility of your air tool. If the PSI is higher than the maximum pressure of your compressor, you should not use that tool.
If you have a minimum of 20 percent PSI differential in favor of the compressor, you are good to go.
4. Connect the Hose and Tool
Now that you have compatibility between the compressor and the air tool, it’s time to connect the device to the air hose and the hose to the compressor.
You should have a quick-connect fitting that clips into the air port of your pneumatic device, and the other end of the hose should screw onto the compressor.
Top Tip
5. Adjustment Time
Once you have the tool and hose connected securely, it’s time to start adjusting the pressure regulator.
6. Locate the Knob or Lever
The location of the knob or lever varies depending on the make or the model. Most have it on the right side. It’s also typical to have a locking function to secure the lever when not in use. Pull it to release the lock, and when done, push it back in place to reactivate.
7. Increase the Pressure
To raise the PSI value, twist the knob clockwise, and the pressure will rise. When you get to the correct level, snap the lever back into place to initiate the lock.
8. Decrease the Pressure
To decrease the pressure, turn the lever anticlockwise, and the PSI will drop. Again, once you have the correct setting, push the knob in to put the lock on. Now you can operate your pneumatic tool.
Air Compressor Pressure Regulator Maintenance
As with all electrical or mechanical things, they require tender love and care to keep them in tip-top condition. Without regular maintenance, pressure regulators can develop issues that severely affect the smooth running of your air compressor.
Cracks are one of the most common faults with regulators. This occurs thanks to the continual downward motion of the pressure in the regulator. Once a crack appears, air starts to leak out, which causes the compressor to drop pressure, making it less effective. It also spoils the performance of your pneumatic tools.
If continuous operation is an issue, so too is a lack of use. While the compressor sits idle, the regulator dries out, which could lead to cracks and splits. It’s always advisable to give your compressor a chance to stretch its legs once in a while, so to speak.
The good news is that replacing an air pressure regulator is relatively inexpensive and reasonably easy to do.
What Happens When a Pressure Regulator Valve Fails?
When a pressure regulator valve fails, the first thing you notice is a pressure drop, especially if it is leaking. As air spills out of the tank, the PSI drops, and the compressor kicks in to recharge the tank. This could be a constant cycle if the regulator is left unchecked.
The second thing that happens is you lose control of the pressure, meaning you cannot adjust it to match your air tool. It will almost certainly impact your device as well as the compressor.
Thirdly, airflow reduces as the pressure drops. Airflow is what delivers the impact to your air tool.
Of course, the valve could fail and not allow any pressure to escape the tank. If this happens, the motor keeps running because the tank is too pressurized to make it stop. Switch off the compressor immediately to avoid any situations that may occur and get the regulator swapped as soon as possible.
FAQs

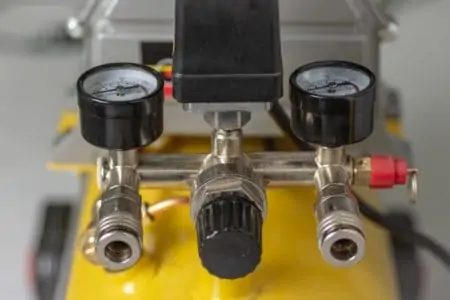
Why Do Air Compressors Have 2 Gauges?
Air compressors have two gauges because you need to know the pressure inside the tank and the one that comes into your tool.
One of the gauges is the tank gauge, which will always tell you how much PSI is swirling around in the tank.
This gauge will show a reading based on the maximum capacity of the compressor. If you have a compressor, you mostly use around the house, it likely has a gauge with 200 PSI max.
As you turn on the compressor, the indicator on this gauge starts to rise (it should always be at 0 when the compressor is turned off).
Compressors have a factory-set cut-out point (which varies from 90 to 175 PSI). Once your compressor fills with air and reaches that point, it will no longer compress.
The second one is the regulator gauge, which should be located near the compressor’s regulator knob. As opposed to the tank gauge, this one will indicate the PSI coming out of the tank and going into your air tool.
This gauge is highly important because different air tools have different PSI requirements. You don’t want to use too much pressure with your tools because it wears them out faster.
Because of that, you can adjust the regulator knob to determine how much pressure you want the air compressor to release.

Is 100 PSI Enough for an Air Compressor?
100 PSI is enough to power most air tools inside your home or small shop. For the most part, the tools compatible with an air compressor take 1 to 5 CFM at 90 PSI to operate (naturally, there are exceptions, as some tools need 10 CFM at more than 100 PSI).

Why Is My Air Compressor Building Too Much Pressure?
Several reasons your air compressor may be building too much pressure.
One potential cause is not having the pressure switch to the correct setting. Your air compressor tank is set by default by the manufacturer. This is called cut-out pressure. If this pressure is set too high, it might cause build-up inside the tank.
Another cause is an air compressor too large for what you need. If you have a high-pressure setting and need to power an air tool with low demand, it can lead to pressure build-up.
High pressure inside the tank could point to a faulty pressure relief valve. This is a safety measure that manufacturers integrate into their products.
Its primary role is to release any excess pressure from inside the tank. Should this part be faulty, there will be too much pressure inside your air compressor.

Can You Adjust Tank Pressure on an Air Compressor?
It’s possible to adjust the tank pressure on an air compressor by fiddling with the regulator knob.
But you should always have this cut-out pressure set to whatever level the manufacturer specified in the user manual. Air compressors come with pre-adjusted tank pressure, so don’t mess with it unless you know what you’re doing.
Under Pressure
Hopefully, you can now see why the pressure regulator is such a vital cog in your air compressor’s machinery. Regulators give us control, and who wouldn’t want more of that when operating air tools.
Pressure adjustments are crucial if you want to get the most from your tools and get the best possible results.